The Best Paper Airplane


Introduction: The Best Paper Airplane

Playing with paper airplanes has always been an enjoyable activity for young and old. The paper airplane is said to have been invented by the Chinese in about 400 BC. It's been a great educational toy ever since then! Even the Wright Brothers used paper airplanes to build models of their first actual airplanes.
This paper airplane (pictured above) is simple to make and it performs better than any other paper plane I've made. No previous paper airplane experience is needed. This instructable will guide you through the steps of how to fold it, and then modify it so you can make your own great design!
Step 1: Materials Needed

What you will need to make this airplane:
-A 8.5 x 11 piece of paper (any paper will do, but I prefer to use printer paper, which hasn't been three-hole punched)
-Scotch Tape (optional)
-A willingness to keep trying if you don't succeed the first time.
Step 2: Fold in Half

Fold the paper in half lengthwise (some call this "hot dog style") and open it back up again. Ensure that the crease made by the fold is visible.
Step 3: Fold in Top Corners

Fold the top corners in to the middle crease you made during the previous step. Try to keep these two folds as even and symmetrical as possible. The edges that you folded in should be touching each other, which will make a triangle at the top of your paper.
Step 4: Fold the Top Point Down

Fold the point of the triangle down. I've found that the plane performs best if the shape made by this downward fold is another perfect triangle. Don't worry if your fold isn't perfect--it should still work just fine as long as the shape you made closely resembles a triangle.
Step 5: Fold in Top Corners So the Points Touch

This is similar to Step 3. However, instead of having the the edges completely touch in the middle, fold the top corners in such that only the corners meet at the middle crease. Your paper should look like the picture above, with a little triangle shape showing underneath the touching corners. Once your paper looks similar to the picture, tightly crease these two folds.
Step 6: Fold Up Little Triangle

Remember the little triangle shape mentioned in the previous step? Fold it up and tightly crease so it holds the corners down. You can also use a small piece of scotch tape to hold these folds down.
Step 7: Turn Over and Fold in Half

Turn your airplane over (first picture) and fold it in half along the middle line (second picture). You should be folding it up towards yourself so you end up with something that looks like the picture. During this process, make sure the two corners don't slip out of the little triangle fold that's holding them down.
Step 8: Check Your Work

At this point, your plane should appear similar to the pictures. Obviously, your plane will look slightly different, but the general shape should be the same. If yours looks significantly different, it may be best to start over with a new piece of paper. If you're happy with how it looks, great! Go to the next step.
Step 9: Fold Down the First Wing

Let's make the wings! Place your plane so the nose is facing left and fold most, grab one half, and fold it down straight across, as the picture indicates. This will make the first wing. You can make your wing as big as you choose. I've found that my plane performs best if I crease the wing 0.5-1 inch above the bottom of the plane.
Step 10: Fold Down the Second Wing

Turn your plane over and place it so the nose is facing to the right. Fold down the other wing so it exactly matches your first wing. It is important that these folds are as equal as possible; otherwise, your plane will not be balanced correctly.
Step 11: Unfold Wings and Check Your Work

Unfold the wings so they are perpendicular with the body of the plane. Again, make sure your plane looks somewhat like the pictures. At this point, you have a fully functional paper airplane! Nice work! You could end here if you wanted. If you find your plane spinning out of control, and would like to give it some more stability, go to the next step.
Step 12: Fold Up Wing Tips

I've found that my paper airplanes are much more stable if I complete this step. Fold the wings down again and place your plane with the nose facing right. Fold up the very tip of the wing about a half-inch. Turn the plane over and do the same thing to the other wing. Again, it is crucial to make sure these folds are equal to each other so your plane is balanced correctly.
Step 13: Finished!

Unfold the wings again to reveal your finished product. You did it! Now you know how to make the best paper airplane known to man!
If your plane loses balance while flying, try re-folding the wings and wing tips so they are exactly even with each other.
If you'd like to modify the design, try making the plane with different sized wings, or with bigger folded-up wing tips. Bigger wings are better for gliding, while smaller wings are good for accuracy. You can also put a paper clip on the nose for better accuracy. Make the design yours, have have fun!
Recommendations

Remake It - Autodesk Design & Make - Student Contest

Make it Resilient

Green Future Student Design Challenge

Origami Way
How to make paper airplanes.
Learn how to make paper airplanes with these easy instructions. Select the plane you want and get ready for takeoff. Be careful with the ones that are pointy, they can hurt! Most planes are best indoors, but some will surpise you outdoors.
In addition, paper planes resemble flight itself! As early as 500 BC, they found the first folding paper airplane that came from China. The popularity of these paper airplane flying toys is the same as the paper-folding craft of origami, which grew in Japan around the same time in China.
Paper airplanes are very helpful when you want to illustrate air traffic control guidelines. There was a time when people used the paper airplane to explain and discuss the fundamental parts of real aircraft. People of a certain age may recall buying those fancy "White Wings" in the store made from several sheets of squeezed chipboard paper, and these cutout versions are still paper airplanes too.
How to Make a Paper Airplane?
If you want to know how to fold a paper airplane with the best design, you can check out this page for easy step-by-step paper airplane instructions, and you will be amazed at the outcome of the paper airplane you made.
Gather the materials needed, like a piece of origami paper or any other type of paper, and be excited about the results. When we want to achieve something like this paper airplane, we rely on the instructions given, and with these proper instructions, you can let your paper folding plane fly with the best design. Get your craft paper, and start the folding process to make the paper plane, soar it high.
- © Origamiway.com
Paper Airplane Designs
A database of paper airplanes with easy to follow folding instructions, video tutorials and printable folding plans. find the best paper airplanes that fly the furthest and stay aloft the longest. learn how to make paper airplanes that will impress your friends., search airplanes, parents & teachers, become a member.
- Printable Folding Plans
- Downloadable Activities
- Customize your License
- Save Your Favorites

About Fold'NFly
For more than 10 years, Fold'NFly has been teaching people around the world how to make paper airplanes . Our extensive database of designs includes step-by-step instructions, video guides and printable templates where you simply fold on the numbered lines to get a perfect paper plane, every time.
In addition to the paper airplane plans, we have a collection of expert tips & tricks that will help you perfect your folded aircraft and achieve optimal performance. We also have a collection of paper airplane articles on a variety of topics that enthusiasts may find interesting. For example, discover some paper airplane world records or learn how to make a paper airplane launcher .
Whether you are an expert paper airplane ace pilot or a novice student aviator, we have something for everyone. We hope that you will enjoy this fun activity and share it with friends and family.
Please select your preferred language:

- 100 Day Dream Home
- Barbie Dreamhouse Challenge
- Bargain Block
- Battle on the Beach
- Battle on the Mountain
- Brother Vs. Brother
- Building Roots
- Celebrity IOU
- Christina on the Coast
Down Home Fab
- Fixer to Fabulous
- Help! I Wrecked My House
House Hunters
- Lil Jon Wants to Do What?
Love It or List It
- Married to Real Estate
- My Lottery Dream Home
- No Demo Reno
- Property Brothers: Forever Home
- Renovation Aloha
- Rico to the Rescue
- Rock the Block
- Small Town Potential
- Tough Love With Hilary Farr
- Unsellable Houses
- Why the Heck Did I Buy This House?
- Windy City Rehab
- See Full Schedule
- Stream Full Seasons
- Sign Up for Our Newsletters
- Ideas by Room
- Design Styles
- HGTV Magazine
- HGTV Newsletters
- Flowers and Plants
- Landscaping and Hardscaping
- Outdoor Spaces
- Curb Appeal
- Cleaning and Organizing
- Entertaining
- Healthy Home and Garden
- Real Estate
- Home Improvement
- DIY Projects
- HGTV Handmade
- HGTV Smart Home 2024: See the Location
- Living the Dream $10K Giveaway
- Spring Into Cooking $5K Giveaway
- Spring It Forward $5K Giveaway
- HGTV Dream Home 2024
- HGTV Urban Oasis 2023
- Product Reviews
- Gift Guides
- Sales and Deals
- News and Trends
- Newsletters
- TV Schedule
- Get inspired! Sign up for our newsletters for the latest ideas, products and projects.
By entering your email address, you agree to our Terms of Use and acknowledge the Privacy Policy . HGTV and its affiliates may use your email address to provide updates, ads, and offers.
Want even more inspiration?
- HGTV Shopping
- HGTV Makeovers
- HGTV This Week
- HGTV Gardens and Outdoors
- HGTV Weekend Projects
- Make and Celebrate
How to Make a Paper Airplane
Learn the simple steps for high-flying fun with this tutorial on five basic paper airplane patterns.

Related To:
Test your paper folding technique with these paper airplane examples. Whether you are looking for a quick diversion from the grind of adulthood or are teaching a youngster DIY skills, these planes are a great way to add a little levity to your day. The examples below are all beginner or intermediate level. The materials are cheap and only require paper, a pair of scissors, a ruler, and some double stick tape (optional) to complete.

Paper Airplane DIY
Create fun and simple paper airplanes
Photo by: Sam Henderson
Sam Henderson
For best results use a flat, thin-edged ruler. Make good creases along each edge. Adding double stick tape to the inside of the body keeps the wings from separating in flight.
The most basic version. A simple standard that everyone should know how to make.

- Fold the paper in half vertically.
- Unfold the paper and fold each of the top corners into the center line.
- Fold the top edges into the center line.
- Fold the plane in half toward you.
- Fold the wings down, matching the top edges up with the bottom edge of the body.
- Add double stick tape to the inside of the body. The finished plane should look like this.
This one is built for distance, plus it just looks cool.

- Fold the peak toward you and 3/4” from the bottom of the paper.
- Fold both top corners into the center line.
- Fold the remaining tip over the two flaps at the center line to lock them in place.
- Fold the plane in half away from you.
- Fold the wings down 1” from the bottom of the plane.
- Fold up the sides of each wing 1/2” tall.
- Cut two small slits at the back of each wing. Fold up the tabs.
Built correctly, this bee-like beauty stays in the air for a long time.

- Fold the paper in half horizontally.
- Fold the peak down to meet the edge of the previous fold.
- Fold the upper sides into the center line.
- Fold the top edge 1/2” away from you.
- Fold the plane in half towards you.
- Fold the wings down 1/2” from the bottom of the plane.
Count on speed and distance from this sleek plane.

- Unfold the paper and fold the top edge down 2”.
- Fold the top edge down again to meet the bottom of the previous fold.
- Fold the top edge down one more time to meet the bottom of the previous fold.
- Fold the top edges down and away from you to the center line on the back of the paper.
- Starting at the top of the thick nose of the plane, fold the wings down 1/2” in the front and slightly angled to 1 1/2” in the back. Fold up the edges of the wings 1/2”.
The Bullnose
This plane is deceptively fast and stays aloft for quite a distance.

- Fold the top right corner over to the left side, making a fold from the top of the paper to the bottom right corner.
- Unfold the paper and repeat for the left corner.
- Unfold the paper again and fold the top right corner over to meet the crease made from the first fold.
- Fold the left corner over to meet the crease from the second fold.
- Fold the top right edge over to meet the edge of the fold from step 3. Repeat for the other side.
- Fold the top edge down and towards you to meet the point where the right and left layers cross.
- Fold the plane in half away from you. Staring at the nose, fold the wings down at a slight angle, 1/2” in the front to about 2” in the back.
Want More Crafty Ideas?
Sign up for the HGTV Handmade newsletter to get our best crafts and DIYs delivered to your inbox weekly.
To withdraw your consent or learn more about your rights, see the Privacy Policy .
- HGTV Insider
- HGTV Daily Sweepstakes Reminder
- HGTV Inspiration
- Sweepstakes Updates

20 Fun and Easy Kids' Crafts 60 Photos
Keep little hands busy with 20 fun, easy kids' crafts they'll love.

- How to Make Calming DIY Glitter Jars

- How to Make Paper Snowflakes

Easy-to-Make Valentine's Day Paper Chain Countdown Calendar

How to Make a Classic Tulle Tutu

How to Make a Kid's Sun-Print Treat Bag for Halloween

How to Make a Macrame Plant Hanger

How to Make a Scrunchie

Cute + Crafty: Back-to-School DIY Crayon Hair Bows

How to Make a No-Sew Sock Bunny

5 Cute + Easy Mother's Day Cards to Make
Hgtv handmade newsletter.
Subscribe now to get our latest craft projects and DIYs delivered to your inbox.
What's New in Handmade

How Ceramic Artist Gabo Martinez Preserves and Celebrates Mexican Culture Through Her Vibrant Pottery Mar 22, 2024

How to Make a Hypertufa Pot Feb 14, 2024

See How an Artist Creates 'Hair Gardens' That Fuse Mexican Culture, High-Fashion Millinery and Old Hollywood Feb 9, 2024

Block Print Like a Pro: How to Carve Rubber Stamps for Fabric Printing Oct 17, 2023

Here’s How the Barbie Movie Team Created All Those Fantastic Spaces Feb 29, 2024

Gullah Gift Guide: 12 Gullah Artists, Makers and Brands You Should Follow Jun 13, 2023

Meet the Austin-Based Clothier Who Upcycles Vintage Quilts and Fabrics Into Custom Clothing Apr 20, 2023

This North Carolina Artist and Interior Decorator Has Her Own Fabric Line and Home Decor Collection Mar 28, 2023

How to Start Using Your Cutting Machine Dec 19, 2022

The Best Crafting, DIY and Hobby Books to Buy or Gift Dec 19, 2022

How to Make Wire Shelf Covers That Look Just Like Floating Shelves Mar 1, 2023

Turn a Plywood Board Into Easy DIY Outdoor Art Jun 7, 2022

How to Upcycle a Cutting Board Into an Address Plaque Jun 17, 2022

How to Decoupage a Chinoiserie-Style Planter Pot Jun 17, 2022

DIY Rainbow Doormat Feb 14, 2024

Make Homemade Play Dough May 12, 2022

How to Make Stress-Relieving Glitter Slime May 9, 2022

Make a Mini Blooming Garden Table to Showcase Your Favorite Succulents Mar 22, 2022

How to Build a Floating Shelf With Hidden Charging Station Apr 7, 2022

Upcycle an End Table Into a Cute and Cozy Dog Bed Apr 7, 2022

How to Build a Cozy Cat Hideaway Apr 7, 2022

Upgrade a Bookshelf With Cane Webbing Apr 7, 2022

Make Clay Pinch Pot Hanging Planters to Display Your Fave Succulents May 9, 2022

Turn an Old Tomato Cage Into a Storage Basket May 9, 2022

How to Build an End Table With a Built-in Pet Bed Feb 17, 2022

Easy-to-Make DIY Beach Scene Painting May 9, 2022

Turn an Old Laundry Detergent Pod Container Into a Moon Planter for Succulents May 9, 2022

How to Make a Cactus Pincushion May 9, 2022

How to Make DIY Reusable Produce Bags Mar 21, 2024
How to Make Calming DIY Glitter Jars May 9, 2022
Fix my frankenhouse, house hunters international, follow us everywhere.
Join the party! Don't miss HGTV in your favorite social media feeds.
Related Pages
- How to Make Paper Flowers for a Wedding Bouquet
- How to Make Origami Paper Flowers
- How to Make Christmas Paper Star Decorations
- How to Make Paper Pinwheels
- How to Make a Paper Airplane Garland
- Flying Bats
- How to Make Little Explorer Binoculars
Paper Airplanes HQ
How to make paper airplanes, detailed fold and fly instructions for 50 awesome designs.

Over 50 flying paper airplane designs with written and video step-by-step folding instructions. All classes of paper airplanes are represented from darts to gliders to jets to schoolyard contest winners. There are models that look really cool, or fly super far or stay aloft for extend periods of time.
How to Make the Best Paper Airplane for Long Flights
Family Fun | 8 comments
My kids LOVE paper air planes. No really. They waste so much of my printer paper folding and folding trying to make the best paper airplane EVER.
Over the years they have gone from the Klutz Paper Airplane book to studying how-tos on websites to combining their favorite folds to create their own paper airplane designs.
** This website contains affiliate links. If you make a purchase using one of these links, I may earn a commission. Please click here for more information about cookies collected and our privacy policy **.
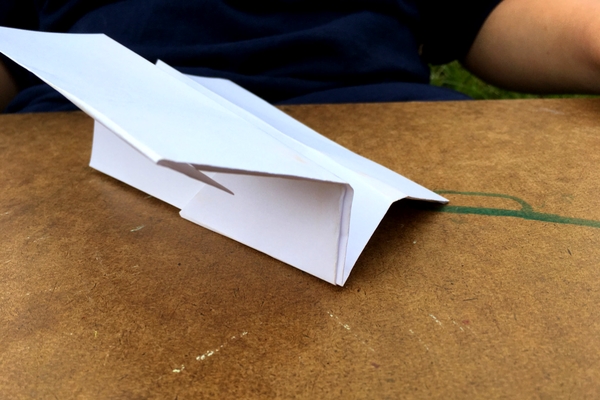
Today, I am bringing you step-by-step paper airplane instructions for The Duck . Don’t ask where the name came from, who knows how the mind of a 12 year old boy works!
This plane works really well! It is a glider that uses wind to help keep it in flight longer and it does a few stunts- like loops before sailing over the grass.
After the instructions, I’ve included some tips for flying this paper airplane, PLUS a video to see it in action!

How to Make the Best Paper Airplane for Distance
I’ve provided step by step instructions for how to make this paper airplane design.
Sometimes pictures are easier to understand than words for learning how to create things! Let’s get started!
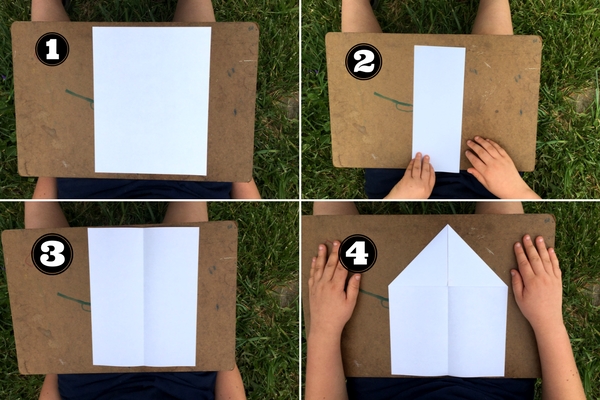
Take a standard sheet of 8 1/2 x 11 inch piece of paper.
Fold in in half long ways, then unfold.
Fold the top edges in so that they line up with the center line. At this point, this should look very similar to the most basic paper airplane design.
Fold the top point down so that it touches the bottom edge of the paper.
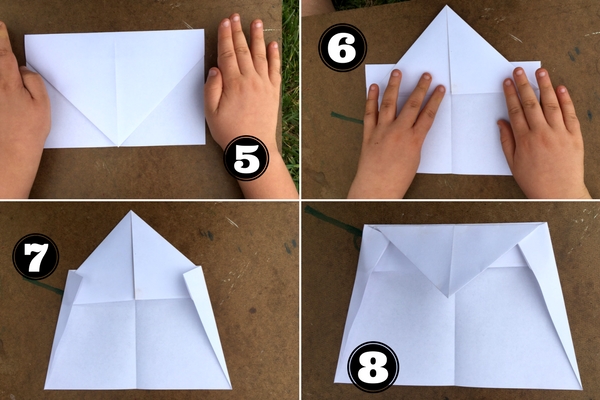
Then fold the point back up, starting about 1.5 inches from the top edge. (Shown in picture 6)
Fold the side edges in as shown in picture number 7.
Fold the top back down along the top edge of the folds made in the previous step.
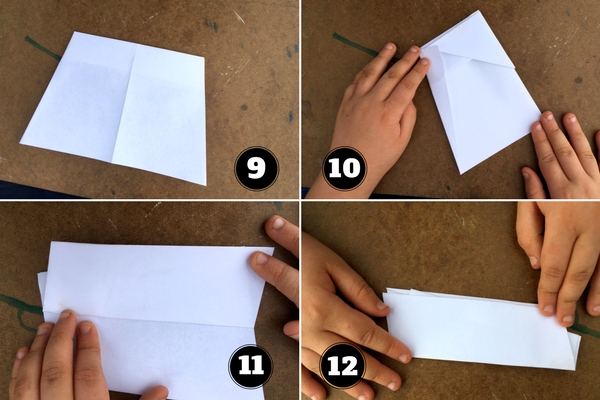
Flip the paper air plane over, and fold in half towards you.
Fold the the wing back as shown in image 11. The wing will be at a slight angle.
Flip over and fold the second wing in the same manner.
Crease well and you are done!
Tips for Flying this Paper Air Plane Glider:
- Throw the paper airplane with a medium weight- not too hard and not too soft
- Have the wings pointed slightly upwards
- Throw the airplane at a 45 degree angle
- The plane flies best standing on top of a hill, throwing down hill
- Fly the paper airplane with the wind direction
- This glider does best outside, where wind can offer some lift
You May Also Like: 20 Activities to Do With Your Kids this Summer
Paper Airplane Test Flight
Want to see this paper airplane glider in action?? Check out this video of a few of the test flights!
Isn’t it amazing?! Even my 2 year old could toss this one in the air and have it soar away! The kids made at least a half dozen of the same design to test and they all worked amazingly!
Try it out- let me know what you think!
*This paper airplane was created and designed by my 12 year old son, who wanted paper airplane that flies far. (Want to see more of his paper air plane designs? Check out his site Paper Airplane World !)
Save & Share!
May I get some activities which I download and use
You lose me at 10-11. No idea what you’re talking about.
Step 10. Fold the paper in half so the folds from 6 to 8 are showing. Step 11. Fold the wing down so it is even with the bottom of the plane.
Hope this helps!
Know the feeling I am the same lost at 10-11 no idea what this is, glad to see its not just me that is lost lol 🙁
Amazing flight!!!
IT TO HARD AT THE LAST STEP IT DO HARD
Holy cow, this plane is good =)
I made one of these for my 5yr old daughter. I told her and my 11yr old boy to take it outside and play with it…they have been out there for more than an hour 😁
Submit a Comment Cancel reply
Your email address will not be published. Required fields are marked *

Love Everyday Chaos & Calm?
Did you enjoy these free printables? Support my work!
- PRO Courses Guides New Tech Help Pro Expert Videos About wikiHow Pro Upgrade Sign In
- EDIT Edit this Article
- EXPLORE Tech Help Pro About Us Random Article Quizzes Request a New Article Community Dashboard This Or That Game Popular Categories Arts and Entertainment Artwork Books Movies Computers and Electronics Computers Phone Skills Technology Hacks Health Men's Health Mental Health Women's Health Relationships Dating Love Relationship Issues Hobbies and Crafts Crafts Drawing Games Education & Communication Communication Skills Personal Development Studying Personal Care and Style Fashion Hair Care Personal Hygiene Youth Personal Care School Stuff Dating All Categories Arts and Entertainment Finance and Business Home and Garden Relationship Quizzes Cars & Other Vehicles Food and Entertaining Personal Care and Style Sports and Fitness Computers and Electronics Health Pets and Animals Travel Education & Communication Hobbies and Crafts Philosophy and Religion Work World Family Life Holidays and Traditions Relationships Youth
- Browse Articles
- Learn Something New
- Quizzes Hot
- This Or That Game New
- Train Your Brain
- Explore More
- Support wikiHow
- About wikiHow
- Log in / Sign up
- Hobbies and Crafts
- Paper Craft
- Paper Planes
How to Make a Fast Paper Airplane
Last Updated: March 23, 2024 Fact Checked
This article was co-authored by Natalie Kay Smith . Natalie Kay Smith is a sustainable fashion writer and the owner of Sustainably Chic, a sustainability-focused blog. Natalie has over 5 years of sustainable fashion and green living writing and has worked with over 400 conscious brands all over the world to show readers fashion can exist responsibly and sustainably. There are 11 references cited in this article, which can be found at the bottom of the page. This article has been fact-checked, ensuring the accuracy of any cited facts and confirming the authority of its sources. This article has been viewed 867,127 times.
The image most people have of paper airplanes involves a badly folded sheet of notebook paper floating lazily around a school classroom. The basic design has come a long way over the years, however, and it’s now a breeze to make a paper airplane that can zip along at high speed and cover about the same distance as a good frisbee toss. All it takes is a couple of minutes and a steady hand. Find yourself a piece of sturdy paper, make tight, precise folds and watch your creation sail.
Folding the Paper Airplane

- It’s easiest to make the folds of your airplane from the top of the paper down.
- For the purpose of following these instructions, a basic sheet of 8.5”x11” (most comparable to A4 paper outside the US) letter paper will work best.
- You can use shipping paper.
- Or reuse old paper boxes for this purpose.
- The center crease is made to serve as a reference point for later folds.
- You can also fold the paper in half width-wise, if you choose. This will help guide the first couple of vertical folds you make.
- Leave 2-3 inches (5-7.5cm) of space between the point of the triangle and bottom of the paper.
- Folding the paper over on itself adds weight to the plane as it reduces its size, giving it the heft to allow it to fly farther.
- This last folded point at the top of the paper will serve as the nose of the plane.
- The technique of using a triangular flap to secure a fold is known as the "Nakamura lock," named after the origami practitioner who invented it.
- Folding the paper back on itself wraps the lower triangular piece around the outside of the bottom of the plane, holding it in place and making it easier to grip and throw.
- Be careful not to bend the wings while folding them.
- Go somewhere with plenty of space and give your new airplane a toss. Airplanes made with this design fly far and straight and can reach some pretty impressive speeds. [10] X Research source
Making Adjustments
- Blunt-nosed planes give up a little speed but fly much further due to their streamlined construction. [11] X Research source
- It’s normal for the plane to curve a little, so only adjust the wing height if the plane is spiraling out of control when thrown.
- Paper airplanes operate on the same physical principles that allow real planes to fly. A slight curve of the wings is necessary to turn air resistance into lift. [13] X Research source
- Try a blunt-nosed design if your plane has a problem with taking a nosedive. Pointed noses can easily become damaged when they hit the ground.
- Attempting to throw too hard can also cause the nose to rise, stalling the plane. Launch the plane with a smooth, straight motion of the arm and wrist to send it on its way steadily.
Choosing the Right Paper

- The types of paper commonly used in offices—crisp, smooth and perfectly weighted—often make for excellent paper planes.
- It’s okay to use thinner paper for smaller planes, since the compact size will compensate for the weight difference. Likewise, heavier paper can be used to make oversized planes.

- If you’re working with scrap paper, cut or tear it until it’s roughly the proportions of letter paper, then reproduce the folds on a slightly larger or smaller scale.
- Raw, foil, laminate and glossy papers do not take a fold well.
- Apply pressure to each crease you make and go over it a couple of times. The neater the fold, the better it will maintain its shape.
Community Q&A
- Always pick your paper airplane up by the nose to keep from damaging the wings. Thanks Helpful 0 Not Helpful 0
- Test the paper airplane in a wide-open area with lots of space so that it doesn't collide with any obstacles. Thanks Helpful 0 Not Helpful 0
- For the best flight, throw the airplane forward and up at a slight angle. Thanks Helpful 0 Not Helpful 0
Tips from our Readers
- If your plane isn't quite right that first go, keep at it! Tweak things bit by bit and test fly again until you get it how you want. Don't let setbacks discourage you.
- When trying out different airplane designs, use sheets of paper that match in size and thickness for an even comparison. Paper variables impact how designs fly.
- Use a ruler if you struggle to fold straight lines freehand. Precision is key for your plane to fly right. Just don't tear the paper in the process.
- Avoid weighing down your plane with bold markers or decorations. That added heft throws off proper flight. Keep the design simple and light.
- If you mess up on a fold, use that sheet for something else and start over with a fresh sheet of paper for your plane.

- Keep your airplane from crashing into things. Once it's bent or damaged, it may not fly right again. Thanks Helpful 101 Not Helpful 27
- If your paper airplane gets wet, it's ruined. Thanks Helpful 98 Not Helpful 32
- Don't throw paper airplanes at people, especially if they have pointed noses. Thanks Helpful 92 Not Helpful 33
Things You'll Need
- A smooth, sturdy sheet of paper (preferably 8.5"x11" letter paper or A4 paper)
You Might Also Like

- ↑ https://rolemodels.wise.iastate.edu/uploads/1/3/f/13f4bb00c100eee7ae0d2506728eec3e83cc618b/Paper-Airplane-Designs.pdf
- ↑ https://www.jpl.nasa.gov/edu/learn/project/make-a-straw-rocket/
- ↑ https://www.exploratorium.edu/exploring/paper/airplanes.html
- ↑ https://www.youtube.com/watch?v=veyZNyurlwU
- ↑ https://www.youtube.com/watch?v=AljTDb2cyhc
- ↑ https://www.youtube.com/watch?v=G7ec7qCHwzc
- ↑ https://www.youtube.com/watch?v=7Cy3lRJGiR4
- ↑ https://www.youtube.com/watch?v=5-5OxzPKr0w
- ↑ https://www.youtube.com/watch?v=xuyx-49vvWE
- ↑ https://www.youtube.com/watch?v=yI-sG-9PMlk
- ↑ https://www.youtube.com/watch?v=-B9ciJvLWcs
About This Article

To make a fast paper airplane, fold a sheet of paper in half lengthwise and unfold it. Next, fold both corners down until they’re even with the center crease and press the creases to hold them in place. Then, fold down the top triangle, bring the corners in so they meet in the middle, and fold the triangular flap at the bottom up and over the angled folds to secure them. Fold the paper outward to form the body of the plane, then make one last fold to form the wings! For tips on making crisp folds and creases, read on! Did this summary help you? Yes No
- Send fan mail to authors
Reader Success Stories
Tami Sakariyas
Jan 19, 2017
Did this article help you?
May 24, 2017
Nicole Estrada
Oct 14, 2019
Anonymous Anonymous
Jan 10, 2021
Apr 5, 2016

Featured Articles

Trending Articles

Watch Articles

- Terms of Use
- Privacy Policy
- Do Not Sell or Share My Info
- Not Selling Info
wikiHow Tech Help Pro:
Develop the tech skills you need for work and life
- Games and hobbies
We Are in Our Friendship Bracelet Era. Here’s How to Make the Perfect One.

Friendship bracelets might not have started with Swifties, but they sure did make them even more popular .
Beaded friendship bracelets are a little token of community and belonging, of special moments and memories, of shared experiences and favorite songs sung out loud.
You’ll see them adorning the wrists of attendees at stadium concerts, weddings, family reunions, girlfriend getaways, and Wirecutter’s editor-in-chief (his says “DAD”).
Of course beaded accessories have been around long before the tour buses rolled into stadium parking lots. From Native beading to ravers making kandi bracelets to summer-camp kids, pony- and seed-bead creations have stood the test of time.
If you want to get in on the trend, you may find yourself overwhelmed in the bead aisle at your local craft store or while scrolling through the endless options on Amazon.
As Wirecutter’s (self-appointed) head camp counselor, I spent what felt like 10,000 hours researching the best supplies and techniques, stringing and unstringing bracelets, and finding solutions to every problem new bracelet makers might encounter to save you time and money. Here’s our Wirecutter-recommended way to spread the love.
The research
Choose a bead type and color palette, buy most of your beads in bags or on strings, not trays, but buy your letter beads presorted, a bead board helps keep things in order (but isn’t totally necessary), get the right string and prep it before beading, use a beading needle for speed, tie it in knots, keep folding scissors in your beading kit, store your kit, if you don’t want to invest.

Resist the temptation to buy every pretty bead you see, at least for now. It is very easy to just keep buying up supplies before you know exactly what you need.
Wirecutter purchased all of the supplies I tested, including a variety of beads from Amazon and Michaels. Honestly, we couldn’t tell much of a difference among the brands. We don’t recommend any one brand of bead, as the beads we purchased had only minor differences. (If you’re crafting fine jewelry, which we are most definitely not, that is a different discussion.)
Start by figuring out what style and color selection of beads you want to use. I chose blue because Wirecutter’s brand color is a nice bright blue.
Pony beads are generally plastic and 9 by 6 mm with a large 4 mm hole that makes them easy to string. They come in a huge range of colors and are inexpensive (about half a cent per bead), and the bracelets you can make out of them are perfect for handing out or trading.
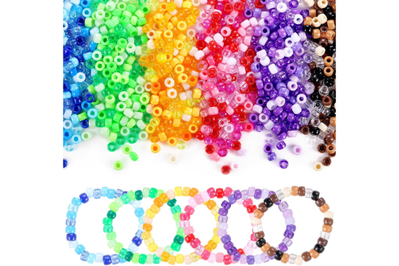
Funtopia Bulk Pony Beads
Staff-favorite pony beads.
While almost any pony beads will do, we like that these come in bags organized by color and don’t come with junk like dull, flimsy scissors.
Buying Options
Round beads are made of glass or acrylic, and are usually smaller than pony beads (8 mm is a good size, but 6 mm also works well for friendship bracelets). Round beads look more elevated than pony beads but are slightly slower to string than larger-hole pony beads and are more expensive (about 1¢ to 2¢ per bead).
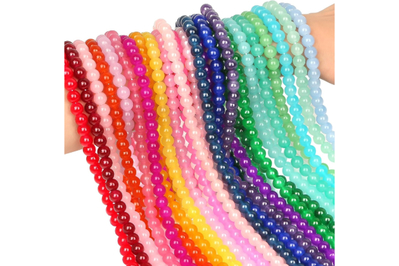
Selizo 8mm Glass Beads
Staff-favorite round beads.
We like the elevated look of this bead style, and this brand sells beads strung by color, which means you can choose your own storage container.
We recommend pony beads or round beads for most people making friendship bracelets for events. That’s mostly due to their size—you need fewer beads to complete a bracelet, and they are less annoying to string than smaller beads.
Spacer beads add a little break between beads, often come in gold or silver but can be any color, and are a good transition bead to separate letter beads into distinct words.
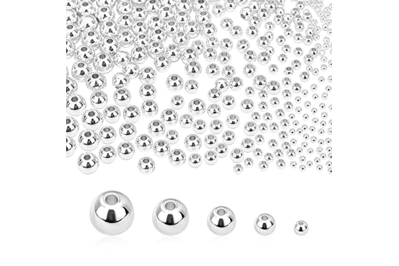
PH PandaHall Smooth Round Beads
Staff-favorite spacer beads.
These spacer beads come in gold, silver, and rose gold and help break up patterns and words in your bracelets.
Seed beads and clay beads are the smallest. Seed beads come in many sizes but are generally around 2 mm in diameter with a small hole. Clay beads are flat and around 6 mm in diameter, with a 2 mm hole.
The smaller size of seed and clay beads makes them slow to string, but the completed bracelet tends to look more refined. I tested the Beadalon Spin-N-Bead , a wooden device that uses centrifugal force to gently fling seed beads onto a beading needle in a random pattern. It has a bit of a learning curve, especially with clay beads, but Kelly Prepster Studio has a good YouTube tutorial (video) that helped me understand the flow of it. Beadalon also makes quick-change trays so you can switch colors without emptying the spinner every time.

Beads come in three types of packaging: in resealable plastic bags, on string, and in hard-plastic slotted trays that snap closed. The presorted trays have tiny compartments filled with beads that my adult-size fingers have trouble pinching. You can use tweezers or jewelry pliers to pick beads up, but I prefer the more tactile nature of using my fingers for this type of work. I find it a lot easier to pour bagged beads into stacking containers to work from rather than picking individual beads out of the tiny slots.
The bonus is that bagged and strung beads are less likely to come with cheap unnecessary add-ons like dull scissors or string that snaps too easily.

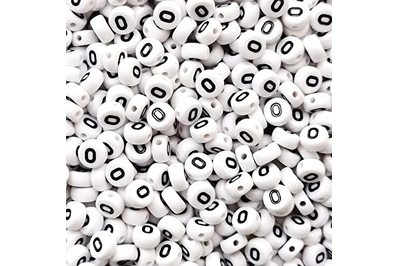
Amaney Letter Beads A-Z
Staff-favorite alphabet beads.
These standard white beads come sorted and make it easy to order replacements for common letters.
Amaney Common Letter Beads
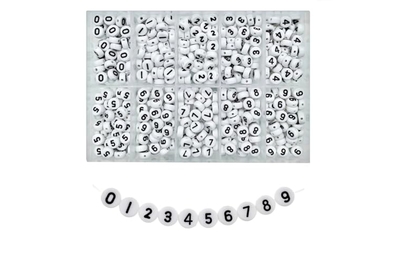
Amaney Number Beads 0-9
I know I just told you to buy bagged or strung beads, but I have one exception: letter beads. Buy those (preferably the standard white letter beads) in a presorted tray.
If the letters are already organized alphabetically in the trays, you can find what you need quickly. A jumbled bag of random letters means you spend more time sorting for that rogue Y than actually beading.
Then, when you run out of vowels or common letters, you can buy a bag of just that letter or vowels as refills, which means you don’t have to keep buying the trays over and over and end up with 1,000 Zs.
A lot of pretty letter-bead shapes or colors are available, and I’m telling you to resist. Resist! Many of those letter sets aren’t sold individually, so they are so much harder to replace when you need more letters. And you will always need more letters.
In my enthusiasm, I bought a kit that came with rose gold letters. I hit a standstill nearly immediately, as the kit came with one A, one R and yet had three Ws. So as to not waste what I had, I ended up using some of those rose gold letters to start words. Good thing Wirecutter starts with W, eh?
You may also want to buy a bag of number beads to have on hand for 13s, 22s, and your phone number. Not only can you make a phone number bracelet to, say, slip to a world-famous singer-songwriter, but if you have someone in your life who may get separated from you and need to contact you (a small child or someone with Alzheimer’s, for example), a phone number bracelet can be a lifesaver.

Adult wrists often fall between 6 to 8 inches, so if you’re making bracelets for strangers, aim for somewhere around 7 inches in length, which equates roughly to about 30 beads per bracelet. Kid-size wrists are smaller, in the 4- to 6-inch range. It’s helpful to have something to measure your string against, especially if you’re making a bracelet for someone whose wrist size you know.
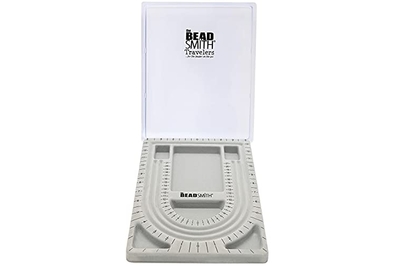
The Beadsmith Bead Board with Cover
Staff-favorite bead board.
The no-slip interior and measured grooves help keep your beads in place while you work.
A bead tray, such as The Beadsmith Bead Board with Cover , has a soft, flocked surface with channels, grooves to help you plan your patterns, and size markings to help you measure. It’s helpful when you’re working on a slick surface since the tray itself prevents your beads from rolling away. I bought one with a plastic cover, thinking it would be helpful, but there’s no way to secure the cover, so it’s better if you’re, say, beading in your house and want to take a break, rather than beading while traveling.
The workaround is laying down a piece of felt on any tray with sides and then using a tailor’s measuring tape so you can measure your string against it before you knot and cut it.
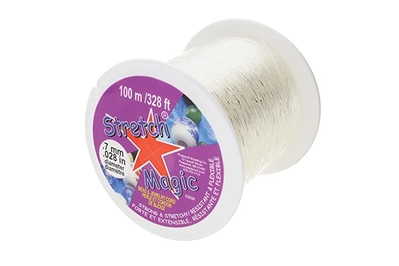
Stretch Magic Bead & Jewelry Cord 0.7mm
Sturdy, stretchy elastic beading string.
This thicker string works well with pony beads and doesn’t snap or break easily.

Stretch Magic Bead & Jewelry Cord 0.5mm
This thinner string works well with round beads and doesn’t snap or break easily.
Elastic string is perfect when you’re making bracelets for people whose wrist size you don’t know. You should have string with enough stretch that it accommodates multiple wrist sizes but also holds its shape and doesn’t stretch out too much.
Stretch Magic cord is on the pricey side but holds its shape well. The 0.7 mm size is best for pony beads, and the thinner, 0.5 mm size works well with round beads (this will make it easier to string through the smaller hole and will make the knot smaller and less visible).
Before you start beading, stretch about 10 to 12 inches of string so the elastic has less opportunity to stretch once the bracelet is completed and on your wrist. If you use cheaper string—often what comes bundled with beads—and it snaps in your hands while you stretch it, it definitely won’t survive everyday wear and tear.
The most important tip for reducing string waste is to not precut your string. Just bead directly onto the roll so you can snug up the finished bracelet as close to the end as possible when you knot it off.

The downside of elastic string is that it can be wobbly when you’re trying to bead. A big-eye beading needle allows you to stage multiple beads and then push them through. We tried the Beadalon Big Eye Beading Needles , The Beadsmith Basic Elements Collapsible Eye Needles , and options from Amazon off-brands . We liked the test-tube style packaging of the generic needles, but the Beadalon needle was a bit sturdier overall.

Beadalon Big Eye Beading Needles
Best beading needle.
This needle is easy to thread and easy to bead, but it will bend if you’re using thick elastic and beads with small holes.
Once you’ve finished stringing your bracelet, tie off the elastic with three to four knots and add a dot of clear nail polish to help prevent the bracelet from opening and allowing your hard work to skitter all over the floor.
We tried the Beadalon Bead Stringing Glue and really liked the fine-point tip on it that made adding a dot of glue to the knot simple. But the formula itself has an intense, astringent smell, and the cap was challenging to replace (you need to insert a needle-thin wire into the hole on the glue tube, which requires a hefty amount of hand-eye coordination).
We also ordered crimp beads to use as knot covers but found that they weren’t really worth the time and effort. You can easily tuck a knot inside a pony bead so it doesn’t show, and with the round beads, I actually like to have my knot showing. It feels a little punk rock.
Our budget pick, the Fiskars 8 Inch The Original Orange-Handled Scissors , works very well for cutting the elastic. But they are big and take up space. Having a pair of compact, folding, TSA-approved pair of scissors that live in your beading kit makes it that much more portable.
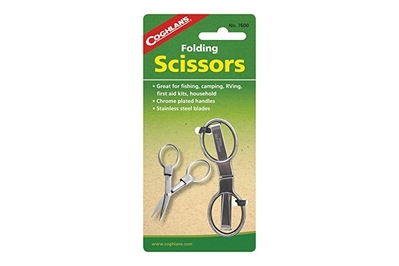
Coghlan’s Folding Scissors
The best compact folding scissors.
Sharp stainless steel scissors come with a one-year limited warranty and are TSA-compliant.
I tested three types of small, TSA-compliant travel scissors: the Coghlan’s Folding Scissors , Singer 151 3-Inch Folding Scissors , and a pair that came in the Fiskars Sewing Kit . The Coghlan’s scissors were by far the most comfortable to hold and use and the easiest to fold and unfold. Made of stainless steel, they fold up quickly, are perfect for keeping in your beading kit, and can even be taken on an airplane—perfect for Swifties heading to Europe for her summer tour.

I store the beads in the bags they came in and then use clear, round stacking jars to sort while beading. Just be careful if you’re going to store the beads in the jars because if you’re a little clumsy while unscrewing the stack, you’ll end up with beads everywhere. That’s why I pour the beads back into the bag after a bracelet-making sesh.
But if you prefer a snap-close beading box, Bead Landing makes bead organizers that have deep, wide compartments and secure enclosures that are much more accessible than the smaller snap containers beads come in.
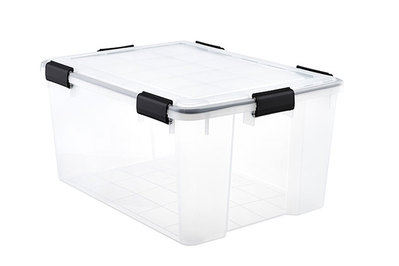
Iris WeatherPro Storage Boxes
Clear, latched boxes.
For everyday use inside the house, these tightly latching, clear containers are the most versatile we’ve found for storing clothes and other gear. They’re also available at multiple stores.
Finally, to keep everything together, I store it all in the 19-quart size of our top-pick storage container , the Iris WeatherPro Storage Boxes . The bead board goes on the bottom, the bags nestle to the side with the elastic, scissors, needle, and other accessories on the other side. It keeps your equipment dry, safe, and secure for whenever the beading mood strikes.
Concert bracelet making is all about trading, so you want to efficiently string as many as you can. If you plan to make a lot of bracelets, you’ll get more value out of investing in the individual supplies rather than kits, which may come bundled with unnecessary or redundant supplies.
You will probably spend more initially, but the savings per bracelet will be greater. If the average bracelet uses 20 pony beads and 10 letter beads, it will cost you about $35 for the basic supplies of pony beads, letter beads, and elastic string, which makes about 50 bracelets with some supplies left over.
For those who want to keep this hobby contained, we recommend the Super Smalls Make It Rainbow Mini Bead Kit in our Valentine’s Day gift guide for kids , which makes two bracelets for about $20. (If you’re interested in embroidery-floss-style friendship bracelets, we recommend the Loopdedoo Friendship Bracelet Maker in our guide to gifts for 8-year-olds .)
The goal here is to have a tangible memento of good times, good people, and good vibes. As T Swift says, take the moment and taste it.
This article was edited by Catherine Kast.
Meet your guide

Annemarie Conte
Deputy Editor
Annemarie Conte is a deputy editor at Wirecutter. She has written and edited for multiple local and national magazines throughout her career. You can follow her on Instagram .
Mentioned above
- After extensive testing, we found seven storage bins, boxes, and totes are our favorites for keeping stuff clean and dry. Here's what we recommend. The Best Storage Containers
- Weird But True
- Sex & Relationships
- Viral Trends
- Human Interest
- Fashion & Beauty
- Food & Drink
trending now in Lifestyle

National Burrito Day deals are here — how to eat for cheap or...

High-class escort reveals the one thing men just can't handle...

12-year-old girl who married high priest, 63, taken into police...

Tourists stunned after getting $100 bill for two hamburgers,...

Airplane window shades should be open during takeoff and landing...

Oh, my stars! The once-in-a-lifetime 'Mother Of Dragons' comet is...

I’m 6'10 and have the world’s longest legs — here's how I...

WFH employee fired after boss tracked her laptop activity breaks...
Gen z is giving up smartphones for flip phones — but life without a map app is almost impossible.
- View Author Archive
- Follow on Twitter
- Get author RSS feed
Thanks for contacting us. We've received your submission.

Everyone is flipping out — but that might be a good thing.
More and more school districts across the country are banning cell phone use . Politicians like Ron DeSantis are barring kids under 14 from social media. Social psychologist Jonathan Haidt’s March book “The Anxious Generation: How the Great Rewiring of Childhood Is Causing an Epidemic of Mental Illness” has shot to the top of the bestseller charts.
But some Zoomers themselves are taking matters into their own hands in an unexpected way. More and more digital natives are swapping their smartphones out for “dumb phones” — like flip phones and Nokias — to reclaim their time and their mental health.
The Post spoke with four Gen Zers who’ve gone retro with their cell phones:
Sammy, 19: I was completely addicted to my iPhone

Sammy was just 12 when she got her first iPhone — and she was the last kid in her entire grade to do so.
But after that, she was all in: Snapchat, Instagram, TikTok.
“The endless scroll was just so addicting,” she told The Post.
And it only got worse a few years later when the world locked down for the pandemic.
“It almost felt like I couldn’t get off TikTok,” Sammy, who asked to withhold her last name for privacy reasons. “I’d be on it for hours and not sleeping, and it was hard for me to put my phone down. That’s when it really felt like an addiction.”

Now a 19-year-old sophomore, she can be spotted on the University of Illinois campus with an unlikely accessory: an AT&T Cingular Flex flip phone.
During her freshman year, Sammy and a few friends resolved to get flip phones after a long conversation about how their smartphones had degraded their quality of life.
“We were talking about how these are supposed to be the best days of our lives, but we’re just on the phone all the time — even when we go out to parties, everybody’s just scrolling on their phones,” she said. “It feels like we’re almost missing out on something that our parents and past generations hyped up.”
Even though she still has her iPhone, now she goes out with just her flip phone — in case of emergency — several times a week when she needs to unplug: “It definitely keeps me in the moment when I go out. And it’s definitely a talking point at the bar.”

Sammy says that, even though parents and teachers might want to help Zoomers break their screen addiction , it’s probably a losing battle.
“When my mom told me to get off my phone, it was just annoying. If my teachers said you need to be off your phone in class, I’d be like, ‘Well your class is boring.’”
Even when she knew they were right, she said, “It’s something that they’re not able to help with, even if they want to — because I wasn’t wanting help from any of them.”
Alena Vandaele, 20: ‘It’s a fashion trend, too’

“I feel like the iPhone kind of cut my childhood short,” 20-year-old Alena Vandaele told The Post. “But using a flip phone reminds me of the very early 2000s when I was little, and it’s really nostalgic.”
Vandaele, a Homegoods sales associate in Chicago, first got a smartphone at age eight and has been on Snapchat and Instagram since middle school.
“I grew up constantly on my phone,” she said.
But two years ago, at age 18, she decided to make a change and purchased a flip phone from Verizon: “I had been thinking about it for a while, because I was so sick of social media. I was just desperate to get away from the internet.”

Now, she added, “I enjoy the world more. It helps me soak in what I’m experiencing in life.”
The Zoomer also predicts that, as early 2000s clothing comes back into style, so will the era’s technology — even as a fashion accessory.
“I think this is going to become a trendy thing,” she predicted. “If your style is like Y2K, it definitely makes your aesthetic look way more put together. It feels very authentic to the early 2000s.”
Aicha Yoda, 25: It’s a conversation starter
Aicha Yoda spoke to The Post via her smartphone, while on a social media cleanse.
“It’s just so much better,” the psychiatric nurse from Frederick, Maryland, told The Post. “Your reality is really just what you make of it. You can just unplug, and then, all of a sudden, all the pressures of social media just don’t exist to you anymore. People are only in your world if you allow them to be.”

Yoda, 25, first traded in her iPhone for a flip phone for a month, in observance of Ramadan in 2022.
“It was my own idea. I’ve just always longed to go back in time to the whole 2000s thing — even with the styles and the clothing,” she said.
She decided she wanted to go back to a flip phone — which she’d had from ages 10 to 14 — because it reminded her of simpler days.
“Because it was a flip phone, I don’t think it impacted my childhood at all. I would play outside, go to the creek, walk around the cul de sac, go on the zip line,” she recalled.

But when she got an iPhone at age 14, her relationship with her cell phone took a turn for the worst.
“I started comparing myself a lot more on social media, especially in my teen and adolescent years when my body was developing and I was a late bloomer,” Yoda said. “It really affected my self-image.”
After nearly a decade on her iPhone, she knew it was time to ditch it.
“I just found I was on my phone way too much,” she said. “But it was actually pretty hard to adjust to the flip phone. I felt like it was kind of like a reflex to always reach for my phone when I was bored in any sort of idle moment.”

After Ramadan, she went back to her iPhone but decided to keep her flip phone on hand for days that she needs to unplug: “I pick it up whenever I want to go do something and be present in the moment and actually experience what I’m doing.”
Now Yoda usually uses the flip one day a week, when going out with friends: “A lot of strangers use it as a conversation starter. It actually attracts a lot of attention. Everyone acts like I’m using a rock for a cell phone.”
Andrew Kim, 22: I finally broke up with my iPhone

Andrew Kim was tired of being bombarded by his wealthy friends’ social media photos — fancy vacations, luxury cars — and feeling bad about it.
Just as bad, he felt compelled to chase likes.
“Every time I posted anything I would constantly be refreshing my page,” Kim told The Post. “I was obsessed with it.”
So he took a drastic step and made it impossible to torment himself.

The 22-year-old dental student traded in his iPhone, which he’d had since he was 10, for an AT&T flip phone during his sophomore year at Oregon Health & Science University.
“I really wanted to separate myself from my phone,” said Kim, who grew up in South Korea. “I just didn’t like the idea of being dependent on technology, when there’s so much more to life than that.
“My flip phone helped me stop comparing myself so much. It was the most present I’ve ever felt. I was reinvigorated in my hobbies, like painting and crocheting, again. It became easier to pay attention to other things I like to do.”
He said that, while none of his friends wanted to join his embrace of old-school tech, “a lot of them said they wished they had the courage to do it too.

“I think more and more young people are wishing their life was grounded in reality, rather than the virtual world.”
But today’s real world makes it almost impossible to communicate without a smartphone.
“Navigation was one aspect I never took into consideration,” he said. “I had to look up any place I wanted to go to on Google Maps first [on a laptop] and take mental notes on how to get there. It made traveling alone unexpectedly hard.”
After two years of using his flip phone, Kim admitted, he felt forced to go back to his smartphone at the start of this school year — because he couldn’t access messages from professors and classmates about assignments in a timely manner without it.
That said, “I’ll be straight back to my flip phone immediately after graduation.”
Share this article:

Advertisement
IMAGES
VIDEO
COMMENTS
Fold three of the best paper airplanes in the world! These things fly to the far side of the gym and hit the back wall!Get the book: https://amzn.to/2M5L5D5I...
2. Bring the top corners toward the crease in the middle. Grab one of the top corners and fold it into a triangle so the edge lines up with the crease. Flatten the fold using your knuckle or fingernail so it holds in place. Repeat your fold on the other top corner so there's a point at the top of your paper. [7]
5. Fold that small triangle up to hold those previous folds in place. 6. Fold in half, but make you sure you fold it outwards on itself, not inwards. You want the previous triangular fold to be visible on the bottom edge. 7. Fold the wing down so its edge meets the bottom edge of the airplane. Repeat on the other side.
Step 3: Fold in Top Corners. Fold the top corners in to the middle crease you made during the previous step. Try to keep these two folds as even and symmetrical as possible. The edges that you folded in should be touching each other, which will make a triangle at the top of your paper.
How to make a paper plane - the best paper airplane in the world - origami a4 paper planes.How to make paper airplanes that fly farPlease read (1-5)! ️(1)Hi...
Subscribe for more amazing videos! https://bit.ly/33SNrhK BEST PAPER AIRPLANES ANYONE CAN MAKEMake the 5 best paper airplanes with this EASY step by step...
If you want to know how to fold a paper airplane with the best design, you can check out this page for easy step-by-step paper airplane instructions, and you will be amazed at the outcome of the paper airplane you made. Gather the materials needed, like a piece of origami paper or any other type of paper, and be excited about the results.
The flaps should make two triangles, and the tip should be in a point. 3. Flip the paper over and fold the outer edges in toward the center crease. Turn your paper onto the other side with the triangular flaps facing down. Take the outer pointed edge and fold that corner to the center crease. Repeat on both sides.
For more than 10 years, Fold'NFly has been teaching people around the world how to make paper airplanes. Our extensive database of designs includes step-by-step instructions, video guides and printable templates where you simply fold on the numbered lines to get a perfect paper plane, every time. In addition to the paper airplane plans, we have ...
Unfold the paper and fold each of the top corners into the center line. Fold the peak down to meet the edge of the previous fold. Fold the upper sides into the center line. Fold the top edge 1/2" away from you. Fold the plane in half towards you. Fold the wings down 1/2" from the bottom of the plane.
Detailed fold and fly instructions for50 Awesome designs. Over 50 flying paper airplane designs with written and video step-by-step folding instructions. All classes of paper airplanes are represented from darts to gliders to jets to schoolyard contest winners. There are models that look really cool, or fly super far or stay aloft for extend ...
Ballista is one of the best paper airplanes you will ever throw, flying well over 100 feet with a good toss. Better yet, it's easy to fold! Watch the video a...
Take a standard sheet of 8 1/2 x 11 inch piece of paper. Fold in in half long ways, then unfold. Fold the top edges in so that they line up with the center line. At this point, this should look very similar to the most basic paper airplane design. Fold the top point down so that it touches the bottom edge of the paper.
3. Fold down the upper corners. Take both corners and fold them down until they're even with the center crease. Press the creases to hold them in place. The folded corners will form a large triangle at the top of the paper. [3] 4. Fold down the top triangle. Fold over the triangle made by the folded corners.
00:44. Katija Cortez is a high-class escort, and claims that working in the sex industry has "dramatically" reduced her dating pool. A successful creator with more than 10,000 followers on ...
Origami Paper AirplanePlease SUBSCRIBE for more videos like this!By: KoenDesigner: UnknownLevel: Very EasyPaper: A4 Printer PaperMy Blog: http://tinyurl.com/...
Auditions for the legendary Radio City Rockettes began this week as more than 800 dedicated dancers flooded the Midtown theater for an open call and a once-in-a-lifetime shot to join the show.
4. Serena Smith, a 24-year-old singer, is pausing her cosmetic enhancements after spending $50,000 in the last six years on plastic surgery and treatments. Serena Smith / SWNS. "My chin was too ...
Staff-favorite spacer beads. Seed beads and clay beads are the smallest. Seed beads come in many sizes but are generally around 2 mm in diameter with a small hole. Clay beads are flat and around 6 ...
HOW TO MAKE A PAPER AIRPLANE (EASY) - Make a classic dart style paper airplane with this step by step tutorial! :-)UPDATED and SLOWER VERSION OF THIS VIDEO H...
John Collins, also known as 'The Paper Airplane Guy,' teaches us how to fold and fly our very own version of his "world record" paper airplane. John attempts...
A study published in Plos One journal revealed that irregular work schedules can negatively impact your health. The journal defined a "standard" work schedule as work beginning at 6 am or ...
Venom is one of the BEST paper airplanes you'll ever fold. It looks amazing and flies over 100 feet!Become a Patron: https://www.patreon.com/foldableflight G...
Published April 4, 2024, 5:12 p.m. ET. Zoomers like Alena Vandaele are dumping their iPhones for flip phones in an effort to unplug. Courtesy of Alena Vandaele. Everyone is flipping out — but ...
Learn how to make a super simple paper jet that flies really well. Become a Patron: https://www.patreon.com/foldableflight Get my book: https://www.FoldableF...
This is the easiest paper jet that you'll find on YouTube, and it flies excellently! Watch the video to learn how to fold this amazing paper airplane, design...
How to make a paper airplane that flies far - best paper plane jet. Papierflieger falten basteln der weit fliegt - origami paper planes. Subscribe for free (...
Here's how to make a paper airplane that flies far! This is one of the easiest and best paper gliders out there!Materials Used in this Video:Paper: Astrobrig...
Paper Type: Printer PaperPaper Size: A4 (210 x 297mm)"Paper Planes""How To Make The WORLD RECORD PAPER AIRPLANE"This is very easy paper plane tutorials. Now ...
In this video...Learn how to make a paper airplane that fly far. Long distance flying origami aircraft easy to make.