
How to Turn a Composition Notebook into a Stylish DIY Journal
A DIY journal can be super stylish! Plus, it’s a great option when a fancy designer journal isn’t in the budget. I’ll show you how to completely transform an ordinary composition notebook with supplies you probably already have!

I’ve had this post on the back burner from a couple of months, and I’m so excited that I can finally share it with you today! One of the most exciting times in my journaling routine is breaking into a brand new notebook. I keep a stash of high-quality notebooks and journals around so I’m always prepared to start a new one when the need strikes. But what if you’re brand new to journaling? Or on a tight budget? Investing in those designer notebooks can be intimidating. You might not want to drop a pile of cash right now, especially if you’re not sure journaling is your jam!
Today, I’m going to show you how to transform a boring composition notebook into a stylish DIY journal you can use for planning, Bullet Journaling , studying, doodling, daily journaling, scrapbooking, creative writing , or anything else that strikes your fancy!
I have a soft spot for those all-too-familiar black marble composition notebooks. Not only can you find them everywhere, but they’re the quintessential blank slate for making a DIY journal. You can customize everything from the cover to the index, or even add pockets to the covers. They’re also lightweight, inexpensive, B5 sized (which is comfortable for writing) and the paper gets a wonderful crinkly quality after it’s been used for a while. There just something about these notebooks I love!
Today, I’ll show you how to cover one of these bad boys so that it reflects your personality. I’ve also noticed this process adds a bit of strength to the cover.

Materials Needed
These are the materials I used, but they definitely aren’t the only options. Start with what you have on hand, then switch things up with new materials or color combinations.
- Composition notebook : The lined versions are everywhere! You can usually find them in stores for less than a buck. I prefer grid or dot ruled paper for my journaling ( Of course! It would be too easy otherwise, right?). Since grid composition notebooks are surprisingly hard to find in my area, I ordered a 4-pack of grid-ruled notebooks by Roaring Spring . I keep them handy for those times I need a good basic notebook.
- Mod Podge: I used the paper craft formula because I had it on hand. I probably would have preferred matte gel medium , as my base adhesive. I still would use the Mod Podge at the end to seal the notebook. It dries completely clear and has a wonderful matte finish!
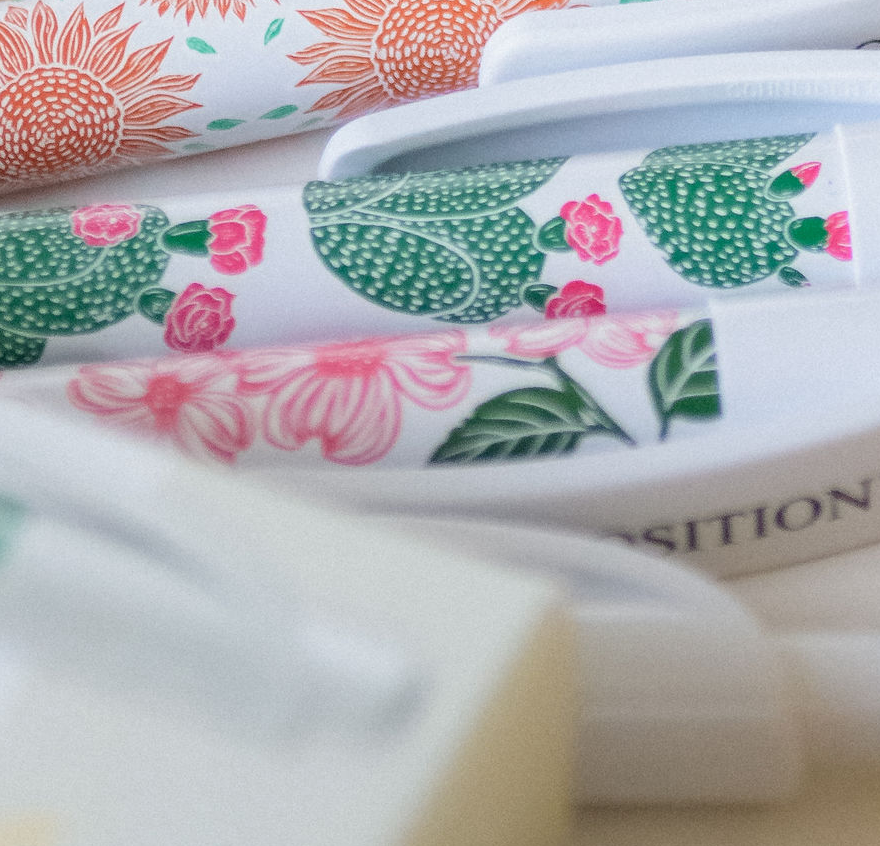
- Scrapbooking paper or gift wrap: I’m using Rifle Paper Co. gift wrap. I adore their designs, and I had a huge stash from a sale they ran a few months back.
- Printer paper (if your decorative paper isn’t thick enough to hide the marble pattern)
- Colored duct tape: I had mint green Duck Tape that looked great with my gift wrap.
- A flat paintbrush : Use one you don’t care about ruining. Remember, you’ll be dipping it in glue!
- A sponge brush
- A sharp craft knife
- A cutting mat or board: I used my big Fiskars sewing mat, but you can also use a small one designed for paper crafts.
How to Make a Stylish DIY Journal
Step 1: Start by covering the composition book with a thin layer of Mod Podge, matte gel medium , or adhesive of your choice. You need to work quickly so the glue doesn’t dry before the next step. Pay special attention to the edges of the notebook. *Quick tip: To avoid getting glue on your pages, hold the cover away from the rest of the notebook while you coat the edges with glue. Smooth everything with your sponge brush.

If your decorative paper is a light color, or if it’s not very thick, you’ll need a white layer to hide the marble pattern (see Step 2). Otherwise, you can skip the white paper and dive straight in with your decorative paper.
Step 2: While your glue is still wet, apply a sheet of white printer paper to the front of your notebook. Start at the spine and smooth outward, paying special attention to the edges. Give everything a good once over to make sure you have a smooth application with no air bubbles. Every inch of the paper should be firmly adhered to avoid problems later on. Repeat on the back cover and allow everything to dry for at least two hours before moving on.
Step 3: Using a craft knife , trim around the front cover of the notebook to remove the excess paper. I wanted a very clean edge, so I trimmed right up next to the cover. Repeat on the back cover. Now you should have a white composition notebook with clean, trimmed edges.

Step 4: We’re ready for our next layer of glue. Just like you did in Step 1, apply a thin, even layer of Mod Podge over the white paper layer. Work quickly so your glue doesn’t dry up before you’re finished applying it. Remember to smooth it with your sponge brush. Smooth, smooth!

Finally, it’s time for the star of the show! I bought a couple rolls of Rifle Paper Co. gift wrap a while back, and it’s so pretty I can barely bring myself to wrap gifts in it! Along with these pretty peach flowers, I also snagged a few other patterns. That way, I can make a complete set of notebooks in different patterns and still have some left for–Oh, I don’t know–actually wrapping gifts? 😉 *Quick Tip: If you’re using gift wrap, you’ll need to cut your paper down to a size you can work with. I used my Fiskars paper trimmer to get a nice even cut.
Step 5: While your glue is still wet (I know I’ve already said it, but it’s really important that your glue is thin, even, and wet. Otherwise, your paper won’t adhere properly), apply your decorative paper sheet, starting at the spine and working your way outward. Since you just did this in Step 2, you’re already an expert paper smoother. Look at you go! Once your pretty paper is safely applied to both sides of the notebook, let the whole thing set for 2 hours. *Quick Tip: If you notice your notebook warping while it dries, you can place a heavy book on it to coax it back into shape.

Step 6: Once everything is nice and dry, go around the edges again with your craft knife to remove the excess paper.
Step 7 (optional): Coat the whole notebook with one more layer of Mod Podge to seal everything. Pay special attention to the edges since that’s where you’re most likely to get lifting. **This was an essential step for me since I tend to be pretty rough on notebooks. Having an extra layer of Mod Podge gives it a little more durability against sticky-fingered kids and coffee spills. I was really happy with the finish I got from the Mod Podge paper formula because it wasn’t shiny or sticky.

Step 7: Now that your notebook is covered, let’s take care of the spine. I got glue all over the spine while I was working. Seriously, you would think I was working with a mop! Anyhow, you can cover the spine with colored duct tape that matches your paper. It may take more than one strip to cover the entire spine. Smooth any air bubbles and trim the top and bottom edges with your scissors.

Voila! A beautiful DIY journal that’s ready for all your big ideas. Grid-lined notebooks are great for Bullet Journaling, planning, travel journaling, and even doodling. Plus, these make great gifts for teachers, writers, and budding entrepreneurs.
I f you’re more of a visual learner, here is the full video tutorial:
Give this a shot, then experiment with other materials. Make sure you share your projects and tag me on social media ( @pageflutter ) so I can see your beautiful creations. Happy journaling!
Those are my ideas, but I want to hear yours! What materials would you use to cover your own DIY journal or stash of notebooks?
Brainstorm with me!
Subscribe to my newsletter for Page Flutter updates, posts, and announcements.
Don’t worry, I only deliver the good stuff. No spam.
Facebook // Twitter // Instagram // Pinterest

Related Posts

8 Tips for Readers on a Budget

9 Steps to Jump-Start Your Book Club
5 thoughts on “how to turn a composition notebook into a stylish diy journal”.

This is a fantastic tutorial. I sell fabric covered composition notebook over on Etsy. I would add to pay particular attention to the edges and make sure they are firmly glued down. As you use this notebook the edges take a beating and the paper will lift if not firmly secured. If that happens you can always put tape around the edge, from the outside folded over to the inside — this will give added protection and a cute edge.

Thanks for the awesome tips, Laurie! If you send me the link to your shop, I’ll add it to the end of this post. 🙂
Pingback: Pin Ups and Link Love: My Favourite Things This Week - Knitted Bliss

I cover mine with clear contact paper. This is a fun activity to do with kids. They love having their own journals, My grandkids made their covers with super heroes and favorite book characters.
That’s a great idea! Contact paper would protect it much better than a layer of Mod Podge. Thanks for sharing your tip!
Comments are closed.
Artjournalist
How to Make an Altered Composition Book Art Journal
Here’s a tutorial on how I make an altered composition notebook art journal. Hope you enjoy!
You probably remember Composition Notebooks from school. While they used to have only one design – a marbled black and white cover – they come in all types of shapes and sizes these days.
I purchased my Composition notebooks at Wal-Mart. because I’m a bargain shopper 🙂 It’s best to stock up during back to school sales. but they are only like 94 cents regular priced so it won’t break the bank too much!
The important thing about choosing a composition notebook for altering is making sure it has sewn pages. Most do, but I’ve seen ones that don’t so be sure to check!

Once you have the notebook, you’re going to want some other supplies:
PVA Glue (Regular Elmer’s will work also) or Gel Matte Medium
I started using gel matte medium in mine – which works really nicely- but I was going through a lot of it so switched to Elmer’s white glue – can’t really tell too much a difference between which pages used the gel matte medium and which ones used Elmer’s – so use whatever your budget allows for and you prefer!
A big fat craft “Popsicle” stick or a credit card:
I used a jumbo sized craft stick for smoothing pages down and spreading the glue around on my papers – an old credit card/gift card would work well too.
Old Scrap Paper for Thickening Pages:
The original pages in a composition notebook are very thin. We want to thicken them up a bit, so you’ll need some sort of paper to cover each page with. I used a combination of old book pages and some leftover scrapbooking paper – but you can use pretty much anything!
Newspaper can also work well this – I’ve also seen some people use pages out of the phone book in some other tutorials I’ve seen. Just use whatever you have handy and don’t worry about buying any supplies..
Optional Supplies: Hole Punch, Ribbon – to tie the book closed. Gesso – to cover the pages before you start creating in the journal.

Step by Step Intructions for Altering a Composition Notebook
Step 1 : begin by ripping out every other page..
You’ll find once you reach the half way mark the pages you already ripped one half from will come out very easily. Then, start back at the beginning and rip out every 2-3 pages again. It’s up to you really how many pages you want your journal to have.
I’ve found about 30-35 (for a total of 60-70 pages if you count the front and back) is a good number – not too bulky or intimidating to finish! Be sure to save the pages you ripped out – they can be used later as journaling blocks and I will definitely be using them in the junk journal tutorial I’m planning in a few weeks!
Step 2 : Make the Papers Thicker by Adding Collage Layers

Once your pages are ripped out, you’re ready for the sticky gooey fun part! I like the shabby collaged ripped effect – you can make this as neat or as messy as you’d like!
I started by just ripping out pages from a couple of old books I had (one I am planning on altering and would be ripping pages out of anyways) – as well as tearing up pieces of the scrapbook paper.
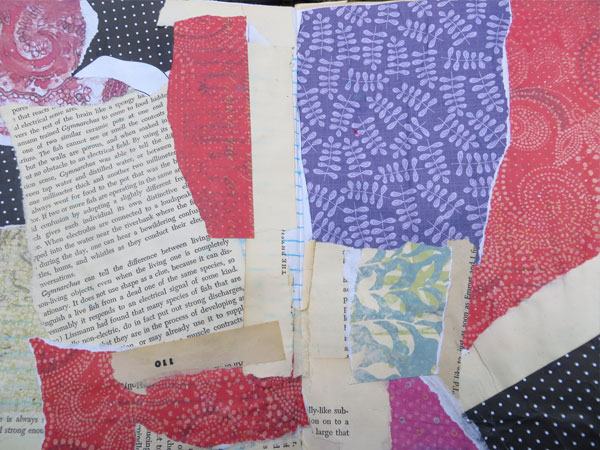
I did my pages very haphazardly – if you prefer something neater or cleaner, you can cut out paper strips to the exact dimensions of the book and glue them down that way, or you can cut out squares, rectangles, circles, etc. etc. The only real limit is your imagination!
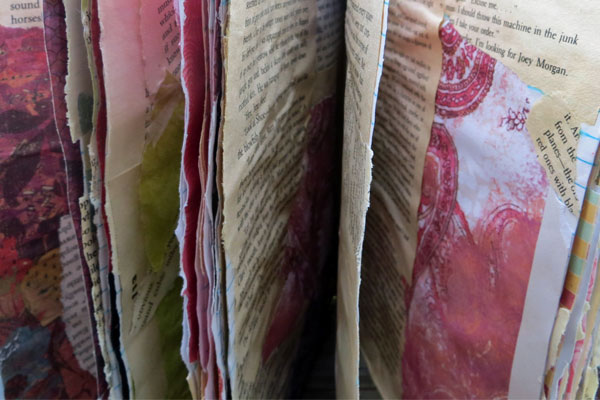
I used a jumbo craft stick to spread the glue around on the papers before sticking them down, and then pressed the jumbo craft stick against the papers to flatten them out and get rid of any air pockets.
This seemed to work really well and I didn’t have to worry about ruining any brushes! You’ll see some of my pages are still a little wrinkly…that’s OKAY! My journal here is going to be about letting go and to stop trying to be perfect about everything, so I think the wrinkles add to the story I plan to tell as well as add some really nice texture.
You’ll notice I didn’t go all the way to the center on some of these – that’s okay! Nothing a little gesso and/or washi tape can’t fix. 🙂
Tip : Use wax paper in between pages as you are working on them so they don’t stick together while drying!
Step 3 : Paint/Gesso over the pages if you’d like

Just look at the texture here! I used a credit card to spread the gesso, again because it’s terribly hard on brushes.
I can’t wait to start creating over this awesome background!
If you want your pages to show through more of the collaged background – just use plain craft paint, as that will be a little more translucent and not cover it up as much as the gesso. And don’t feel like you have to use the color white either – use any colors you want!
Step 4: Decorate the Cover:
I usually do the cover absolutely last because it is inevitable I will splash paint all over it at some point (I am very clumsy, lol) – the cover can be done in the same way we thickened the pages, or you can cover with gesso and paint over it.
The cardboard covers on these composition notebooks are not real thick or high quality – so you may want to cover with paper first and then paint over it – plus adds lots of fun layers to your work!
When my journal is complete, I am going to take a hole punch (or a screw punch if you have one of those!) and poke a hole on the front and the back cover of the journal to tie a ribbon so it stays shut. You can also use rubberbands to achieve this – that works just as well also.
I can’t wait to start creating in this altered composition notebook journal and will be sure to post some more photos of the project as I complete more pages!
What Are Your Thoughts?
I hope you enjoyed this little tutorial on making an altered composition notebook art journal – and if you have any different techniques or tips you’d like to share I’d love to hear them!
And if you make a composition notebook journal – please do share your project in our Facebook Group – I love seeing everyone’s work!
Sharing is caring!
Join our facebook group!
Share what you’re creating and working on, ask questions + connect with over 4000 creative artjournalists for inspiration + ideas!
23 Comments
This is an amazing tutorial. I have an old composition book that I’d love to alter…will be adding this to my art to-do list! 🙂 Thanks!
You’re welcome!
This is a great tutorial. I found you through Pinterest. I have extra composition books laying around since we always buy extras at back to school time. Even that one little line about using wax paper between pages is like a little gem to me. I kept wondering how you could do more than a page or two at a time without everything sticking together. Thanks so much for this! I’m off to check out the rest of your blog. Diane
Thanks Diane! Glad you found it helpful 🙂
Thank you, i have to have an art journal for school except i need at least 100 pages so if i took ur idea and used an old book like a textbook it would be a cheap way to turn in my journals
i am obsessed with you blog!!! such an inspiration!!!!
Thanks! Looking forward to keep adding more for 2014! 🙂
Hi Chelle –
I’m very enthused to start some art journal projects. I’m also a writer & craft teacher to little ones. I’m always looking for projects that allow me to blend my interests. Thanks.
Merry Christmas, Grace
Thanks Grace! Hope you have fun creating! Happy holidays to you also! 🙂
I love this tutorial but I have a suggestion for a change. Instead of ripping pages out, use a jumbo glue stick or gel medium to glue pages together into groups of 4-5 pages. This adds strength to the pages but can also add a little bulk once you start gluing in scrapbook paper. I tend not to glue in a lot of paper to my journals ( I do mostly stamping or painting) so that works perfect for me. So glad I found your site!
Thanks Julie! If you like thick chunky journals then keeping in the pages is definitely an option! That is one of my fav. things about art journaling – there are no steadfast rules, lol. 🙂 I like ripping them out so it’s not quite so bulky, but gluing them together definitely does work!
Yeah, so you totally inspired me to convert a comp notebook into an art journal. 🙂 So far, I’m just gessoing the pages, not ripping any out and not gluing them together. I like that they are strong but floppy, but they’re just a bit too floppy, like vinyl, so I think I’ll try your idea of collaging paper scraps on them first and then splodging on some gesso.
I read this tutorial and thought it sounded great…but I kept reading things like its only 94¢ ….not very thick not well made and it hit me what a waste of time it would be to put so much effort and other expenses into what will be a journal that someone…maybe kids would one day want to keep as a keepsake…
So not to sound crabby….shouldn’t more quality products be used to make a keepsake? Art supplies are a luxury for many people….expense is a factor in what I use in regarding some things…but I absolutely need a good foundation…its just not practical to spend time with cheap paper and covers when I am investing much time and products to achieve a one of a kind…
Sorry if this seems trite….I am considering art journals as a form of hobby and art…but not sure of what I would do with mine when finished…I have two grown sons whose wives certainly would not want them and my grown sons could not appreciate them either…so this may not be an artful expression for me after all…but you have a nice website
Hi Stranger! You did not sign your name so I don’t know who you are, so apologies if I don’t use your name. IMHO I’ve thought of some of the same thing you have… For me, art journaling is for personal pleasure, to gain insight, to create an entry of what was going on in my life at the time… just for me. I don’t expect my kids to look through it or take an interest… that being said, make sure that whatever you decide to add to your journal is not going to embarrass you or people who you know. (Don’t let it come back to you.) I’m totally OK with the thought that my journals wont last and will never be in display at the Smithsonian or the Louvre LOL… totally OK with that. I’m not Emerson Waldorf so no one is going to study my journals after I’m gone. So, I did go to the local department store when they were having their school supplies sales and bought the .99 cent composition notebook in this blog for .50 cents… can’t beat that price, bought six of them… should carry me for a year or so. Also I don’t mind if it looks a little “fat” so I did not remove any pages but I did what another reader suggested and “glued” two pages together then added the bits of paper to thicken it (used some junk mail… LOL works for me!) with gesso on top (.50 cent disposable brush, leaves nice brush marks, I like the texture it makes). So, for me, cheep is good because I will never worry about “ruining” a nice expensive journal with my silly musings, belly aches, grocery lists, found recipes, zentangles, sketches, movie tickets stubs, business cards that matter to me ATM – and whatever else that fancies my mind… Remember, content is everything, container… not so critical… after all, have you ever recycled an empty jar to store something? LOL – Have a great day!
Hello Chelle, I found this blog post so inspiring! I tried it out immediately on a hardbacked notebook I found in a charity shop for £1 (I live in the UK). I tore out some of the pages and collaged the rest with scraps of paper from old books. I’m thrilled with the end product. I’m quite new to art journaling/sketchbooks but I like the idea of creating something individual and unique to put my artwork/photography in. Not quite sure yet what I’m going to put in it ~ but I’ll know the right thing when it comes along! Thank you for the inspiration!
Kind regards, Evelyn
You inspire me to do what I haven’t got to yet, prepared the book by tearing out pages, now to start the “spit n paste”! Thanks, youre a star.
Hello all. First of all there is a group on facebook called Junk Journal Junkies, awesome bunch of ladies and ideals. I have been making these comp. books for a while now. I junk them up use as a art journal and diary/planner agenda type of book. I love them. I don’t rip out pages I do glue them and add papers and file folders throughout the book. I glue in calenders and put in stickers and washi tape. Gesso and paint I do just whatever the mood hits me to do. I do however hope one day my grand babies will look through them and know they had a creative granny. I love doing this to comps and to regular hard back books.I don’t care what happens to them after I’m gone. It’s more of a therapy for me. So good luck to all who adapts to this ideal. By the way love this blog.
Hi Chelle, I recently finished making the composition journal! I love it. It was quite a bit of work but I am currently doing a second with the pages I ripped out. The only thing I found, and I may try a little different approach is that working from front to back twisted the spine that it’s now rounded. But, you know what? It really adds to it. I have had many comments and requests to make for others. So, I told them I’d gladly show them how, that’s it! So in my second attempt, I think as I thicken the pages I will try alternating as I go. Front, back, front, back. This might keep the spine a bit straighter. The pages I tore out of the first composition book, I am thickening the pages front and back as individual event pages. I have, for both used Scrapbooking paper that I wasent very fond of, old receipts, junk mail, wrapping paper, napkins, whatever I could find. I am not sure how I will put the pages together yet. Possibly an old book cover and back and large rings to keep in all together. Thank for introducing this concept to me, I love the multitude of colour on the pages and the very tattered edges of the paper. I will upload you a pic so you can have a visual on my journal. Thanks again Chelle!
Thank you so much for sharing your awesome techniques. I will definetly use your ideas in my future art journals
Does Gesso make the pages thick enough so that one doesn’t have to add extra paper if they don’t want to?
Hey there! I apologize for commenting on such an old post, but I stumbled across this tutorial on pinterest and absolutely loved the idea. I had a ton of comp notebooks, so I got started right away. Only problem… I was thinking that I should keep in all of the pages, because I wanted all of them to be as full as they could be. After spending hours of working on making the pages thicker (and a lot of mod podge :P), I’m realizing now that I really should have followed the step of tearing out pages first. After getting done kicking myself repeatedly and harshly (actually, still not done kicking myself), I’m trying to figure out what to do. I got started 8 books, because I wanted to do some for myself and some as gifts, and I figured if I’m doing the same steps over and over again, might as well make an assembly line. The books are getting thick already, and I still have hundreds of pages to do. I want to tear out pages now, but I’ve already done the first 10+ pages on all of them, so I can’t tear out any from the back or front. Would it work to tear out pages just from the middle? I’ve spent hours of work on these already, and would really prefer NOT to start all over again. (not to mention the money on mod podge… I tried Elmer’s but it curled the pages.) So… Yeah. If you have any suggestions for me, that would be very appreciated. Thank you very much for this wonderful tutorial, and I will make certain to actually follow it in the future. 😛
Hi Chelle, I am new to art journaling but love to find new techniques that I can easily incorporate into my learning. I’ve attempted a few pages but my problem is that once I gesso a page and let it dry the pages curl up. No matter what I do to them afterwards I just cannot get them to lay flat. Is there a tip you or anyone else would have for me? I sure would appreciate it. Thank you.
What a wonderful Idea. I plan to start one today. It is so difficult for me to work in a pricey art journal. This is a very easy way to overcome that. G
Leave a Reply Cancel reply
Your email address will not be published. Required fields are marked *
Save my name, email, and website in this browser for the next time I comment.
Grab a copy of our FREE Handbag eBook!

F REE HANDBAG EBOOK! Get your copy! >
Turn a Composition Book into a Beautiful Journal

Whether you are a student or bullet journaler there is nothing better than writing in a beautiful note-book or journal but they can be expensive. Here is a tutorial that will show you how to make the beautiful journal of your choice in just a little bit of time and a few steps using a $0.50 composition book that you can get at any office supply store. I love journals and I particularly love stylish journals that I want to open and write in and this project gives me both. All you need is craft or wrapping paper and some Mod Podge and you can create this beautiful and stylish journal. I added a few extras to make my journal just right. I used some colored duct tape, some ribbon and a little flower charm to complete my project.
What you will Need:
- Composition Book
- Craft paper, card stock, or wrapping paper
- 1.88″ colored duct tape
- 1/8″ wide ribbon
- Small charm
- Xacto or craft knife

Step 1: Turn a Composition Book into a Beautiful Journal
Decide on your paper and cut it down so that it is just a bit larger than your composition book. I used card stock for my project so I did not have to put anything underneath it. If you choose craft paper or wrapping paper you may have to put a layer of white printer paper underneath to cover the exterior of the composition book. To add the white underlayment to the book you will follow the instructions for the outer layer except that it will be white and serve as the base of your exterior paper.
Step 2: Turn a Composition Book into a Beautiful Journal
Place a layer of Mod Podge on the front of your composition book. You should do this when the book is open so that no glue gets on the pages. Place your paper, either white or exterior, onto the glued front and brush out any bubbles. Using card stock helped to avoid any bubbles because of the thickness of the paper. Let the front dry for about 2 hours and repeat the process for the back.

Step 3: Turn a Composition Book into a Beautiful Journal
Once the Mod Podge has dried use your Xacto or craft knife and cut the excess paper from around the edges of the book following the rounded edges. Do this from the inside of the book so that you can accurately follow the edge. Take care that you do not cut into the book itself and use a fresh blade so that you do not tear the paper.

Step 4: Turn a Composition Book into a Beautiful Journal
Measure a piece of ribbon about 15″ long. Using the Mod Podge, glue a portion of the ribbon to the spine of the composition book about 3″ down from the top. Let the glue dry. The ribbon will be used as a book mark for the journal.

Step 5: Turn a Composition Book into a Beautiful Journal
Once the glue has dried on the ribbon add the colored duct tape to the spine to seal the edges of the paper and the ribbon. I used Scotch 1.88″ duct tape and it was the perfect width for the spine on my composition book. The best way to trim the tape is to open the book to the middle so that it is laying flat and the tape is laying flat on your surface then trim the tape using your Xacto knife. If you are using wrapping paper with printer paper underneath, I recommend that you put at least one coat of Mod Podge over the top of the paper to seal it and to make it stronger. You may want to add two coats on the front and the back.

Step 6: Turn a Composition Book into a Beautiful Journal
Add the charm to the end of the ribbon as an embellishment and you have finished your beautiful journal. Of course you can add additional embellishments if you like but I like mine with just the floral paper and purple duct tape. It is perfect for me.

Step 7: Turn a Composition Book into a Beautiful Journal
Make these gorgeous polymer clay pens to go with your beautiful new journals. Just click on the link or the photo to head over to Lifestyle for Real to get this great step-by-step tutorial on how to make DIY polymer clay pens. This is a fun and functional project that you will enjoy for a long time.

SIGN UP TO RECEIVE THE LATEST FROM SEW VERY CRAFTY !
We don’t spam! Read our privacy policy for more info.
Check your inbox or spam folder to confirm your subscription.
Share this:
- Click to share on Facebook (Opens in new window)
- Click to share on Pinterest (Opens in new window)
- Click to share on Twitter (Opens in new window)
- Click to email a link to a friend (Opens in new window)
- Click to print (Opens in new window)

Hi, Welcome to Sew Very Crafty a place for beginner and intermediate sewists and crafters to learn and create. Here at SVC we create simple and fun projects that anyone with basic to intermediate skills can create and grow with. My name is Diana and I am a lifelong learner, sewing enthusiast, parent, spouse, lawyer, and die hard St. Louis Cardinals fan. I live in California with my husband. I love God and my country but am proud of my Irish heritage. I enjoy sharing my creativity and the things that I love with others.
Similar Posts

How to Make a DIY Santa Hat

How to Make a Witch’s Hat

How to Make an ID Wallet

How to Make a Cellphone Handbag

How to Make Drawstring Tote Bag

Easy DSLR Camera Strap
Looking forward to reading your thoughts on this project cancel reply.
This site uses Akismet to reduce spam. Learn how your comment data is processed .
Privacy Overview

Orange Bettie

DIY Composition Notebook Journal Tutorial
Create a cute journal from a plain composition book, scrapbook paper, and a bit of Duck Tape! Use my tutorial to create an easy DIY composition notebook journal. This would be a fun activity for a scout meeting or a craft night!
I admit that I have a weakness for pretty notebooks and journals. There’s something about a pretty journal that invites you to write down your random thoughts or a to-do list. Is there anything more satisfying than physically marking items off your to-do list?
I’ve got a tutorial for you below showing how to make an easy DIY composition notebook journal.

These scrapbook paper journals are easy to make from a basic composition notebook. I always load up on composition notebooks during the summer when school supplies are on sale, so I usually have a few of them laying around the house. Other than that, all you will need is some scrapbook paper, a glue stick, and a bit of Duck Tape!
Love cute journals as much as I do? See how to sew a leather journal cover here , or get the free pattern for my Snappy Composition Book Cover here .

Seriously, these are so quick to make – just 10 minutes start to finish. They’re perfect for little “I thought of you” gifts for friends and coworkers.
Are you ready to make one? Here’s how:
Supplies (to make one composition notebook journal):
- Cover Paper – 2 pieces scrapbook paper (not cardstock weight) – 8.5” wide x 12” tall
- Inside Paper – 2 pieces scrapbook paper (not cardstock weight) – 6” wide x 8.5” tall
- Duck tape that coordinates with your cover paper
- Composition notebook
Cover the Composition Notebook
Put glue all over the composition notebook cover, but especially around the edges. Then place one of the Cover Paper pieces on it, centered vertically and with the left edge of the paper covering about ½” of the spine.

Now, open the composition notebook. Fold the corners of the Cover Paper over the corner of the composition book. Glue in place.

Fold the top and bottom flaps over the edge of the composition notebook. Glue in place.

Fold the side flap over the edge of the composition notebook. Glue in place.

Now the front is covered, but the inside looks kind of messy. Glue one of the Inside Paper pieces over the middle area. It looks much better now!

Repat all of these steps with the back cover.
Make the Pen Holder
Cute one piece of Duck Tape 3” long, and another piece that is12” long.
Take the 3” long piece of tape and fold it in half lengthwise, sticky sides together.

Bend it into a loop, then slide the back layer of the loop out so it’s roughly ½” longer than the top layer.

Stick this loop to the back side of the 12” piece of tape, roughly 3” from the top and so the loop is peeking out the right edge of the longer piece of tape. Make sure both ends of the loop get stuck to the tape. Check to be sure that the loop is the right size to hold a pen. If it’s not, adjust it now.
This is what it looks like on the back side of the tape. This photo shows a little bit better how the loop sticks out from the edge of the tape.

Cover the Spine
Now, take the 12” piece of Duck Tape (with the pen tab peeking out from it) and cover the spine of the composition book. The Duck Tape is longer than the composition book but that’s okay. Just line the top of the Duck Tape up with the top of the composition book, letting the extra tape stick out past the bottom.

Trim the bottom of the Duck Tape even with the bottom of the composition notebook.
Your DIY composition notebook journal is finished!

you may also like
- How to Sew a Tea Towel from Flannel (with Fringe!) DIY Tutorial
- Patchwork Pillow Wrap with Mini String Quilt Blocks - Tutorial
- Mini String Quilt Blocks From Your Smallest Scraps - Tutorial
- Fabric Lanyard with ID Badge Holder – Tutorial
follow @ Orange_Bettie
Looking for something.
Making a Composition Book Art Journal….
July 3, 2009 by Ashley Hackshaw
 via lilblueboo.com")
About Ashley Hackshaw
Living a simple, creative life in #smalltownusa Bryson City, NC. Renovating a 1960s ranch house and an old train depot. Thank you for reading! Read more in my about section.
July 6, 2009 at 1:44 am
Just gorgeous! Now guess what I want to do?
July 7, 2009 at 1:55 am
Wow what a beautiful piece of art.
July 7, 2009 at 3:28 am
This is just yummy, thanks for sharing your process 🙂
July 7, 2009 at 8:22 am
I love this 🙂 It's amazing. I wanted to start a journal for some time and I'm glad I found your blog. I kept asking myself if I had to make to use watercolour paper to draw and paint in my journal. this sounds the perfect solution 🙂 One question though…what exactly is matte medium? It's an acrylic paint? I'm wondering because I'm from Portugal and I need to find alternatives 🙂
August 22, 2012 at 4:14 pm
Gesso, artists use to prepare thier canvas. Get the matte one not transparent like i just did before seeing this site. I bought while traveling one of those books and i used those paint card samples for my cover and the colors are so beautiful . Of course, lucky no one was helping me as i helped myself to lots of colors. I don’t think they care. I buy paint there. Now i am making one for my grandkids. Football and cheer. I am still away so back to paint shop. I use glue stics and white glue.watercolor pencils for mine when i want to color a page. Simple supplies for traveling. Good luck. So much fun
July 7, 2009 at 4:48 pm
Very neat! I love the idea, but I'm not sure I'm patient enough!
July 8, 2009 at 5:42 pm
At the moment I'm really obsessed with your journals and the journal related posts and return to your page over and over again. Thank you! 🙂
July 15, 2009 at 9:59 pm
I am so glad I found your blog! You just added a ton more things to my list of things I want to make, this journal being at the top! I think my 8yr old daughter would LOVE to make this with me. Is there a place online to get the glue and paint that you use? I live in a small town and I don't think our local Wal-Mart will carry it 🙂
July 18, 2009 at 4:55 am
Stunning. I want to touch it.
July 18, 2009 at 7:15 am
I have easily 15 books about altered arts and journaling. I have shelves and boxes of supplies. I look at them everyday and reprimand myself for not doing anything! But today I read this post and believe I have the right information to start! Thanks for the photo with the words "did our taxes". This made me see that journaling didn't have to be about poetry or prose, just life! Thanks a thousand times!
September 4, 2009 at 3:48 am
Wonderful journaling ideas and I LOVE your blog! I'm so glad I found you. The quote by Jack Kerouac is my very very favorite of all time!
September 4, 2009 at 6:25 pm
wow- you're a crafting genius! I love this idea! I'm a fan of lots of journals… and the more unique and personalized the better. I'm going to have to try this out. Are the tools and supplies easy to find? Like just any craft store? Also, how'd you do the holes to thread through? Looks like a mini hole punch… is it?
Okay – sorry for so many questions but this is awesome! Can't wait to try it out
September 18, 2009 at 5:58 pm
just wanted to let you know I shared your great idea on my blog today- thanks for the inspiration!
November 18, 2009 at 2:45 pm
I like this idea!
January 21, 2010 at 8:07 pm
This is stunning! And a great and accessible idea. I'm going to try this to make a unique photo journal!
January 21, 2010 at 9:13 pm
Awesome. I am going to do this this weekend.
January 22, 2010 at 3:05 am
I'm speachless! This is fantastic and so inspiring! I'm glad I have discovered your lovely blog! I'll bookmark it and comeback often!
January 22, 2010 at 5:15 am
So beautiful! I've always loved composition books, but never thought about using them for art journaling because the pages are so thin…well, you fixed that! Love it. Thank you so much for the idea.
January 22, 2010 at 2:22 pm
This looks like so much fun!! I have to do this. Thanks so much for sharing your creativity and methods.
January 22, 2010 at 3:03 pm
this is gorgeous and i am so inspired and grateful for learning more about helpful materials to create such yumminess!! thank you!
January 22, 2010 at 5:06 pm
Wow, a piece of art in itself and so inspiring! I just don't seem to have that level of crafty DNA in me 😉
March 10, 2010 at 7:58 pm
great post! glad Carmen shared this link in her Cresendoh post!
August 9, 2010 at 3:24 pm
Amazing, it's so beatiful!! I have a 3-yers-old son and every time I'm doing scrap he wants to "help" me. I'll have him doing his own cars & trucks album!! Thanks for the idea!! Lots of kisses for you!!
November 12, 2010 at 7:22 am
hey there; new here, thanks for all the journal art tips. I love gesso, it is the best and makes me feel connected to the old masters, even if it is a totally different substance now. had to say also that you and your little girl are very pretty.
July 9, 2011 at 11:56 am
Ashley, I’ve linked a post to your art journal instructions over at http://christiniyogini.blogspot.com/2011/07/art-journaling.html Just want to let you know your blog is my all time favorite. I love all your fantastic inspiration, and appreciate all you share with your readers. Thanks for all you do! Christiniyogini
July 20, 2011 at 2:24 pm
Love it. I have a question what are you punching holes with? It looks like a whole punch but those holes are very tiny. Is there a specific tool for this?
July 23, 2011 at 6:37 am
i adore this! i suddenly feel the need to hit the dollar store & pick up a composition book. off i go to create. 🙂
August 5, 2011 at 5:02 am
this is so awesome! thank you SO much for sharing this 🙂 cant wait to try my own!
September 15, 2011 at 8:14 am
I am in awe! I have so many of those notebooks. I have so much “stuff” that I could modgpodge on there!!! Now I know what to do with my scrapbooking papers! Thanks so very much!
October 8, 2011 at 1:49 pm
What I love most about this is you could do it with a comp notebook full of boring math notes.
December 7, 2011 at 9:47 am
im actually making this as i type, but a bit curious, did you add phonebook pages to both sides of the doubled notebook pages? btw. i love how this looks at the end and im so excited to keep going!
December 16, 2011 at 2:19 pm
I love this journal idea. I have started my first one and I am in love with it. Thanks for sharing.
December 28, 2011 at 3:37 am
Thanks so much for sharing this! I made one for my daughter (10) and one for my son (8) for Christmas. They LOVE them. It took me weeks of working at night when they were in bed, but it was a beautiful meditation for me…preparing a blank canvas for my children’s dreams and ideas. I think these journals are going to become a big part of our family’s story.
December 29, 2011 at 9:45 pm
This is so amazing and beautiful. I’ve never been one to journal but lately my brain has been working trying to come up with something creative so I could begin to journal. THIS IS IT! Thank you so much for providing the tutorial. I can’t wait to begin.
January 8, 2012 at 5:54 pm
I made one of these, and did my first ever art journal page in it. I posted it here… http://creativeoperation.blogspot.com/2012/01/dabble-into-art-journaling.html if you would like to see it. Thank you for sharing your creativity with us! Michelle
January 30, 2012 at 8:11 pm
Oh my Goodness! I think that I have been looking for this for my whole life!!! This is wonderful, magnificent, breathtaking, fantastic, brilliant and just plain great! I love it and it is so helpful and I am seriously going to try and make one. It seems like forever I have been looking for a tutorial to make a book where my pages will not curl and look crazy!! THANK YOU. You’re awesome, and I intend to go through all of those posts. You have given me so many ideas I think my brain might explode! {in a good way} I have been stuck in a rut so thank you, again. 🙂
February 7, 2012 at 8:16 pm
Hey! This is so adorable! I want to get started on one tomorrow 🙂 I have a question though… why do you add phonebook pages? Is is absolutly needed?
February 10, 2012 at 10:29 am
Hi Ashley!! Just found your tutorial at pinterest & wanted to tell you that I´ve got a crush with it (I can´t wait to start mine)…I´ll keep an eye on your work from now on (I find it inspirational)…Regards from Spain
March 1, 2012 at 6:52 pm
Thank you very much for this. I just made one for my sister- she loved it! Now I have to make one for me!
March 2, 2012 at 10:03 am
can i just use modge podge for the whole thing, do i really need to use gesso?
March 20, 2012 at 11:22 pm
Thank you thank you thank you! I’m headed to the beach over spring break with my BFF. I told her I’d seen some mixed media journals & I wanted to make one, she was all for it. Then comes the “how?”. She, thank goodness stumbled upon this website and found this tutorial. This is so absolutely what I need right now it will be a great way to express myself in lots of ways, the possibilities are endless. I’ve been wanting to journal but I’m not the sit down and write kind of person. Taking my love of paper and adding so many other things will be a great experience. I can’t wait to start in I see some fun late nights ahead of me. Thanks again for sharing your blog is fantastic! Your one amazing talented lady! God bless you!!
April 14, 2012 at 10:39 am
adorable idea! thank you for sharing!
April 14, 2012 at 9:02 pm
I have a diet journal, I’ve been cutting things out of magazine’s to add to it. This would be lovely. Thanks……….
May 4, 2012 at 11:09 am
This is just gorgeous!! Love it!
May 11, 2012 at 1:58 pm
How did you punch the holes in the middle of the page to sew that girl onto it?
June 22, 2012 at 7:18 pm
Thanks so much for sharing your great ideas. I love art journaling & always love to see what others are doing to their journals.
July 4, 2012 at 12:47 pm
I make something similar to this and give to people as prayer journals with info about prayer journaling. I also found (at our local Dollar Tree) tiny composition notebooks, and made them for my daughter to give friends at college. Tiny= very cute!! Thanks for the beautiful examples-you are so creative!!
June 5, 2013 at 9:13 am
Sarah, We are making these AMAZING journals for our women’s retreat and are running into a cost & time issue for 16 of these journals. But we LOVE AND ADORE these journals and want to bless the women who will be using these journals…can you email me with your ‘something similar”? We NEED HELP ASAP!
August 7, 2012 at 1:24 pm
I have a question. I can do this on canvases, especially the acrylic transfer process. But as for doing compositions on paper: mine end up buckling from the wet mediums that I use (gels and gesso). How do I keep the pages from buckling? If I use a brayer, do I use it on all coats, adhesive layers as well as gesso? And how can I put a nice textured finish on the top coat, rather than just having all the brushstrokes? Or do I put waxed paper over the final finishing coat of adhexive before using the brayer? I never ran into this problem of buckling on stretched canvases. I really like the art journal idea of using mixed media. Mine were always done in dry media (colored pencils, conte, pastels, stamp pad techniques). Nice work! -Sheri
August 7, 2012 at 1:26 pm
They actually flatten out eventually. After you are finished with a few pages put wax paper in between and leave it under a few heavy books for a day or so!
August 16, 2012 at 4:42 pm
I’m trying to do this, I am using mod podge instead of the brand you put on here but all i get is a mushy mess with my pages ): How long is it supposed to take to dry?
August 26, 2012 at 10:00 am
I am also using Mod Podge, but finding success with it. I paint on the Mod Podge in a somewhat-thin, even layer (too thick will leave a mess). I would let it dry at least a few hours, or up to a day if you can. You could Mod Podge some pages in advance. Then you can even us e Mod Podge to glue embellishments on or seal your art. Hope this helps.
September 13, 2012 at 3:54 pm
I can’t wait to start this. I just love it, seems so old fashioned. Thanks for sharing. I am not a crafty person but I could do this.
September 14, 2012 at 7:00 pm
Beautiful! Can you use the mod podge instead of the matte medium for those steps, then cover w/ the gesso? Thanks!
September 15, 2012 at 12:28 pm
This is crazy cool(:
November 25, 2012 at 8:37 pm
Why don’t you just by a book with thicker paper instead of all the work with triple layers of paper glue and paint? I don’t get it?
January 2, 2013 at 1:57 pm
i like the idea but i want to make the pages for writing i want to give it as a gift but i dont want to put stuff in it you knoe do u have an idea i can use to just make the pages look nice
January 15, 2013 at 6:24 pm
Hi! I just love your site! This is so cute and fun! I just wanted to stop by and let you know that I mentioned you in my blog tonight and linked it back to you so others can see your fabulous ideas. I can’t wait to try more of them. They are great! Faith 🙂
February 6, 2013 at 2:58 pm
I love your blog! I have a question. What is the difference between guesso, modge podge, and matte medium? Also what different things do you use them all for?
September 8, 2013 at 7:45 pm
I love this will do this with my students
Composition Book/Journal

Introduction: Composition Book/Journal

This is a pretty easy notebook that’s bound a lot like a composition book, but it substitutes duct tape and staples for the composition book’s cloth and thread binding. You don’t need any glue or to wait for anything to dry, so your notebook will be ready as soon as you finish it. (Although leaving it overnight under something heavy will help flatten it.)
Not only is this notebook easy to make, but it’s durable, too - it will work really nicely as a field science notebook or a nature journal that you can throw in your backpack.
Step 1: Gather Your Materials.

- Stapler (I used an Arrow T-50 stapler)
- Utility knife
- Needle-nose pliers
- T-square (or other square)
- Scrap cardboard for a work surface
- Chipboard or binder’s board (I used Blick 14-ply chipboard: http://www.dickblick.com/items/13115-2226/)
- Paper (I used 8.5” x 14” because found a lot of extra of this size)
- Staples (I recommend T50 staples that are ⅜” minimum)
- Put your scrap cardboard flat on your workspace to work on top of.
Step 2: Measure and Cut Your Coverboard.

- You can skip to step #3 if you are lucky enough to have pre-cut covers.
- Leave 1” for the spine total, or in other words, ½” for the spine on each cover. The height of the cover should be exactly the same as the height of the notebook. Therefore, since my 8.5” x 14” paper is folded in half, I have a front and a back cover each measuring 8.5” x 6.5”.
- Cut the coverboard to the sizes you measured. Chipboard is pretty thick and may require several passes with a utility knife. Cut carefully to maintain straight, precise edges.
Step 3: Count and Fold Your Paper.

- For a 100-page notebook, you’ll need 25 sheets. Why? Each sheet is folded in half and has a front and back.
- Fold the paper sheets in half. You may need to fold 2-4 sheets at a time to get a nice crease. For my book, I fold them to create an 8.5” x 7” folded sheet.
- Put all of your folded sheets together into one large folio, then unfold it into one neat, flat stack with a crease running up and down the centerline. (In the picture, I taped my paper down. You don't have to do that.)
Step 4: Prepare Your Binding.

- Cut a piece of duct tape slightly longer than your notebook’s height. Since my notebook is 8.5” high, my piece of tape is about 9” long.
- Carefully lay your piece of tape straight up and down the centerline of your neat stack of paper.
- Place your two covers carefully on the left and right sides of the paper stack. They should be stuck to the duct tape along their edges in the middle and precisely aligned to the edges of your paper stack.
- Measure the exact midpoint of the duct tape at the top and bottom.
- Draw a straight centerline along the duct tape using the midpoints you marked. This can be tricky since your ruler will get stuck to the duct tape and might move it, so be careful your notebook doesn’t shift around.
Step 5: Bind Your Notebook.

- Staple carefully along the centerline on the duct tape. I like to start at the top, the staple the bottom, then the middle, and finish with two more staples for a total of five evenly-space staples.
- Your staples may not go in flush with the duct tape, so gently hammer the staples flat.
- You may wish to add a piece of paper, construction paper, or cardstock to stiffen your binding slightly. Only use one sheet of material and don’t make it much wider than the duct tape binding.
- Place another piece of duct tape over your binding facing down, so that the staples and any additional binding material is covered. Be sure this piece sticks to both covers!
Step 6: Finish the Binding.

- Use a utility knife to trim the duct tape in line with the covers.
- Carefully pull your notebook off your work surface, being certain that your paper is coming up with the covers and binding. Flip it over so it’s open to the very middle, where you’ll see your staples poking through.
- Get the staples to lay flat in the middle. First, bend them down with your needle-nose pliers. Then, hammer them flat.
Step 7: Finish Your Notebook.

- You probably want to trim the pages to be even with the covers. A utility knife works, but you get a bajillion little paper ribbons as waste.
- Your book may spring open a bit. Clamping your book or placing something heavy on it overnight will fix this.

Participated in the First Time Author Contest
Recommendations

Made with AI - Autodesk Design & Make - Student Contest

Big and Small Contest

Engineering in the Kitchen - Autodesk Design & Make - Student Contest

- Sketchbooks
- Shop All Notebooks
- By Binding Composition Spiral
- By Paper Type Blank College Ruled / Lined Dot Wide Ruled Grid
- By Design Decomposition Of the Sky Plants Jalapeno Food Birds Of the Sea Animals
- By Size Extra Large Pocket Size Standard
California Poppies
State flower, state of mind
Marsh-dwelling, fun-loving
- Writing Utensils Pencils Pens All Writing Utensils
- Greeting Cards Birthday Cards Christmas Cards Thank You Cards Holiday Cards Funny Cards All Greeting Cards
- Other Items Folders Filler Paper
Botanical Pen Set
Five fabulous floral designs
Honeycomb Pencils
The hive mind stamped on sustainably forested wood
- Display Options
Your cart is empty
Join the Club
Composition
40 products

Best Sellers
IMAGES
VIDEO
COMMENTS
How to Make a Stylish DIY Journal. Step 1: Start by covering the composition book with a thin layer of Mod Podge, matte gel medium, or adhesive of your choice. You need to work quickly so the glue doesn't dry before the next step. Pay special attention to the edges of the notebook. *Quick tip: To avoid getting glue on your pages, hold the ...
Step 1: Begin by ripping out every other page. You'll find once you reach the half way mark the pages you already ripped one half from will come out very easily. Then, start back at the beginning and rip out every 2-3 pages again. It's up to you really how many pages you want your journal to have. I've found about 30-35 (for a total of 60 ...
Buy: Mead Composition Notebooks, 3 Pack, College Ruled Paper, 9-3/4″ x 7-1/2″, 100 Sheets per Comp Book, Black Marble (38111) $13.19 Buy it The go-to composition journal for decades, the Mead ...
Step 2: Turn a Composition Book into a Beautiful Journal. Place a layer of Mod Podge on the front of your composition book. You should do this when the book is open so that no glue gets on the pages. Place your paper, either white or exterior, onto the glued front and brush out any bubbles. Using card stock helped to avoid any bubbles because ...
Then place one of the Cover Paper pieces on it, centered vertically and with the left edge of the paper covering about ½" of the spine. Now, open the composition notebook. Fold the corners of the Cover Paper over the corner of the composition book. Glue in place. Fold the top and bottom flaps over the edge of the composition notebook.
I'm going to show you how I start and personalize a glue book junky collage journal that's made from a simple, ordinary composition book. I started my Pink ...
Let's work on the altered composition notebook, as I share an easy diy on how to customize the inside of my composition notebook craft journal.Thank you for ...
Place wax paper underneath 2 pages of the journal to protect the other pages. Paint matte medium on the bottom page to glue the top page to it. Take a brayer and roll out any air bubbles. Next, I take old phone book pages and use the matte medium to glue them onto the top page. Brush a light layer on top as well.
Once all the papers are stacked add a piece of lace and then sew along the top of the stack. Add decorations to the page, like stickers and stamps. Decorate the base page with distress ink and a page from a tear off notepad. Attach the notepad paper with washi tape. A great way to use up that stash of washi tape!
Step 2: Measure and Cut Your Coverboard. You can skip to step #3 if you are lucky enough to have pre-cut covers. Leave 1" for the spine total, or in other words, ½" for the spine on each cover. The height of the cover should be exactly the same as the height of the notebook. Therefore, since my 8.5" x 14" paper is folded in half, I ...
8.5 x 11" PRIMARY STORY Paper Interior Editable Template Notebook Composition Journal for Amazon KDP | 120 pages | With Bleed | Pdf Pptx. (368) $3.00. $3.53 (15% off) Fabric Covered Journal . Handmade Fabric Composition Book . OOAK Collage of Fabric Strips and Buttons on Book Cover . Personal Organizer. (73)
About this item . PAPERAGE COMPOSITION NOTEBOOKS: This multipack of 12 lined journal notebooks includes 120 pages per book (double the pages of other kraft soft cover journals) with a brightly multicolored linen-textured tape binding.
PAPERAGE 6-Pack Composition Notebook Journals, 120 Pages, Kraft Cover with Jewel Tone Spines, College Ruled Lined Paper, Small Size (8 in x 5.75 in) - For Home, Office or School Supplies. ... Cute 30 Pack Black Narrow Ruled Mini Composition Books Bulk, Small Pocket Marble Journal Notebooks for Kids Students College Office, Pocket Size 4.5 x 3 ...
The Decomposition Book is the classic composition notebook reimagined with fun prints, bright colors, clever designs, and quality construction. The binding is rugged and durable, perfect for everyday use. We make our composition books with 100% Post-consumer Waste Recycled Paper, heavy board, and manufacture in the USA.
Amazon.com: Unruled Composition Notebook: 100 unruled pages [50 sheets], 7.5" x 9.25, black marble, composition style cover, perfect bound notebook. (Arune Composition Books): 9781517236434: Frankel, Brian, Arune: Books ... A5 Softcover Spiral Notebooks Blank Journals 2-Packs, Unlined Sketch Books Writing Pad Bullet Travel Memo Notepads Diary ...
Mead Composition, Wide Ruled Comp Book, Writing Journal Notebook with Lined Paper, Home School Supplies for College Students & K-12, 9-3/4" x 7-1/2", 100 Sheets, Black Marble (09910) ... Composition Notebooks Lined Journal Bulk, 15 Colors with Rainbow Spines, 60 Pages for Kids Women Girls, School Office Supplies. 4.7 out of 5 stars. 537.
Shop for Composition Books in Notebooks & Pads. Buy products such as Spark Create Imagine Half Page Ruled Primary Journal, Grades K-2, 100 Pages (09644) at Walmart and save. ... Mintgreen Journal, Composition Book, Wide Ruled, 80 Sheets, Recycled Paper, Dinosaurs. 106 4.7 out of 5 Stars. 106 reviews. Save with.
With their ample pages and dedicated spaces for introspection, these journals become an extension of your mind and soul. Whether you're documenting your daily experiences, setting goals, or exploring your deepest emotions, a journal notebook is an invaluable tool that encourages personal growth and self-discovery.
Perfect for school or everyday use! Best choice for planning, designing, sketching, and creating charts. 150 Blank Unlined Pages; Can also be used to capture your visual journey through life track your goals and inspirations, a notebook to create poetry, a journal to write down your reflections or a composition book.
PAPERAGE 48-Pack Composition Notebook Journals, 120 Pages, Kraft Cover with Rainbow Spines, College Ruled Lined Paper, Small Size (8 in x 5.75 in) - For Home, Office or School Supplies ... DND Notebook / Journal, Unique 200 Page Book with 3D Bronze Dragon Embossed Faux Leather Cover with Pen- Ideal for Dungeons & Dragons / D&D. Great RPG ...
Mead Square Deal Journal Composition Book, Wide Ruled, 100 Sheets, 9 3/4" x 7 1/2", Black Marble Price $8.00 ...
Buy Mead Composition, Wide Ruled Comp Book, Writing Journal Notebook with Lined Paper, Home School Supplies for College Students & K-12, 9-3/4" x 7-1/2", 100 Sheets, Black Marble (09910): Everything Else - Amazon.com FREE DELIVERY possible on eligible purchases
Better Office Products Primary Journal, Hardcover, Primary Composition Book Notebook - Grades K-2, 100 Sheet, One Subject, 9.75" x 7.5", Blue Cover-3 Pack Visit the Better Office Products Store 4.8 4.8 out of 5 stars 1,259 ratings