
How To Make A Paper Graduation Cap (Fun 10 Minute Craft)
Summer is basically here because it’s graduation season! I’m super proud of my kids’ academic growth this year. My oldest is graduating from virtual kindergarten so I wanted to do something special and made this fun graduation cap craft for us. I figure we might even make it a yearly tradition.
The craft itself is fairly simple and requires materials you’ll likely have at home anyway. I’ve put together step-by-step instructions and pictures below as well as a template.

* This post includes Affiliate Links.
Materials for Your Graduation Cap Craft
- Graduation Cap Template (below)
- Cardstock Paper for Cap (traditional colors are Black, Blue, White, or Red)
- Construction Paper for Tassel (we used yellow)

How To Make A Paper Graduation Cap
First, let me state that there are two measurement options for creating this cap. One is by measuring by hand, as I did. And the second is by following the template I have created for you. Sign up below to get it by email.
I will explain both in more detail below. But first, the basic instructions:

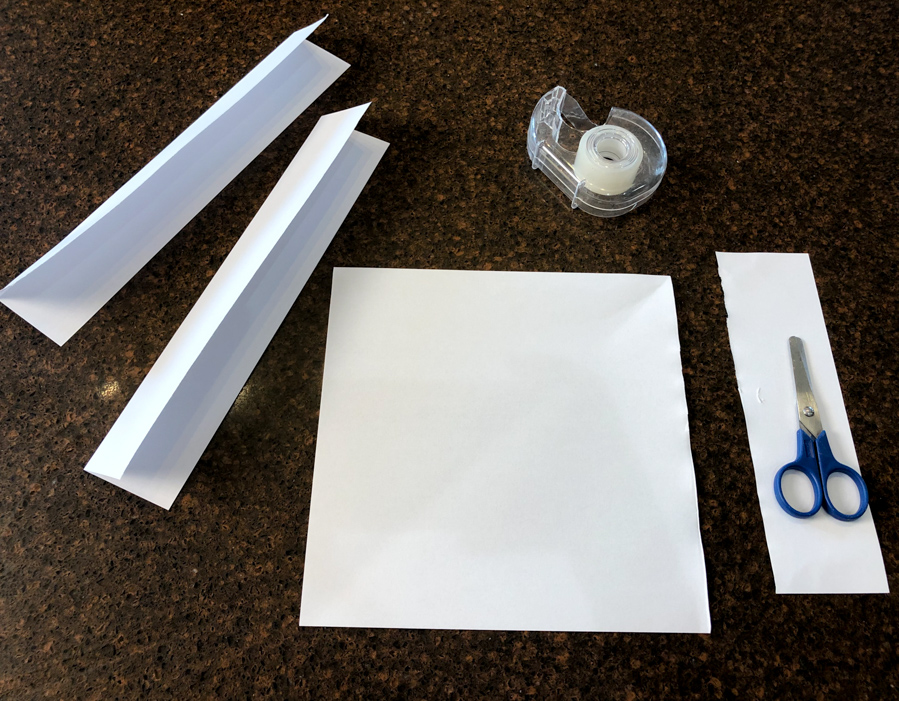
The first step in making your graduation cap craft is to cut out your square Cap Base, two Cap Strips, Tassel Clip, and Tassel. I chose black for my graduation cap and yellow for the tassel.
Next, you’ll glue the tassel and tassel clip (I honestly have no idea what it’s really called) to the center of your cap base, or square.

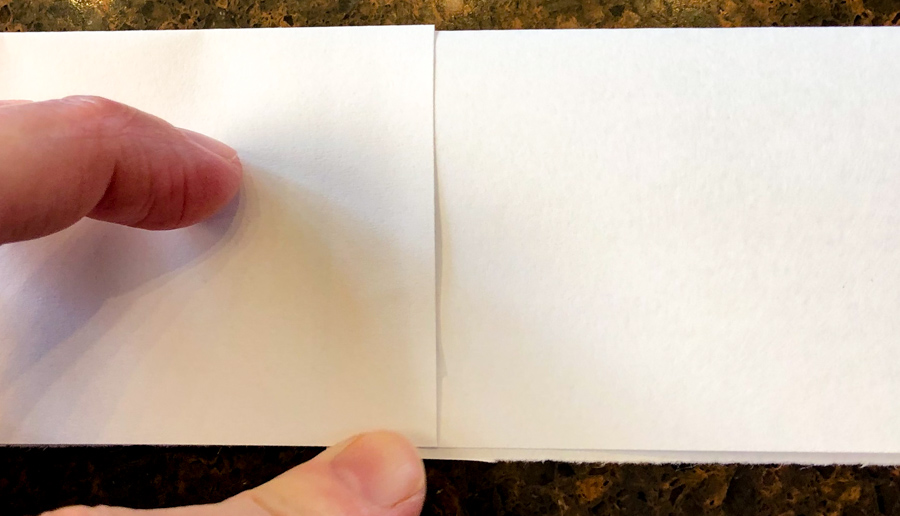
The two cap strips will need to be attached. By overlapping them you can either glue them or tape them. I preferred to tape them because glue often comes apart when bending paper.
Then you will need to fold the top piece of your strips all the way across, as this will be the lip that will attach to the cap.

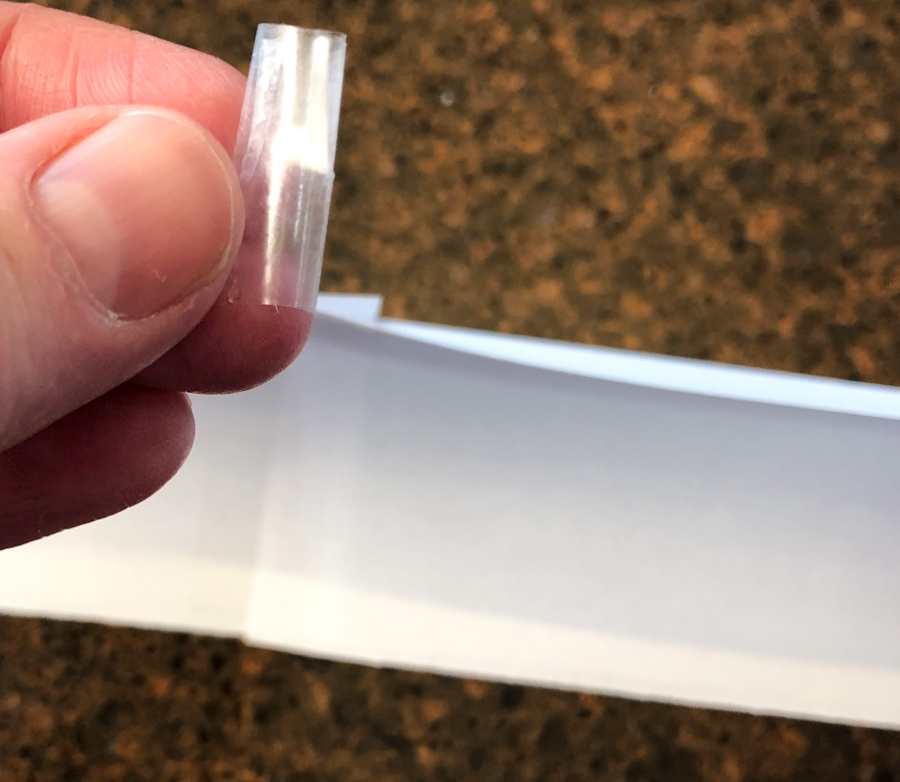
After folding it down, pull it back up to form a 90-degree angle and cut triangle shapes across the lip. This does not need to be perfectly measured but it will allow your strip to bend and form more easily.

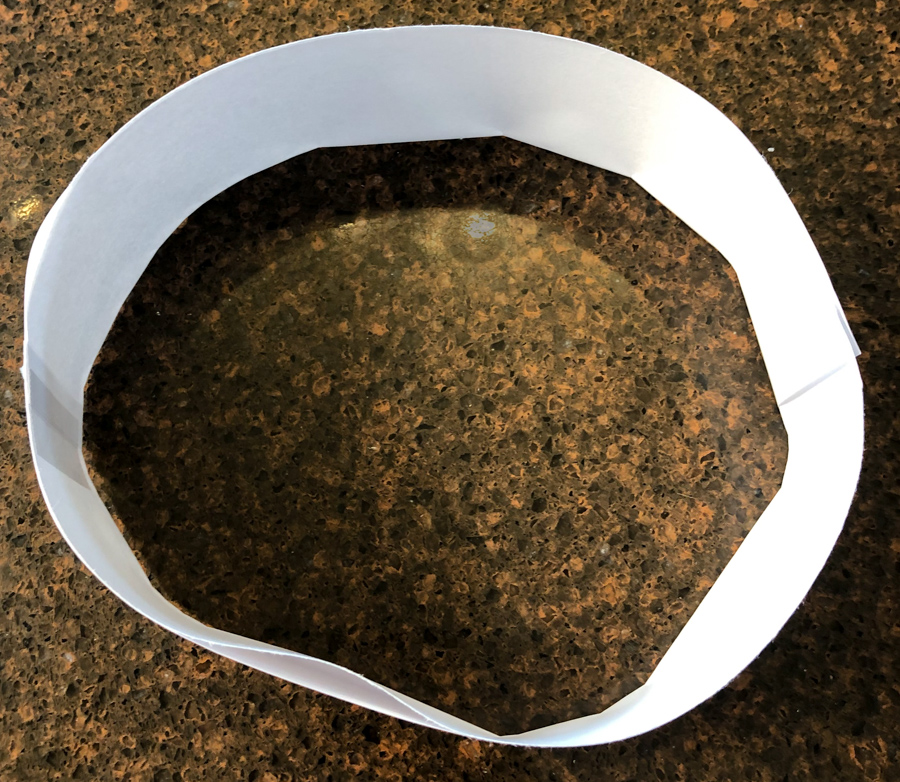
Next, you will need to form the strip into a ring and connect the ends with tape or glue.

The final step is to glue the lip of the cap strip to the bottom center of the cap base. Congratulations, you have a paper graduation cap!

Using The Template vs Measuring By Hand
I promised I’d explain myself. After making this craft myself I wanted to create a template to make it easier for you guys so I included all the parts needed in the file. However, you have the option of simply measuring out your own parts, especially the square, rectangles, and maybe even the circle. The tassel is more of a tricky shape.
So if you choose to follow the template, you will have an 8″x8″ cap with two 2.5″x9.75″ cap strips. But if you prefer to measure by hand, you can simply use the standard paper dimensions (at least in the US) and have an 8.5″x8.5″ cap. Then you can either use the remaining 2.5″x8.5″ for one of the strips and cut out a 2.5″x11″ strip or cut out two 2.5″x11″ strips.
If this confused you and I’ve just sent you back to geometry class, I’m sorry, just ignore this part and refer to the template.
Like this Post? Leave a comment, Share it, pin it!

Looking For Other Craft or Summer Activity Ideas?
- Fun And Simple Turtle Art For Kids Using A Potato Masher
- Simple Penguin Craft for Kids and Toddlers – Paper Handprint Activity
- Teach Diversity with Beautiful Diversity Craft For Kids – MLK Day
- Easy Color Exploration Water Activity That’s Guaranteed To Actually Entertain
- Colorful And Unlimited Fun With Easy Dot Marker Activities For Toddlers
- 70+ Fun Kids Activities You Need At Home Right Now
- 50 Easy and Creative Pool Noodle Activities for Toddlers You Need to Try
- How To Make Tear Free Bubble Foam For Kids

My name is Paula and I’m a mom of two scrumptious cuties. Thanks Mommy Blog became a project for me to help guide other new moms and current moms through any of my own personal experiences and struggles. My hobbies include singing, doing jigsaw puzzles, baking, designing and trying to stay creative.
You Might Also Like

Simple Penguin Craft for Kids and Toddlers – Paper Handprint Activity

Finding The Best Gifts For Four Year Olds

- Search Search Please fill out this field.
- Martha's Blog
- Sweepstakes
- Entertaining
- Graduation Party Ideas
Paper Graduation Cap
Cover round mini boxes with paper in the graduate's school color; top with a matching square envelope and tassel. Stash candy or a class ring in the box, and a big-ticket item (hello, crisp check) in the envelope.
:max_bytes(150000):strip_icc():format(webp)/martha-stewart-fried-chicken-180-d111035_vert-173e3c60cce241afb72c89611640faef.jpg "how to make a paper graduation cap")
Surprise your graduate with a paper gift box made to just like their school's mortar board and tassel. For more ideas, scroll through our entire collection of graduation party crafts and decorations .
What You'll Need
- square-envelope template
- Colored paper
- Craft tape or glue stick
- Round lidded box
- Hemp cord to match paper (Hemptique 100 percent–hemp cord spool, in Blue, Gold, and Lime Green, $7.75 for 62.5 m, hemptique.com)
- Safety pin or needle
Instructions
Download and print the template on colored paper. Cut out the template along solid lines; fold along dotted lines. Tape three flaps to form an envelope, leaving one flap open. Let dry.
Cut out a 1/2-by-10 1/2-inch strip of paper in the same color, and adhere it around the outside of the box lid.
Cut a 1 1/4-by-10 1/2-inch strip of paper in the same color, and adhere it around the outside of the box base.
To make a tassel, cut a 1 1/2-by-3-inch strip of paper in the same color. Make parallel snips along the length of one side, about 1 inch deep. Cut a 10-inch length of cord in a matching color and fold in half. Tape the cut ends of the cord to one end of the strip and roll paper tightly around the cord; secure with tape. Use a pin or needle to poke a hole at the circle in the top center of the envelope. Thread the cord's folded end through hole by 1 inch; secure the inside envelope with tape.
Put a gift inside the envelope; seal the envelope with tape. Tape the back of the envelope to the center of the box lid. Put a gift in the box; top with lid.
How to make a (paper) graduation cap!
Want a cute graduation mortar board cheap and easy for grad parties or kid fun? Here ya go!

The Boy graduated from Pre-K the other day, and they made these cute graduation caps for them. So I reverse engineered it (and improved upon it) to make it into a tutorial for you guys!
These mortar board caps are made from poster board and foam core… easy and fun to celebrate a graduation milestone.
- Black foam core board – about 12 in square.
- Black poster board (cut to 22 in wide x 6 in tall)
- Gold fringe and gold floss (60 inches)
- 1 gold colored brad
- Staples & glue

Staple hat together into appropriate size. (See second photo below).
Center on the square of foam core, and glue down.

Take 48-60 inches of gold floss, and double, and double again, so you have 4 strands. Knot each end.
You have two options here. Either use a 4 inch piece of gold trim, as shown here, or just make a tassel using gold floss.
Fringe version: roll up a length of fringe, then tie with the end of a of your floss.

Putting it together
Use the pointy end of the brad to make a small hole in the center of your foam core. Use a toothpick to press the knot in one end of your floss through the hole. Position the tassel string so that 1 inch or so of the string falls down over the side of the hat. Inside the hat, knot the tassel string if necessary to secure. Stick your brad through the hole in the top of the hat to secure the string as well.
You may trim off the excess floss from the inside of the hat if desired.

Share this:
- PRO Courses Guides New Tech Help Pro Expert Videos About wikiHow Pro Upgrade Sign In
- EDIT Edit this Article
- EXPLORE Tech Help Pro About Us Random Article Quizzes Request a New Article Community Dashboard This Or That Game Popular Categories Arts and Entertainment Artwork Books Movies Computers and Electronics Computers Phone Skills Technology Hacks Health Men's Health Mental Health Women's Health Relationships Dating Love Relationship Issues Hobbies and Crafts Crafts Drawing Games Education & Communication Communication Skills Personal Development Studying Personal Care and Style Fashion Hair Care Personal Hygiene Youth Personal Care School Stuff Dating All Categories Arts and Entertainment Finance and Business Home and Garden Relationship Quizzes Cars & Other Vehicles Food and Entertaining Personal Care and Style Sports and Fitness Computers and Electronics Health Pets and Animals Travel Education & Communication Hobbies and Crafts Philosophy and Religion Work World Family Life Holidays and Traditions Relationships Youth
- Browse Articles
- Learn Something New
- Quizzes Hot
- This Or That Game New
- Train Your Brain
- Explore More
- Support wikiHow
- About wikiHow
- Log in / Sign up
- Hobbies and Crafts
- Hatmaking (Millinery)
How to Make Your Own Graduation Hats
Last Updated: March 20, 2024 Tested
This article was co-authored by wikiHow Staff . Our trained team of editors and researchers validate articles for accuracy and comprehensiveness. wikiHow's Content Management Team carefully monitors the work from our editorial staff to ensure that each article is backed by trusted research and meets our high quality standards. There are 13 references cited in this article, which can be found at the bottom of the page. The wikiHow Video Team also followed the article's instructions and verified that they work. This article has been viewed 211,910 times. Learn more...
Making a graduation hat can be a fun thing to do if your kid is graduating from kindergarten or elementary school, for instance, or if you want to take graduation pictures before you have your actual hat. You can create a simple hat from poster board and foam core board or cardboard. To complete the look, add a tassel. Alternatively, take some time to decorate a pre-bought graduation hat so you'll stand out from the crowd.
Things You Should Know
- Quotes, song lyrics, illustrations, and puns are all popular options for graduation hat decorations.
- You can construct your own graduation cap out of poster board , construction paper , and hot glue .
- To make the cap, fold the construction paper in half lengthwise and roll it into a cylinder; add a square-shaped piece of poster board on top.
- You can make a tassel using gold yarn and embroidery floss .
Decorating a Graduation Hat

- For instance, you could write "earned it!" if you're becoming an registered nurse or add an apple or ABC's if you're going to be a teacher.
- You could also just paint on one of your favorite characters, flowers, or animals and the year you graduate.
- Many hats focus on the adventure that awaits ahead.

- You can find a wide range of scrapbook paper in single sheets at your local craft store.

- For more oomph, make your hat 3D. Glue on silk flowers, pompoms, feather, or rhinestones, for instance.
- Alternatively, use stick-on letters.
- If you have a vinyl cutting machine, you can cut out professional-looking letters to stick on your hat.
Creating a Graduation Hat
- If you want to make sure the hat will be form-fitting, wrap a piece of string around your head and measure the length with a ruler. Then, add 2 inches (5.1 cm) for overlap. That will be the long side you measure on the poster board.
- Children's hat sizes range from 20 inches (51 cm) for preschool kids to 22 inches (56 cm) for teens. Don't forget to add 2 inches (5.1 cm) or so for overlap.
- You can also use construction paper.
- Wrap the long side around your head (or the person you're making it for) to see if it fits with a little overlap. If it's too long, you can trim a bit off.
- Basically, you need to fold the edge of the paper up 1 inch (2.5 cm) or so along the long side of the paper. You can measure this out and fold it that way if you prefer.
- You should end up with flaps sticking up from the fold every 2 inches (5.1 cm) or so.
- You can run a glue stick along the edge or use basic white school glue. A hot glue gun would also work, but always be careful when applying hot glue! It can burn your fingers.

- You can find foam core board at most craft stores and big box stores. Alternatively, cover a piece of cardboard with black paper.
- If you're having trouble cutting the foam core with scissors, use a craft knife to cut along the lines. Always cut away form you and make sure there's something underneath the board so you don't scratch the surface you're cutting on.
- You can use glue sticks or regular school glue.
- If you want to add a tassel, wait to glue this piece on.
- You can also use a small brad instead, inserting it through the top of the hat. [12] X Research source
Making a Tassel

- You can add other colors by cutting off one color and wrapping a different color on the next go round.
- You can also use a form instead, such as a piece of cardboard you cut to size.
- To tie a square knot, wrap one end over and under the other end, then do the same with the other end, pulling them both tight.
- This creates the fringe for your tassel.
- Tuck the ends of the knot under the wrap.
- Run your fingers through the tassel to make sure you got all the longer pieces.
- At this point, you can glue your foam core board button on top of the string and the hole to hold it in place. Hot glue will work best, but you can also use school glue.
- To create an overhand knot , make a loop with both strings together as one string, then pull the end through the loop on the other side.
Community Q&A
Things You'll Need
Creating a paper and cardboard graduation hat.
- Poster board or construction paper
- Foam core board
- Glue or glue sticks
- Needle or toothpick
- Scrapbook paper
- Stickers or printed images
- Pompoms, flowers, feathers, or rhinestones, optional
- Sticker or vinyl lettering, optional
- Make sure your school doesn't have rules against decorated graduation caps. You don't want to put in all that work and then need to switch to a plain hat. Thanks Helpful 0 Not Helpful 1

You Might Also Like

- ↑ https://www.seventeen.com/life/school/a17779/decorated-graduation-caps/
- ↑ https://www.hercampus.com/school/u-mass-amherst/how-decorate-your-graduation-cap-tips-tricks-ideas
- ↑ https://dabbled.org/how-to-make-a-paper-graduation-cap/
- ↑ https://www.youtube.com/watch?v=r6fZnWeysSY&feature=youtu.be&t=44
- ↑ https://www.youtube.com/watch?v=r6fZnWeysSY&feature=youtu.be&t=65
- ↑ https://www.youtube.com/watch?v=r6fZnWeysSY&feature=youtu.be&t=86
- ↑ https://www.youtube.com/watch?v=r6fZnWeysSY&feature=youtu.be&t=188
- ↑ https://www.youtube.com/watch?v=Yt16p3XTqBA&feature=youtu.be&t=14
- ↑ https://www.youtube.com/watch?v=r6fZnWeysSY&feature=youtu.be&t=271
- ↑ https://www.youtube.com/watch?v=Yt16p3XTqBA&feature=youtu.be&t=41
- ↑ https://www.youtube.com/watch?v=n2pIqhQTdIM&feature=youtu.be&t=87
- ↑ https://www.youtube.com/watch?v=n2pIqhQTdIM&feature=youtu.be&t=138
About This Article

- Send fan mail to authors
Did this article help you?

Featured Articles

Trending Articles

Watch Articles

- Terms of Use
- Privacy Policy
- Do Not Sell or Share My Info
- Not Selling Info
wikiHow Tech Help Pro:
Develop the tech skills you need for work and life
- Craft Search
- Valentine's Day
- St. Patrick's Day
- Mother's Day
- Father's Day
- Fourth of July
- Thanksgiving
- Preschoolers
- Polymer Clay
- Tin Can Crafts
- Paper Plate Crafts
- Safety Pin Crafts
- All Occasions
- Beach Crafts
- Candle Crafts
- Cricut Projects
- Handprint Crafts
- Recycled Crafts
- Beaded Safety Pins
- Crafting for Profit
- Embossing Powders
- Jewelry Making
- Pumpkin Carving
- Scrapbooking for Beginners
- Submit a Craft
Paper Graduation Cap
Graduation gifts to make.

This paper graduation cap is a clever craft made from folded construction paper.
There are many way this little cap can be used, with some imagination. The graduation cap can be used on top of a wrapped gift package for the graduate. They also look great at graduation party decorations (they can be made in any size) or as party favors. It is also a cute gift for teachers to give out to their children who are "graduating" from preschool!
Be sure to use school colors!
However you choose to use the hat, you will definitely enjoy how simple this craft is to put together.
Materials Needed:
- 8.5 x 8.5 inch square piece of construction paper or card stock.
- 11.5 x 2 inch strip of construction paper or card stock
- 6 inch piece of yarn
Paper Graduation Cap Instructions
1. Begin by folding in one corner of the square piece of paper. Continue with the next three corners, folding them in to meet in the middle. Follow the photos below for help.

2. You will now have a smaller square. Begin to do the same thing again, folding each corner into the center. Use the photos below for guidance.

3. Next, take each flap in the center, and fold it back upon itself until the corner point reaches the edge of the square. Do this for all four flaps. The top of the graduation hat is done. These four "flaps" will serve as the anchors to attach the headpiece to.

4. To make the headpiece, fold the 8.5 x 2 inch strip of paper in half, lengthwise.

5. Place each of the "flaps" from the top of the graduation cap inside the fold of the headpiece strip, as shown. Staple to secure.

6. Punch a hole at one corner of the cap for the tassel.

7. To make the tassel, make a knot about one inch up from one end of the yarn. Then, unravel the yarn from the knot to the end to create a tassel.

8. Tie the tassel through the hole you made in the cap. Your graduation craft is complete!

Comments by Others
by msbroyo (New Jersey) "I gave my senior high school students Blow Pops with these little caps on them. It's one of the many end of the year treats I have planned. Perfect directions. Thanks!" Response from Crafts For All Seasons: Wow! What a great idea... thank you for sharing msbroyo!
Would you consider a small donation?
You will receive my craft ebook as a thank you!

Every little bit helps! If you are enjoying this site, would you consider making a small donation? I use the extra money to help with the cost of craft supplies! With any $5.00 donation or more, you will receive my 650 page ebook full of 178 craft tutorials from this site. Thank you for your consideration!
Click here to learn more about the book, and to make a donation .
Facebook Comments
Like this Site? Please share the Love!
You can follow me here:

I invite you to subscribe to
The Creative Crafter
The Creative Crafter is my quarterly newsletter that is emailed four times per year. It lets you know about any new additions to the site. As a bonus, you will get a new craft project in your email that only subscribers get to see.
Submit a Craft • Share This Site • About Me • Contact Me • Privacy Policy
Copyright © 2007–
- Video Library
- Monthly Collection
- Craft Academy
- Paper Flowers
- Felt & Fiber
- Kid's Crafts
Paper Graduation Cap

- Copy Link
Join our email list to learn about new projects, discounts, and membership perks!
Goodies You Can't Google
You've found a member-exclusive project. But for less than the price of a fancy coffee... You'll get instant access to this and over 2,000 other premium projects inside the Lia Griffith membership!

Assembling a paper graduation cap is so simple and can be used in so many ways. All you need is black card stock to make your cap, which you can find at any local craft store. Begin by downloading our template below. Use the PDF file if you are cutting by hand, or the SVG if you are using a cutting machine. The download includes the template to make the band for the cap, as well as the circular piece for attaching your tassel. Cut the template out on card stock and adjust the band to fit the head size of the person or child who will be wearing the paper graduation cap. The pointy part of the band should be in the front of the cap so that it rests on the person’s forehead. Assemble the band using glue or tape, and fold the top flaps inward. Then, take a square sheet of black card stock and attach it on top of the folded flaps. The top of our cap measures 10 x 10 inches. Next, add the circular piece to the top of the cap. We cut two circular pieces of card stock using the template. Stick a brad (also known as a paper fastener) through one of the circular pieces, and then glue the second circular piece on top to cover the brad. Poke the brad through the center of the top of the cap and secure it.
Now that your paper graduation cap is assembled, you can add a tassel to complete the project. Of course, we had to go with our favorite metallic color, copper. To match our paper cap, we decided to make a tissue paper tassel, but this would also look great with an embroidery floss tassel! For our easy technique to make professional DIY tassels, find our step-by-step photo tutorial here . This tutorial is for an embroidery floss tassel, but you can use the same process to make your tissue paper tassels. Simply tie your tassel around the circular center piece of the cap, and the cap is ready for wearing! I love the idea of seeing these adorable paper caps at a kindergarten graduation. Or, they would look great to use as decor for your graduation party. If you are hosting a celebration for your graduate, be sure to also check out our editable graduation party invitations! Congrats graduates of all ages! ~ Lia

All the Goodies You Can't Google 🎁
Tired of scrolling endlessly for the perfect project? Save time, money, and Google-induced headaches with us! Our membership makes it easy to create beautifully finished crafts without needing to look all over the internet for ideas and materials or spend lots of money on individual videos and templates.
Already a member? Click here to log in.
Ask Lia or the community!
Leave a comment cancel reply.
Your email address will not be published. Required fields are marked *
Save my name and email in this browser for the next time I comment.
Member Login
Email Address
Remember Me
Let your creativity bloom!

Join our email list to get a free flower crafting project bundle . Create four pretty peonies with the materials you already have on hand - in 60 minutes or less.
Your fresh picked peony projects are on the way to your inbox!
Continue Download?
This will use up one of your extra projects for the month.
Save posts to your craft room with the Lia Griffith membership.
Enjoy your freebie.
Join our email list to instantly download this freebie and get more DIY inspiration delivered to your inbox.
- Email Address *
- Hidden download_url
Already a member? Log in to get this freebie.

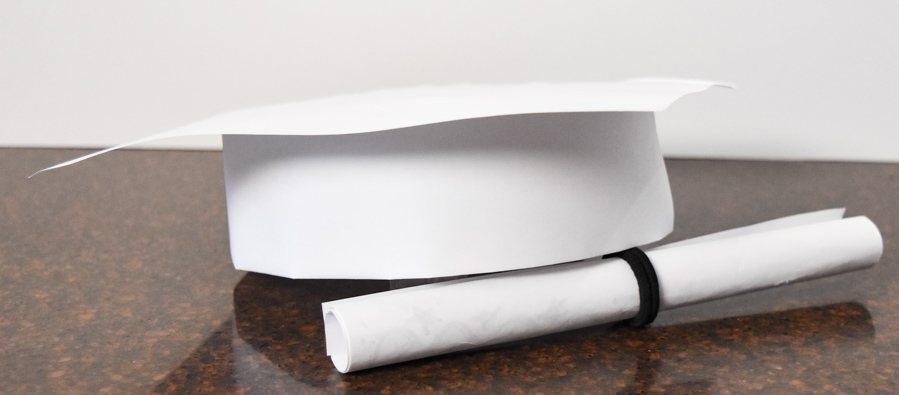
How to Make a Graduation Hat and Diploma out of Printer Paper
Posted on Published: May 21, 2020

Share to Your Social Media
This tutorial will show you how to make a graduation hat and diploma out of printer paper and tape. It is very easy and inexpensive. It’s a great craft for kids.
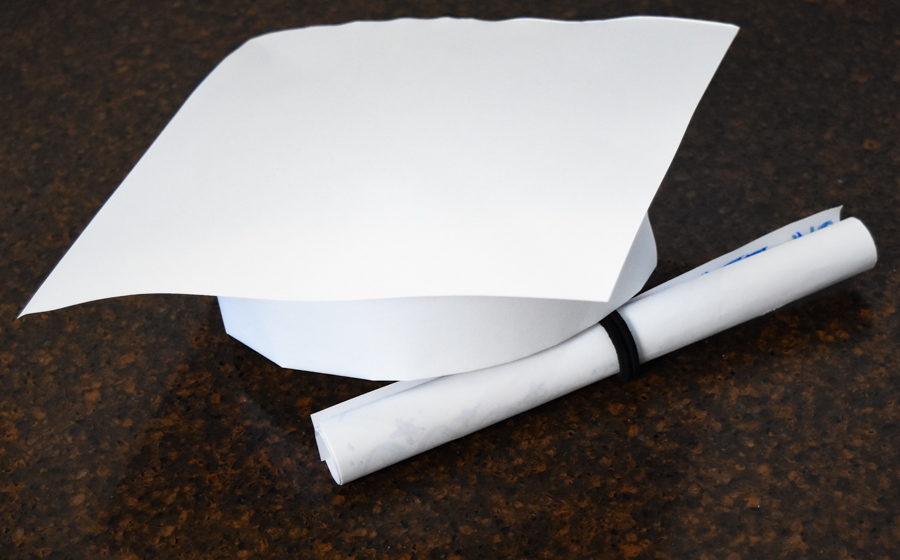
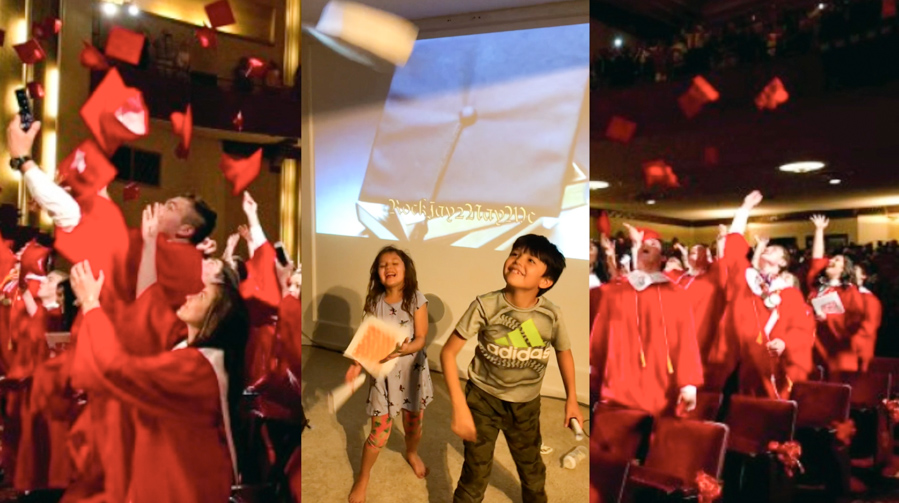
These caps are customizable. My daughter had a lot of fun decorating her graduation cap. You can see how we used them in our At-Home Graduation ceremony video below.

2 sheets of regular printer paper tape scissors
Instructions: How to Make a Graduation Hat and Diploma out of Standard Paper
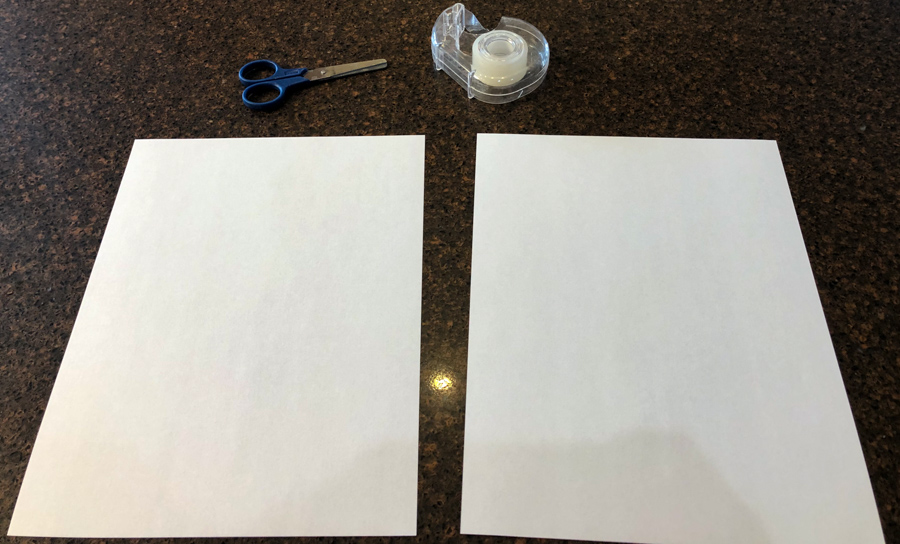
1-Fold first paper into a square. The way I did this was match one corner to the side to form a square——without creasing it!

Then bring the bottom up and fold it in place to form a perfect square.

Next, fold the second sheet of paper into fourths hot dog/length-wise.
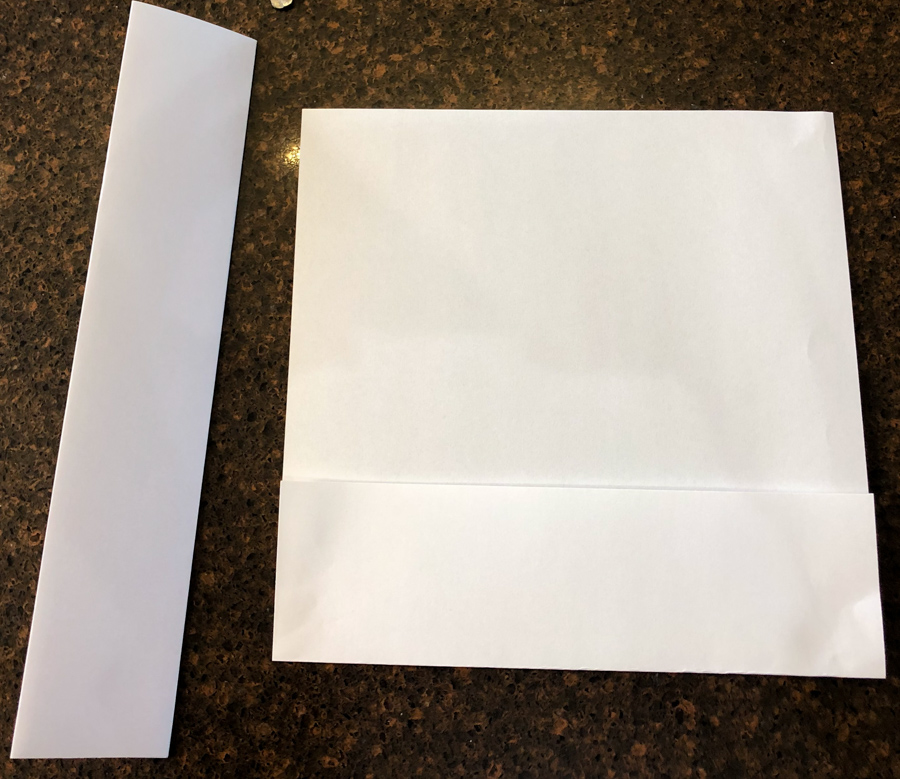
Cut the square out. Then cut down the middle crease of the paper folded into fourths to create two identical folds.
Tape the two identical pieces together. I taped them together on the inside and put a roll of tape on the outside so it remained concealed.
Using small rolls of tape on the outside edges allows you to tape the pieces together without it being seen.
Measure your child’s head and connect the two ends together. If you child has a bigger head, you will want to take that extra piece of paper left over from the square piece and use it as an extender. You will make another similar width folded piece of paper and tape it all together to fit your child’s head.
Set the rim on the paper about an inch on all four sides. I positioned the cut-rough edge of the square in the back and the taped seems of the rim towards the sides.

- Optional- use yarn or string to form a tassel and tape it to the middle of the cap.
That’s is it. So super easy isn’t it?

How to make a diploma out of printer paper:
1 sheet of printer paper a ribbon, rubber band, small piece of tape or hair tie to keep it rolled up Marker
Instructions:
- On a piece of paper write something like: Congratulations! You have successfully graduated from ___ grade! Presented to_____ year ______.
- Roll it up like a scroll and use a ribbon, rubber band, small piece of tape or hair tie to keep it rolled up.
I think easy is an understatement for this craft.
Making both the cap and diploma is simple and inexpensive! Yet it is very versatile craft. You can decorate it, use different colors of papers, put stickers on it etc.
It would be a fun craft to do with the kids!
Check out our At-Home Graduation party video:
How to Make a Graduation Hat and Diploma out of Standard Paper
Easy, simple craft that is fun for kids to receive, make, and decorate.
For the Cap:
- 2 sheets of regular printer paper
- Optional: string to make a tassel.
For the Diploma:
- 1 sheet of printer paper
- ribbon, rubber band, string, hair tie, piece of tape.
Instructions
- Fold first paper into a square. the way I did this was match one corner to the side to form a square——without creasing it! Then bring the bottom up and fold it in place to form a perfect square.
- Fold the second sheet of paper into fourths hot dog/length-wise.
- Cut the square out. Then cut down the middle crease of the paper folded into fourths to create two identical folded pieces of paper.
- Tape the two identical pieces together. I taped them together on the inside and put a small roll of tape on the outside so the tape remained concealed.
- Using the taped paper fit it to your child's head. Once you know where to connect the ends (to fit your child's head), connect the two ends together.
- Set the rim on the paper about an inch on all four sides. I positioned the cut-rough edge of the square to be in the back and the taped seems of the rim towards the sides.
If your child has a bigger head than two paper lengths, use a piece of paper folded and cut to the same width to extend the rim to how you need it.
Recommended Products
As an Amazon Associate and member of other affiliate programs, I earn from qualifying purchases.

Did you make this project?
Please leave a comment on the blog or share a photo on Pinterest

For other ‘rich living’ tips and holiday recipes, please subscribe, like me on Facebook , and follow me on Pinterest and Instagram .

SUBSCRIBE FOR OUR EMAILS
Trending Post : Best Printer for Crafting & Party Favors

How to Make a Graduation Cap Topper
Congratulations on graduating or celebrating someone who is! If you’re looking to learn how to make a graduation cap topper , you’re definitely in the right place! Making a custom graduation cap topper is a great way to add a unique, personal touch to your graduation look and I’m going to show you how.
There are a few different ways you can make personalized DIY graduation caps . You could go the arts and crafts route and decorate it using scrapbook paper in the school colors, add a sparkly border to the edges of the topper, paint it with acrylic paint. Or you could use your Cricut machine and glitter cardstock to cut out the base, a custom quote or characters.
But when I make a grad cap topper, I try to keep it simple. So I’ll be showing you the easy way how to make a printable graduation cap topper. Below you’ll find step by step instructions to make your graduation cap design and how to attach your topper to your own cap.
VISUAL LEARNER? SCROLL BELOW OR CLICK HERE FOR THE VIDEO TUTORIAL
How to Make a Graduation Cap Topper Steps
1. gather your supplies..
You’ll need a computer, laptop or mobile device. In addition, scissors, exacto knife or compass circle cutter, an inkjet printer and glossy cardstock (8.5×11 or 11×7-if your printer is wide format) and a self healing mat (or old cardboard box/sheet). You’ll also want to have double sided adhesive. I recommend glue dots/strips for a raised look or double-sided tape .
Shop the Supplies

2. Choose or Create Your Design.
If you’re short on time, you can choose to grab an instant download premade printable graduation topper. The sizing and design is already done for you, all you have to do is print, trim and adhere. If you don’t feel as if you’re creative enough to design yourself, there are shops that accept custom orders for printable designs in any theme you choose.
But if you’re up for doing it yourself, you can create your design from scratch using a blank Canva template . The center small circle of the template represents the tassel button and is .75 inches. The graduation cap base is sized at 8.3 inches. When designing, make sure important elements do not cover that area, because it will be cut out.

When designing, you can upload your own photos, graphics, and fonts to make it more personable. I recommend the free trial pro version of Canva so you can have access to all fonts and graphics. When designing, first choose your background color or design. Then add text, such as a quote or your graduation year. Finally, don’t forget graphics or your graduation photos to complete the design.
After you’ve finished designing, be sure to download it.
3. Print & Cut
I recommend printing on 8.5×11 glossy cardstock. When printing on glossy cardstock, you must use a rear paper feed. Also, ensure you got to your printer settings and set the paper type to “Photo Paper Glossy” or if you have a HP printer set it to “HP PHOTO”.
Once you’ve printed, trim the excess white edges off with scissors or a paper trimmer. Then you want to cut the inner circle out. Some people use a sharp blade, such as an exacto knife. However, I personally use and recommend a compass circle knife.

4. Attach to Cap
Next, attach the topper to the top of the cap . Remove the tassel first, then ensure the tassel holder button fits through the center hole. Add the tassel back on top. Some people use hot glue. I suggest glue dots or double sided tape , instead. These options are great, because it makes the cap topper removable, which is helpful if school administration has strict rules for their high school graduation or college graduation.
5. Finishing Touches.
At this point, you’re finished! If you want to add a little extra razzle dazzle you could attach flowers, bling, fur, chains, pearls, plushies (I’ve seen it all) Go ahead!

With the steps provided, now you should know how to make a graduation cap topper. Having a little personalization on your big day is a small but special way to celebrate and honor yourself and others for the hard work it took to get here. And if you’re looking for more graduation crafts, check out this graduation class ring pop .
The latest on Youtube:
Quick note:.
Love pretty, parties, crafts and free? All that I ask is that you don’t be a stranger and CLICK HERE to follow me on INSTAGRAM or subscribe to my YOUTUBE channel . If you think your friends might like it, share the link to the post and pin the image below. Do that, and you can expect tons more freebies, tutorials, party inspiration, recipes and recommendations!
LIKE WHAT YOU SEE? PIN IT USING THE IMAGE BELOW!

Similar Posts

How to Make DIY Cupcake Toppers

Party Printables Paper: Paper Guide for DIY Ideas

Foil Crafting: How to Make Foiled Paper Crafts

Black History SVG free

Printable Play Money Template: Make Your Own in Canva

Glowforge vs Cricut: Ultimate Comparison Guide 2023
Leave a reply cancel reply.
Your email address will not be published. Required fields are marked *
How to DIY Your Graduation Cap

Introduction: How to DIY Your Graduation Cap

So I am graduating this semester and was reminded of decorating my graduation cap. I began to look up videos and how-to’s, but none of them really helped me, so I decided to make my own Instructable!
*Note: There are two options of decorating caps- directly on the cap and on cardstock paper to attach onto the cap. This instructable is for the latter.
Step 1: Materials

All materials are from Joann’s. Compared to Amazon, searching for similar supplies, I saved around $20! As I mentioned in the past Instructable, plan ahead so you can save the best coupons and make a single trip.
- Old Scrapbook Paper
- Scrapbook Paper- Darice Cardstock (12 x 12, #2 Black Midnight) for $0.99/piece
- Red Flowers*- Allstate Flower Stem (30”, Hydrangea Spray) for $8.99 original
- Pen-touch, Permanent Paint Marker, Fine point for $2.99 original
- DecoColor**, Oil Base Paint Marker, Extra Fine point for $4.99 original
- Paintbrush- Gold Taklon Fiber (Short flat brush) for $2.49
- Silver, 0.6 oz, Fine for $0.99
- Gold, 0.75 oz, Extra Fine for $1.99
I ended up not using the white paint that was in the picture.
*Flowers: The flower stem was 30” long! I immediately chopped off the stem since I knew I would not be using the stem or the huge leaves on my cap. These flowers are small and simple! They’re quite expensive, but I would suggest getting the stemmed ones (~$8-10 originally) which have plenty of flowers and varieties and are cheaper than the wreath or dangling types ($15-18 originally).
**DecoColor marker: This pen started out fine, but for some reason, whether through a long time of not being used, the cap got stuck! I tried to pry the cap off with scissors, pliers, etc. but it was completely stuck. I ended up tossing it and just using the Pen-Touch, so I would suggest not wasting your money.
***Glitter Pics: The silver glitter ($0.99) was perfect amount and cost but they were out of the same type in gold! I was offered the gold in the pic as an option and I thought, “Why not! Sparkling silver and glittering gold, maybe the different size/texture will be good.” In the final steps of adding glitter, I learned that "extra fine" glues on better and forms more clear words.
Step 2: Idea Planning

Decide what you want on your cap, whether it’s a picture(s), a quote, a catchphrase, etc. I already knew I would use a quote about a book or from a book, so I just needed a few choices to narrow down.
The full quote I chose is, "One must always be careful of books and what is inside them, for words have the power to change us," from Clockwork Angel by Cassandra Clare. I sketched the words out a few times on paper and it felt too long, so I shortened it to, "One must always be careful of books... for words have the power to change us."
Note- I had searched on Pinterest, Instagram, etc. for ideas and @kimscustomcaps on IG was very helpful for basic instructions and ideas.
Once my idea was set, I used a Word doc to draft out how my cap could look in terms of word positioning and colors. This was very helpful to me and it gives you the chance to play with different fonts, colors and any inserts, which no other tutorial suggested.
Step 3: Sketching

Now actually sketch it out to size. I used an old piece of scrapbook paper and a pencil and lightly sketched what I wanted. Now you will have a better scale to work with and this can be done before any shopping. Joann's sells single sheets of cardstock if you already know you don’t need a pack but I bought two sheets to be safe.
Step 4: Main Quote/Idea

With my cardstock and materials now ready, I cut the cardstock to size (9.5 x 9.5). Joann’s cardstock is good because the base (what the paper is made of) is also black, so the edges are black as well, despite being cut. I sketched a border and lines to have a clear idea of where my writing would be. The Pen-Touch pen is pretty nice- the two pics show the difference between 1 layer versus 4 layers.
Step 5: Glitter TIme

I filled out the entire quote with the Pen-touch and silver and gold Bic markers, but with the markers, I also outlined them with black.
Now it was glitter time! I used three small cups for the glitters and one for water to dilute the glue, which I used a paintbrush to paint onto the gold and silver letters. This process of painting glue, pouring glitter, and knocking off loose glitter was time-consuming. I would suggest- if you have time- to let the glue dry a bit before checking bald spots and adding more glue and glitter.
*There is a slight difference in the “one” because I redid it, but the process is the same.
Step 6: Finalize

Final product! I added glitter word by word. The extra fine gold stayed glued much better than the fine silver and the words came out much clearer as well, so I would suggest find extra fine glitter if you plan to glue and glitter. I had extra gold ribbon which I used for the border and came out very nicely. The ribbon and flowers were both glue-gunned on, and the books around the border were simply written in one layer with the Pen-Touch pen.
To attach the cardstock onto the cap, I used a Xacto knife to cut a "+" shape into the circle, then cut off the triangles so there was a diamond shape in the circle. I fit and adjusted the size of the diamond as much as possible to fit it onto the cap. Be careful about making cuts too big or you'll have a small hole. If your cardstock is the same color as your cap- no big deal.
Recommendations

Fix It Contest

Made with AI - Autodesk Design & Make - Student Contest

Remake It - Autodesk Design & Make - Student Contest

- Skip to primary navigation
- Skip to main content
- Skip to primary sidebar
- Crochet Patterns
- Sewing Patterns
- DIY Projects
- Pallet Projects
- Home Organization
- Kids Crafts
- Drawing Ideas
- Fashion & Beauty
- DIY Cat Projects
- DIY Dog Projects
- DIY Wedding Projects
- Jewelry Making Ideas
- Inspiration
- Parenting Tips
15 Unique DIY Graduation Cap Ideas and Decorations
Looking for creative ways to make your graduation cap stand out? Our guide offers 15 unique DIY graduation cap ideas and decorations that will help you personalize your cap for the big day. From simple designs that reflect your major to more elaborate decorations showcasing your future plans or cultural pride, we provide all the tips you need to make a memorable graduation cap.
Not only do we cover design inspirations, but we also delve into practical aspects such as cost analysis and sustainability tips for crafting your cap. Whether you’re interested in keeping your project eco-friendly or ensuring your cap decorations last, our comprehensive guide has you covered.
Keep reading to discover how to craft a cap that truly represents you and makes your graduation day even more special.

How to Make a Paper Graduation Cap for Kids
Graduation is a joyful occasion that marks the completion of a significant phase in one’s life. It’s even more special for kids, as it celebrates their academic milestones in a fun and memorable way. Making a DIY graduation cap for kids is a fantastic project that not only fosters creativity but also makes the little ones feel proud of their achievements. Follow this easy, step-by-step guide to crafting a paper graduation hat that’s perfect for children. This project is inspired by a helpful tutorial from Ms. Arjuna Art and Craft, dedicated to providing an enjoyable craft experience.
Materials Needed:
- Black chart paper
- Woolen thread
Step-by-Step Guide:
- Prepare the Base:
- Start by measuring the child’s head to determine the size of the cap’s band. Use the black chart paper to make a strip that fits comfortably around their head.
- Forming the Top:
- Cut a square piece from the black chart paper. This will serve as the top of the graduation cap. A good reference size is a 12×12 inch square, but you can adjust it based on the size of the headband.
- Attach the Top to the Base:
- Secure the square piece to the center of the headband using glue or tape. Ensure it’s well-centered so that the cap looks symmetrical when worn.
- Making the Tassel:
- Take the woolen thread and cut a length of about 20 inches. Fold it in half several times until you have a small bundle. Tie one end together, leaving a loop for attachment.
- Cut through the loops at the opposite end to make the tassel fringes. Adjust the length of the tassel according to your preference.
- Adding the Tassel to the Cap:
- Attach the tassel to the center of the square top, ensuring it’s securely fastened. You can use glue or a small piece of tape.
- Final Touches:
- Adjust the tassel so it hangs off one corner of the cap. Double-check all glued parts to ensure they’re secure.
Video Tutorial
For a step-by-step video tutorial on how to make a paper graduation hat for kids, check out this YouTube video by Ms. Arjuna Art and Craft .
It pairs well with this written guide, offering visual steps that complement each point made here for an engaging and easy crafting session.
Making a DIY graduation cap is not just a fun activity but also a fantastic way to celebrate your child’s accomplishments. With simple materials like black chart paper and woolen thread, you can make a memorable keepsake that cherishes their educational journey. By following these steps, you’ll craft a beautiful graduation cap that’ll make the occasion even more special for your little one.
Personalization Ideas for Your Graduation Cap
Graduation is a significant milestone, and personalizing your cap can make the day even more memorable. Here are some creative ideas to help you design a cap that’s as unique as your journey.
Reflect Your Major
Use symbols, tools, or elements that represent your field of study. For example, if you’re a literature major, consider a famous quote from your favorite book. Science majors might include an iconic formula or a DNA helix.
Inspirational Quotes
Choose a quote that inspires you or has been your mantra throughout your studies. It could be from a historical figure, a line from a movie, or even something a professor said that stuck with you.
Thank Your Supporters
Use your cap to express gratitude to those who’ve supported you—parents, friends, or mentors. A simple “Thank You” or “Couldn’t Have Done It Without You” can be very touching.
Showcase Your Future Plans
If you’ve already lined up a job or have future academic plans, let your cap tell the story. Phrases like “Next Stop: Med School” or “Ready to Teach!” share your excitement for what’s ahead.
Add a Touch of Humor
A little humor can go a long way. A witty pun related to your major or the graduation process itself can lighten the mood and make people smile.
Cultural Pride
Celebrate your heritage with designs that reflect your cultural background. Traditional patterns, flags, or national symbols are great ways to honor your roots.
Use School Colors and Mascot
Incorporate your school’s colors and mascot into your design. This not only shows school spirit but also creates a sense of unity with your fellow graduates.
Include Hobbies or Passions
Whether you’re an artist, a musician, or an athlete, your hobbies have been a part of your life during your studies. Illustrate these passions on your cap to show off the multifaceted nature of your personality.
Don’t limit yourself to flat designs. Use fabric, foam, or other materials to make a 3D effect that stands out. Just make sure it’s secure and won’t fall off during the ceremony.
Keep It Classy
Sometimes, less is more. A sleek, elegant design can be just as impactful. Consider using calligraphy for a sophisticated touch or a simple border for a clean look.
Your graduation cap is a canvas to express your individuality. Have fun with it, and don’t be afraid to let your personality shine through!
Cost Analysis of DIY Graduation Caps
Making a DIY graduation cap can be a fun and cost-effective way to celebrate your achievement. Here’s a breakdown of the potential costs involved, so you can plan accordingly and maybe even save some money.
You’ll need a plain graduation cap as your base, which can cost anywhere from $5 to $20, depending on where you purchase it. For decorating, you might use items like fabric paint, glitter, foam letters, or rhinestones. These materials can range from $1 to $5 each.
Basic tools like scissors, glue, and markers are often already available at home. If not, they’re quite affordable, with prices typically under $10 for a set.
Your time is valuable! While it’s hard to put a price on it, consider the hours you’ll spend crafting your cap. It’s a labor of love that adds personal value to your graduation attire.
Comparison to Pre-Made Caps
Pre-made decorated caps can range from $30 to $100 or more. By making your own, you not only save money but also get a one-of-a-kind cap.
Budget Tips
- Reuse and Recycle : Look for materials you already have at home or ask friends and family if they have supplies they no longer need.
- Dollar Stores : These stores can be a treasure trove for affordable crafting supplies.
- Sales and Coupons : Keep an eye out for sales at craft stores and use coupons to get discounts on materials.
Final Thoughts
A DIY graduation cap not only allows you to express your creativity but also helps you stick to a budget. With a little planning and some savvy shopping, you can make a cap that’s both affordable and meaningful. Congratulations on your graduation!
Sustainability Tips for Your Graduation Cap
Graduation is not only a time for celebration but also an opportunity to make a positive impact on the environment. Here are some sustainability tips for making an eco-friendly graduation cap.
Choose Sustainable Materials
Opt for recycled or biodegradable materials when decorating your cap. Consider using recycled paper, fabric scraps, or natural elements like dried flowers.
Reuse and Upcycle
Before buying new materials, see what you can repurpose. Old jewelry, buttons, or beads can add a unique touch to your cap and reduce waste.
Non-Toxic Adhesives and Paints
Select adhesives and paints that are labeled non-toxic and eco-friendly. These products are better for the environment and safer for you to use.
Digital Decorations
Instead of physical embellishments, make a digital design that can be printed on eco-friendly paper. This reduces the need for plastic-based decorations.
Borrow Tools
If you need tools like scissors or glue guns, borrow them from friends or family instead of purchasing new ones. This helps minimize resource consumption.
Plan Your Design
Careful planning can reduce waste. Sketch your design beforehand to avoid mistakes that might require starting over with new materials.
Encourage Group Crafting
Organize a cap-decorating party with classmates. Sharing materials and tools can cut down on individual costs and waste.
Donate After Use
Once the ceremony is over, consider donating your cap to future graduates or organizations that can repurpose the materials.
Spread the Word
Share your sustainable cap creation process on social media. Inspiring others can multiply the positive environmental impact.
By following these tips, you can proudly display your commitment to sustainability on your graduation day. Your cap will not only look great but also stand as a testament to eco-conscious choices.
Maintenance and Storage of Your Graduation Cap
After the excitement of graduation, it’s important to preserve your cap as a keepsake. Here’s how to maintain and store your graduation cap to ensure it lasts for years to come.
Cleaning Your Cap
If your cap gets dirty, gently wipe the surface with a slightly damp cloth. Avoid using harsh chemicals or submerging it in water, as this could damage the material or any decorations.
Storing Your Cap
Choose a cool, dry place to store your cap. Excessive heat or moisture can cause the material to degrade over time. A closet shelf or a storage box under the bed are good options.
Using a Protective Box
Consider investing in a protective box or garment bag specifically designed for graduation attire. This will protect your cap from dust and accidental damage.
Avoid Folding or Crushing
Keep your cap flat or on a supportive form to maintain its shape. Folding or crushing it can make permanent creases or damage embellishments.
Handling Decorations
If your cap is heavily decorated, handle it with care. Touching it too often or too roughly can cause decorations to fall off or become damaged.
Long-Term Preservation
For long-term preservation, you might want to frame your cap or place it in a shadow box. This not only protects it but also turns it into a display piece.
Regular Check-Ups
Every once in a while, check on your cap to ensure it’s still in good condition. This is especially important if you’re storing it for many years.
By following these simple tips, you can keep your graduation cap in pristine condition, ready to be revisited whenever you want to reminisce about your academic achievements.
FAQs About DIY Graduation Caps
Making your own graduation cap is a fun way to express your individuality on your big day. Here are answers to some common questions to help you get started.
What materials do I need to decorate my graduation cap?
You’ll need a plain graduation cap, decorating materials like fabric paint, glitter, foam letters, and any other embellishments you like. Don’t forget tools like scissors, glue, and markers.
How can I attach decorations securely to my cap?
Use strong adhesives like fabric glue or hot glue to ensure your decorations stay in place. Test your adhesive on a small area first to make sure it doesn’t damage the cap.
Can I use my school’s logo on my cap?
Check your school’s policy on using official logos. You may need permission to use trademarked images or symbols.
How much time should I set aside for decorating my cap?
Give yourself at least a few hours to decorate your cap. If your design is intricate, you might need more time.
What’s the best way to plan my cap design?
Sketch your design on paper first. This helps you visualize the final look and make any adjustments before you start decorating.
Is it okay to use humor in my cap design?
Absolutely! A witty pun or clever joke can make your cap stand out. Just be sure it’s appropriate for the occasion.
How can I make my cap stand out from a distance?
Use bright colors, shiny materials, or even small LED lights to catch the eye. Just make sure your cap still meets any graduation ceremony guidelines.
What should I do if I make a mistake while decorating?
Don’t panic. Many mistakes can be fixed with a little creativity. If you can’t fix it, see if you can incorporate the mistake into your design.
Can I decorate my cap with 3D elements?
Yes, you can add 3D elements to your cap. Just ensure they’re securely attached and won’t interfere with the ceremony.
How can I make my cap design meaningful?
Reflect on your college journey. Include elements that represent your major, hobbies, or important memories from your time at school.
What if I’m not creative?
You don’t have to be an artist to decorate your cap. Simple designs can be just as impactful. Consider using stencils or pre-made decorations.
By keeping these FAQs in mind, you’ll be well on your way to making a graduation cap that’s both personal and impressive.
Discover 15 creative DIY graduation cap ideas and decorations to make your cap stand out at the ceremony. Get inspired for your big day!
1. How to Make a Graduation Cap

Graduating soon and want to personalize your cap with a creative touch? Instructables offers a step-by-step guide to DIY your graduation cap, ensuring your milestone is marked with a unique flair. This tutorial walks you through selecting materials on a budget, planning your design, and applying each element for a professional-looking finish.
With clear instructions, helpful tips, and a focus on using cardstock paper for decoration, you’ll craft a graduation cap that reflects your journey and stands out on your special day. Perfect for those who love to add a personal touch to important occasions, this guide makes it easy to celebrate your achievements in style.
2. Homemade Decorated Graduation Cap

Graduation is a significant milestone, and what better way to stand out than with a personalized cap? The M&J Blog offers creative ideas to infuse your cap with individuality, ensuring you’re visible to your cheering family. With clear instructions, this guide helps you adorn your cap with patches or rhinestones, turning the traditional graduation attire into a unique statement of your achievements.
It’s designed to be approachable for anyone looking to add a touch of flair to their commencement. Get ready to craft a cap that not only celebrates your hard work but also captures your personal style. Congratulations, graduate—now make that walk across the stage in a cap that’s as distinctive as you are!
3. Easy DIY Paper Graduation Cap

Make a memorable graduation moment for your little one with a DIY paper graduation cap from Lia Griffith . Crafting this cap is straightforward and fun, making it perfect for celebrating end-of-year school achievements or for adding a festive touch to graduation parties.
All you need is black card stock, a downloadable template, and some simple craft supplies. Follow the step-by-step instructions to cut, fold, and assemble your cap, complete with a tassel for an authentic look. This project not only offers a charming photo opportunity but also engages children in hands-on creativity. Get ready to celebrate in style with your very own paper graduation cap.
4. Making a Graduation Cap Out of Money

Looking to make a memorable graduation gift? Less Than Perfect Life of Bliss offers a unique idea for crafting a graduation cap made entirely out of money. With an engaging step-by-step guide, you’ll learn how to fashion a thoughtful and festive present that combines the practicality of cash with the fun of a handmade gift.
This project requires simple materials such as cardboard, bills, poster board, tissue paper, and ribbon, all of which are likely already in your home. Perfect for anyone seeking a personalized and enjoyable way to celebrate a graduate’s achievements, this money cap not only serves as a creative gift but also as a quirky accessory for the special day. Get ready to make a graduate smile with this one-of-a-kind graduation cap that they’ll never forget.
5. DIY Hello Kitty Grad Cap at Home

Graduation is a memorable milestone, and what better way to celebrate than by personalizing your cap? For Hello Kitty enthusiasts looking to add a touch of charm to their graduation attire, Sanrio provides an engaging DIY Hello Kitty Grad Cap guide. With simple supplies like felt, scissors, and a glue gun, you can make a unique cap that showcases your love for the beloved character.
This instructive guide leads you through each step, ensuring a delightful crafting experience. It’s an ideal project for adding a playful spin to your graduation ensemble. Get ready to receive compliments and stand out during your commencement ceremony with this fun and creative addition to your graduation cap.
6. Simple Graduation Cap for Preschools

Celebrate your preschooler’s milestone with a touch of creativity by crafting your own graduation caps. Stay At Home Educator provides a clear and engaging guide on how to make these charming caps that are not only fun but also simple to create. Perfect for both preschool and kindergarten graduations, these DIY caps add a personal touch to the special occasion. With a list of easy-to-find materials and step-by-step instructions, you can make a memorable keepsake for your little graduate. This guide offers a hands-on project that allows you to enjoy crafting while preparing for an exciting graduation day.
7. Handmade Bedazzled Graduation Cap

Graduation is a milestone that deserves a personal touch, and decorating your graduation cap is a fantastic way to make the day even more special. On the GraduationSource Blog , discover a creative and engaging tutorial that guides you through the process of bedazzling your graduation cap in five simple steps.
This instructive guide provides a list of necessary items and detailed instructions to add sparkle and personality to your cap. Whether you aim to impress or simply wish to express your unique style, follow these steps for a dazzling graduation accessory that will shine as bright as your achievements.
8. Make a Graduation Cap Headband

Celebrate graduation in style with a homemade touch! The DIY Graduation Cap Headbands project from FUN365 offers an engaging and creative way to craft festive headwear for the special occasion. Ideal for parties or simply showing off your graduate spirit, this tutorial guides you through making a charming headband using black cardstock, a plain white headband, ribbon, a tassel, and some mini bright flowers for decoration. The process is straightforward and perfect for anyone looking to add a personalized flair to their graduation ensemble. With clear instructions, this craft is not only fun to make but also serves as a unique keepsake to remember this milestone.
9. Graduation Cap Decorating Using Cricut Iron on

Get ready to add a personalized touch to graduation day with a DIY graduation cap decoration tutorial from The Polka Dot Chair . If you’re planning to celebrate a graduate’s achievement with a craft that stands out, you’ll find a range of creative ideas to make the cap unique. This guide will walk you through using a Cricut machine to cut and apply iron-on vinyl for a customized look.
Additionally, you’ll learn how to compile a memorable graduation shadow box with supplies and clear step-by-step instructions provided. Perfect for crafting enthusiasts looking for a special way to honor a graduate, these ideas are not for show but also make for a heartfelt keepsake. Prepare to make a graduation cap that captures the essence of this significant milestone with flair and fun.
10. Make a Graduation Cap Message

Get ready to add a personal touch to your graduation cap with DIY messages that capture your achievements and humor! Studio DIY ‘s guide on using Cricut’s Print Then Cut feature helps you make eye-catching decorations that make your cap stand out in the crowd.
Learn how to print your chosen phrases on vinyl and then cut them with precision using a Cricut machine. No Cricut? No problem! You can still print and hand-cut your designs for a customized look. Perfect for those memorable graduation photos, these cap messages can be your creative expression on that special day.
11. DIY Graduation Cap – Step by Step Instructions

Ready to add a personal touch to your graduation cap? Hallmark Ideas & Inspiration serves up creative and customizable DIY graduation cap decoration ideas to ensure you shine on your big day. From using vibrant wrapping paper and heartfelt Hallmark cards to expressing gratitude with special sayings, these easy-to-follow tips will help you craft a cap that truly represents your journey and achievements.
Gather your friends for a decoration party, get your crafting supplies ready, and let your style and educational experiences take center stage as you step forward to receive your diploma. Make your graduation ceremony unforgettable with a cap that’s uniquely you.
12. Make Your Own Graduation Cap

Making a DIY graduation cap is a charming and memorable way to celebrate your preschooler’s milestone. At Casa de Fallon , you’ll find a straightforward and engaging guide to crafting a personalized cap using simple materials likely already available in your home.
Learn how to measure, cut, and assemble card stock or thin cardboard, secure it with duct or clear packing tape, and add a handmade tassel for that classic graduation look. The instructions are clear, the process is enjoyable, and the result is a special keepsake for your little graduate. Perfect for virtual or in-person ceremonies, your child will beam with pride in their custom-made cap.
13. DIY Duck Tape Graduation Cap

Making a personalized Graduation Cap with Duck Tape® is a fun and unique way to celebrate a milestone. Duck Brand ‘s step-by-step guide provides clear instructions, making it easy to follow along and craft a memorable cap decoration. Starting with a simple pumpkin shape, you gradually build up the design with layers of tape, adding a stem for a finishing touch.
This project requires just a few supplies like Gold and Black Duck Tape®, scissors, a graduation cap, a craft knife, and a crafting board. Perfect for adding a touch of individuality to graduation attire, this craft can be completed in a short time and doesn’t demand advanced skills. Follow these directions, and you’ll have a standout cap that captures the spirit of the occasion.
14. Handmade Graduation Cap Tutorial

Get ready to celebrate your graduation in style with this easy-to-follow tutorial from TaysDays on YouTube. This engaging video will guide you through each step of making a personalized and decorated graduation cap, making it a standout piece for your special day. From selecting the right materials at your local craft store to the final touches of adhering your design, this tutorial ensures a smooth crafting experience.
You’ll learn how to measure and cut the base cardstock, properly make a space for your tassel, and arrange your chosen decorations for a professional look. Perfect for those ready to add a personal flair to their graduation attire, TaysDays’ tutorial empowers you to craft a cap that’s as unique as your academic journey. So grab your glue gun, pick your decorations, and start making a graduation cap that you’ll be proud to wear on your big day!
15. Best DIY Graduation Cap for Toddlers

Making a DIY Toddler Graduation Cap is a lovely way to celebrate your little one’s preschool achievements. In this video tutorial on YouTube, you will learn how to craft a charming graduation cap using simple materials like paper and a few craft tools. The process is straightforward and perfect for parents or educators wanting to add a personal touch to a preschool graduation ceremony.
Not only will you find step-by-step instructions for the cap itself, but there’s also a guide for making a tassel to complete the look. The engaging and easy-to-follow directions make this project manageable and enjoyable, ensuring you can make a memorable keepsake for your child’s special day.
Frequently Asked Questions
How do you make a homemade graduation cap.
Making a homemade graduation cap can be done with some simple materials like a cardboard box, scissors, markers/paint and glue. Start by cutting the box into a semi-circle shape and then decorate it however you’d like. Add tassels or other decorations as desired. Secure the cap to your head using an elastic band or ribbon and you’re done! Congratulations on your graduation.
How to make a graduation cap design?
Making a graduation cap design is simple. Start by gathering necessary materials, like fabric, scissors and glue. Then sketch out the design you’d like to make on paper. Cut the fabric and glue it onto the graduation cap following your design plan. Finally, embellish with decorations such as ribbon or glitter to make the cap unique. Congratulations – you’ve created a custom design!
What materials to use to decorate the graduation cap?
Decorating a graduation cap is an exciting way to make your special day even more memorable. Popular materials for decoration include glitter, fabric paint, and foam sheets. You can also add ribbons, jewels, and other embellishments to make the cap stand out. Have fun with it! Get creative and enjoy the moment.
Can you use a Cricut on a graduation cap?
Yes, you can use a Cricut on a graduation cap. You can make custom designs with the right materials and supplies to show off your unique style. You will need heat-resistant material like vinyl or HTV in order to use the Cricut machine safely and effectively on your cap. Make sure to follow all safety instructions when using the Cricut machine.
What glue to use for decorating a graduation cap?
For decoration on a graduation cap, you should use light-bodied fabric glue or hot glue. These glues will provide strong adhesion and are safe to use on fabrics. Additionally, they do not stain or leave residue when dried so your design will remain intact for years to come.
How do you put flowers on a graduation cap?
To put flowers on a graduation cap, start by selecting the type and color of flower that best matches your school’s colors. Then, use fabric glue to attach the flowers to the cap in either a single line or an arrangement. Finally, let the glue dry before wearing your cap.
Related DIY Projects and Ideas
Graduation Party Ideas: There’s no problem with celebrating a milestone in life, but it’s difficult to find the right ideas for graduation parties. This article has fun graduation party ideas that are sure to get all your friends and family members excited!
Graduation Card Ideas: These simple DIY graduation card ideas include beautiful designs, free templates and printables that you can use to make a graduation card for the graduate in your life.
DIY Stickers with Cricut: Learn how to make cool stickers with cricut in your home with just a few supplies. These projects are easy to do and will help you use your machine to its fullest potential!
DIY Straw Toppers: Get inspired with these marvelous DIY straw topper ideas that are a fun way to add personality and flair to your glass, cocktail, or cocktail hour beverage brims.
Photo Booth Ideas: If you’re throwing a party and have no idea how to make your own photo booth, this is the article for you! There are so many easy DIY photo booth ideas from which to choose.
DIY Cupcake Toppers: These beautiful DIY cupcake toppers are perfect for your next party. You can use them on top of cupcakes, on cakes, or even as decorations.
DIY Crepe Paper Flowers: These pretty DIY crepe paper flowers are fun and easy to do, perfect for spring. Make a bouquet or a garland or just one big flower for your next party!
Conclusion:
In conclusion, these 15 unique DIY graduation cap ideas and decorations offer a creative and personal way to celebrate your monumental achievement. By incorporating elements such as your major, inspirational quotes, cultural pride, or even a touch of humor, you can make your graduation cap a memorable and unique piece of art that reflects your journey and aspirations.
With tips on sustainability, cost analysis, and maintenance, this guide not only inspires creativity but also encourages a thoughtful and eco-friendly approach to your graduation cap project. So, grab your materials and personalize your cap to make a statement on your big day!
Related DIY Ideas to Try:


Graduation Cap Ideas to Make on a Cricut

Share the love!
Learn how to decorate a graduation cap with vinyl, cardstock, and personalized designs!
Graduation Day is a special day to recognize students for their achievements! But between the long gowns and mortarboards, it’s hard to get recognized in that crowd. Luckily, I have the perfect solution. Today, I’ll share my best graduation cap ideas that you can make! You can customize these projects with different materials (like layered vinyl or even a plastic folder !) or use the techniques as inspiration to create your own designs. I’ll share my best tips to light up the stage during your graduation ceremony!
Watch the full step-by-step tutorial video on how to decorate your graduation cap on my YouTube channel !

There are many different ways to decorate graduation caps, but these three designs are definitely my favorites.
My Sports Jersey grad cap decoration design uses layers of permanent vinyl for a fast, easy approach. It’s the perfect way to decorate if it’s the night before the ceremony!

The Roses design is more involved and uses layered glitter and foil cardstock to focus all eyes on you! This design is easy to customize with your own quote, graduation year, or school colors . You can use different materials, but the flowers are super pretty with a little sparkle!

Finally, my Stars graduation cap topper is a real attention-getter! I’ll show you how to combine cardstock, plastic folders, vinyl, and fairy lights to make this stunning decoration. Best of all, the whole topper can be removed from the cap and displayed in a shadow box . I’ll show you how in my video!

Planning ahead will make the project go easier! First, make sure cap decorations are allowed and check for guidelines. Not all schools allow cap decor. If not, you might be able to make a topper to wear for photos!
My graduation cap ideas use a mix of 3D Clear Adhesive dots, craft glue, and transfer tapes , but you can adjust most steps to fit the supplies you have available.
These designs don’t take too many tools. I found a brayer, weeding tool, spatula, and scraper helpful for most steps. If you’re making a topper and find your tassel button is off-center , I’ll show you a workaround using scissors and hot glue .
Since you want to look your best, I recommend using a ruler or measuring tape to keep your decorations straight and aligned.
Now, about those tassel buttons. We found that – just like graduates – no two graduation caps are alike . Some are not quite square, others curve, and many have their buttons off-center. For most graduation cap ideas, that’s fine! Just shift your design elements. That’s one of the great things about DIY projects!
But, if you want to craft a topper, its hole needs to line up with the tassel button. If yours isn’t, follow my video to remove the button and reattach it once the topper is complete . It’s so easy and looks good!
However, if your button isn’t removable , the written instructions will help.

Making all three styles was a breeze with my Cricut Maker 3 . You can also cut these designs on an original Maker or an Explore series machine. If you stick to smaller vinyl or cardstock words, quotes, and shapes, you can even personalize your awesome graduation cap ideas with a Joy ! The standard blade that comes with each machine will work fine, just follow my material settings in the tutorial. A StandardGrip Machine Mat works for most materials – especially with painters’ tape for added security – but you may want a StrongGrip Machine Mat nearby just in case.

Now, let’s put your Cricut skills to the test! I’ll show you how to make the Stars design as well as share a few tips for the other graduation cap ideas.
Ready to make these awesome graduation cap decoration ideas? You’re going to love them! This post contains some affiliate links for your convenience (which means if you make a purchase after clicking a link I will earn a small commission but it won’t cost you a penny more)! Read my full disclosure policy .
Quick Links to Information in this Post
Materials for DIY Graduation Cap Ideas
View my Amazon shopping list with the exact items we used to make this project!
- Graduation Caps — These caps are similar to those used for most high school and college graduations. If you are using a different cap, measure it and adjust the designs accordingly.
- One (1) Plastic Folder — Make sure it’s translucent enough that your lights will shine through!
- One (1) sheet of 12” x 12” 100 lb Black Cardstock — The heavier weight holds its shape better
- One (1) sheet 8.5″ x 11″ Silver Foil Cardstock
- Several sheets of 8.5″ x 11″ Glitter Cardstock — Use the colors you like, but I chose one each of red, white, green, and yellow
- Cricut Permanent Glossy Vinyl in Various Colors
- String of LED Fairy Lights , about 20 lights — This set of LED lights is lightweight, easy to shape, and has a small battery pack
- Glue Gun & Glue Sticks
- 3D Clear Adhesive Dots (1/2″ diameter x 1/8″ thick)
- Craft Glue — I used Bearly Art Precision Craft Glue
- Cricut Standard Grip Transfer Tape
- Cricut Permanent Vinyl Shimmer Silver — optional
- Cricut Strong Grip Transfer Tape — for Shimmer Vinyl
- One (1) 16″ x 16″ Shadow Box – optional, for display
- Painters tape — to keep the plastic in place on a StandardGrip Mat
- Tape Measure
- Weeding Tool
- Scraper Tool
- A method to cut your materials — I used the amazing Cricut Maker 3 but you can also use the Cricut Maker, Cricut Explore Series or Cricut Joy (for small decorations) with the standard Fine-Point Blade
- Cricut Green StandardGrip Machine Mat 12″ x 12″
- Cricut Purple StrongGrip Machine Mat 12″ x 12″ — optional, for the plastic or if you use Glitter Cardstock
- Design #382 – My free graduation cap ideas designs (available in my free resource library —get the password at the bottom of this post)
If you want to make a Stars graduation cap just like mine, you’ll need:
- One (1) Graduation Caps
- One (1) Plastic Folder — I used yellow
- One (1) sheet of 12” x 12” 100 lb Black Cardstock
- Cricut Permanent Glossy Vinyl — I used orange, green, and red
- String of LED Fairy Lights
How to Make Graduation Cap Ideas

DIY Graduation Cap Ideas
Learn how to use different materials to make your graduation cap stand out from the crowd!
- Graduation Caps — These caps are similar to those used for most high school and college graduations. If you are using a different cap, measure it and adjust the designs accordingly.
- One (1) Plastic Folder — Make sure it's translucent enough that your lights will shine through!
- String of LED Fairy Lights , about 20 lights — This set of LED lights is lightweight, easy to shape, and has a small battery pack
- One (1) sheet of 12” x 12” 100 lb Black Cardstock — The heavier weight holds its shape better
- One (1) sheet 8.5" x 11" Silver Foil Cardstock
- Several sheets of 8.5" x 11" Glitter Cardstock — Use the colors you like, but I chose one (1) sheet each of red, white, green, and yellow
- Cricut Permanent Glossy Vinyl in Various Colors
- 3D Clear Adhesive Dots (1/2" diameter x 1/8" thick)
- Craft Glue — I used Bearly Art Precision Craft Glue
- Cricut Standard Grip Transfer Tape
- Cricut Permanent Vinyl Shimmer Silver — optional
- Cricut Strong Grip Transfer Tape — for Shimmer Vinyl
- One (1) 16" x 16" Shadow Box – optional, for display
- Design #382 – My free graduation cap ideas designs (available in my free resource library—get the password at the bottom of this post)
- A method to cut your materials — I used the amazing Cricut Maker 3 but you can also use the Cricut Maker, Cricut Explore Series or Cricut Joy with the standard Fine-Point Blade
- Hot Glue Gun & Glue Sticks
- Painters tape — to keep the plastic in place on a StandardGrip Mat
- Cricut Purple StrongGrip Machine Mat 12″ x 12″ — optional, for the plastic or if you use Glitter Cardstock
Instructions
Step 1: get my free diy graduation cap ideas svg files.
First, download my Graduation Cap Ideas SVG/DXF/PDF files from my free resource library. It's Design #382 . I have included files for three designs: one with Shooting Stars; one with beautiful layered Roses; and one for the Sports-enthusiastic. Each design uses different materials to give you customizable options!
The Stars Cap uses LED lights, translucent plastic, permanent adhesive vinyl, and cardstock. The Roses Cap uses glitter cardstock and foil cardstock. And the Sports Cap just uses permanent adhesive vinyl.
A Note About Vinyl: When choosing materials for my cap designs, I tested both iron-on vinyl and permanent adhesive vinyl applied directly to the graduation caps. The iron-on vinyl was difficult to use as the heat needed to apply it easily warped the structure of the cap. I found that using permanent adhesive vinyl worked quite well. It adhered to the polyester material covering the cap and — while it could be removed from the material if needed — held in place.
Here’s what all three of the designs look like in Cricut Design Space.

Choose the design you want to create. Then, upload the appropriate SVG file to Cricut Design Space and add it to your Canvas. For this tutorial I’m going to show you how to make the Stars design.
You may need to zoom out to see the full design. You can click on the minus sign (-) in the lower left corner of the Canvas to do this.
We will cover some tips for the other two designs at the end of the tutorial.
If you are not sure how to upload an SVG cut file to Cricut Design Space , watch this helpful video training series I made. If you are on an iPad or iPhone, here is how to download and upload SVG files to the Cricut Design Space app .
STEP 2: PREPARE YOUR STARS GRADUATION CAP DESIGN FILE
The Stars design is set up to make one graduation cap topper. The black diamond shape measures 13.294" from the left corner to the right corner, but I’ll show you how to fit the layers on 12” x 12” machine mats. The topper layers sit on top of the graduation cap, with the lights closest to the hat’s fabric, then the plastic, followed by the black cardstock and vinyl.
To make the layers fit on 12” x 12” machine mats, we will rotate both the black and yellow diamond shapes into squares.
Click “Select All” in the top menu, then just over to the right, enter “45” into the box under “Rotate.” Now the Cricut knows we can use 12” x 12” machine mats!

This size should work for most graduation caps. If your cap is larger, or smaller, you will need to adjust the size of the project. To do this, just enter specific dimensions in the top menu under Size. Make sure to keep the lock closed to maintain proportions. You can click and drag the Resize handle on the lower right side of the bounding box to adjust the size.
Also, this design has a hole in the center of the board for the tassel button on top. While measuring my caps for this project, I noticed that some buttons are not centered.
If your cap button isn’t centered, I’ll show you how to fix that!
If you are using one of the graduation caps in my materials list, remove the tassel. Next, use a pair of scissors to remove the button. The button is glued on and should be super easy to remove. Don’t worry if you accidentally nick the fabric, we will be covering it up with our design so no one will see. We'll glue the button back on later and add the tassel.
If you can not remove the button from your cap or want to make a topper to save your design, here’s how. I’ll show you how to make a simple one first and then how to adjust the Stars design.
Measure your cap and add a square the same size to your Canvas. Then, add a circle just a tad bigger than your button.
Next, measure the exact position of your button on your cap. Measure from the left side in and the top side down to pinpoint the exact spot. Place your circle in that same spot using the rulers in Design Space, then select both layers and use the slice tool to cut out the circle!
When you make the Rose or Sport cap, use this custom layer as a topper and add the design elements to it. Then, stick a few 3D adhesive dots to the underside. Carefully thread the tassel through the cutout and press the topper in place.
This technique will also work with the “Stars” design, but it’s a little more complicated. After rotating the design, ungroup the layers. Now, add a circle shape to the Canvas a little larger than your cap’s button.
Use the same measuring and placement steps as before to put the new circle in the right spot. Duplicate it and line this up with the original.
One at a time, select the black and yellow layers and use the Contour tool to hide the original button contours. Then, select one of new circles and the black layer. Click Slice. Repeat for the yellow layer and second circle.
Delete all the leftover circle layers. Adjust the size of your text decals if they run into the new hole.
Follow the rest of the steps to assemble.
STEP 3: PREPARE YOUR FOLDER
Before cutting, you also need to prepare your yellow folder to make it fit on your machine mat. Open the folder and use sharp scissors to cut along the center crease until the two sides are separate.
Cut away any extra pockets or pieces to create a flat sheet of plastic that will fit on your machine mat and under the rollers.

STEP 4: CUT YOUR STARS GRADUATION CAP DESIGN
Now we're ready to cut. Make sure you have the right machine selected and click "Make It."
If prompted, click "On Mat" and continue.
You should see five mats on the Prepare screen. Click "Continue" in the bottom right.
Now we will choose material and tool options. You will need to select the correct material and tool options for each layer of your graduation cap topper.
TIP : If you run into any issues cutting your materials check out my Cricut Tips & Tricks for Cleaner Cuts for help!
For Mat 1, the black layer, choose “Heavy Cardstock – 100 lb (270 gsm). I always select “More Pressure” for a nice, clean cut.
Place your cardstock on your machine mat and use a brayer to make sure it's fully adhered. Check that your Fine-Point Blade is clean and in Clamp B. Then, load the mat into the machine and press "Go."

When the cut is finished, unload the mat, flip it over, and roll it back to release the cardstock. This helps prevent the cardstock from curling and ripping.
I used the “Acetate” setting to cut the plastic folder on Mat 2. To find that setting, click back where it says “Base Material set to” and then click “Browse All Materials.” Type “Acetate” into the search field and click enter. Then click on “Acetate” and click “Done.”
Again, I used “More Pressure” to get a clean cut on the folder.
Now, add the plastic folder to your machine mat and use the brayer to make sure it’s fully adhered. You can use a StrongGrip Machine Mat, or a StandardGrip with some painters' tape along the sides. Don't let the tape go over the mat's edges since it may interfere with the rollers. This is an extra layer of security to make sure it stays put.
Once the cut is finished and BEFORE unloading the mat, check that the cut went all the way through the plastic. If it didn’t, hit the “Go” button again to make the cut a second time in the same spot. You can repeat this process if necessary. Once it’s ready, unload the mat, remove the painter’s tape, flip it over, and release the plastic.

Mats 3, 4, and 5 cut well with "Premium Vinyl - Permanent Glossy" with "More Pressure."
STEP 5: ASSEMBLE YOUR STARS GRADUATION CAP DESIGN
While the cardstock and plastic are ready to assemble immediately after cutting, you’ll need to weed the vinyl layers. Use a weeding tool to remove the excess vinyl. Remember to remove the small parts inside the letters.
Once your vinyl material is weeded, cut pieces of Standard Grip Transfer Tape to the same sizes as your text areas. Remove the backer from the transfer tape. Apply the transfer tape to your vinyl decal by holding the transfer tape in the shape of a taco, then putting the bottom of your “taco” onto the middle of your design. Smooth the tape over the decal from the center outward using a scraper tool to burnish both sides. Once you have done that for each of the three pieces of text, you are ready to assemble the cap.
Here's a look at all the pieces that make up the Stars Graduation Cap Design.

To begin assembly, put the black cardstock shape on your work surface. Make sure the largest star is at the top.
Place the decals on the cardstock to make sure you like their placement. You can keep the design open on you computer to help layout your elements correctly.
Apply the vinyl text to the cardstock. To do so, carefully peel the carrier sheet off the back of each piece of vinyl. The vinyl should remain adhered to the transfer tape. If little bits of it don’t want to transfer to your tape, scrape it again and pay careful attention to those problem areas.
Now, place your text in the correct areas on your cardstock, being mindful that it is straight. You can use a ruler to help.

IMPORTANT : Normally, you would burnish all over your transfer tape to ensure the vinyl is well-adhered to your surface, but a slightly different approach works better with cardstock. Gently lay the design on the cardstock in the proper location. Use your fingertip (or another small blunt item) to press over only the vinyl areas under the transfer tape. Slowly and carefully peel away the transfer tape so that it doesn't damage the cardstock underneath. If the cardstock lifts, try to smooth the fibers back down. If the tape pulls up a lot of the cardstock, you can cut the black layer again and repeat with gentler burnishing.
Repeat for each vinyl decal. Apply all of the vinyl text before continuing.

Flip the cardstock over so that it is face down. Apply thin lines of craft glue around all the cut out shapes, then fill in the larger areas with additional thin glue lines. Place the yellow plastic shape on to the black shape, making sure all cut out areas are covered and the center button holes line up. Since the yellow layer is smaller, you’ll see a border of black around the folder piece. Allow the glue to set for a moment before continuing.

In the finished cap, we want the lights to shine through the yellow plastic in the shapes created by the black cardstock. So, we’ll add the string lights to the underside of the yellow plastic, sticking wire sections in place with the 3D adhesive dots. Concentrate the lights under the cutouts for the best shine.
I started with the light furthest from the battery pack and placed it in the big star, opposite from where I’ll hide the pack. Place a 3D adhesive dot on the yellow plastic outside the star cutout, but near where you want the light to sit. Hold the light where you would like it to shine and run the wire from the light to the adhesive dot. Press the wire into the adhesive dot. Move to the next light and repeat the process until you have filled the cut out areas with lights.

In some areas, you may be able to use the same adhesive dots for more than one light's wire section. When you are done applying the lights, you should have a small amount of wire that leads to the battery pack near the bottom of the cap.

Place 3D adhesive dots on all four corners of the cardstock’s underside where it extends past the yellow plastic. Flip the layers over and apply the assembled topper to the graduation cap, making sure the four corners line up.
The wire and battery pack should stick out toward the bottom between the plastic and the cap. Flip the graduation cap over, place a 3D adhesive dot on the back of the battery pack and stick it to the underside of the graduation cap where it will be hidden behind the head.

Let's add the tassel and button back to the cap. With the tassel in place, add glue to the bottom of the button and place it in the center hole. Hold it firmly in place until it’s dry. This time could vary depending on the type of glue you are using.

Your Light Up Graduation Cap is complete!
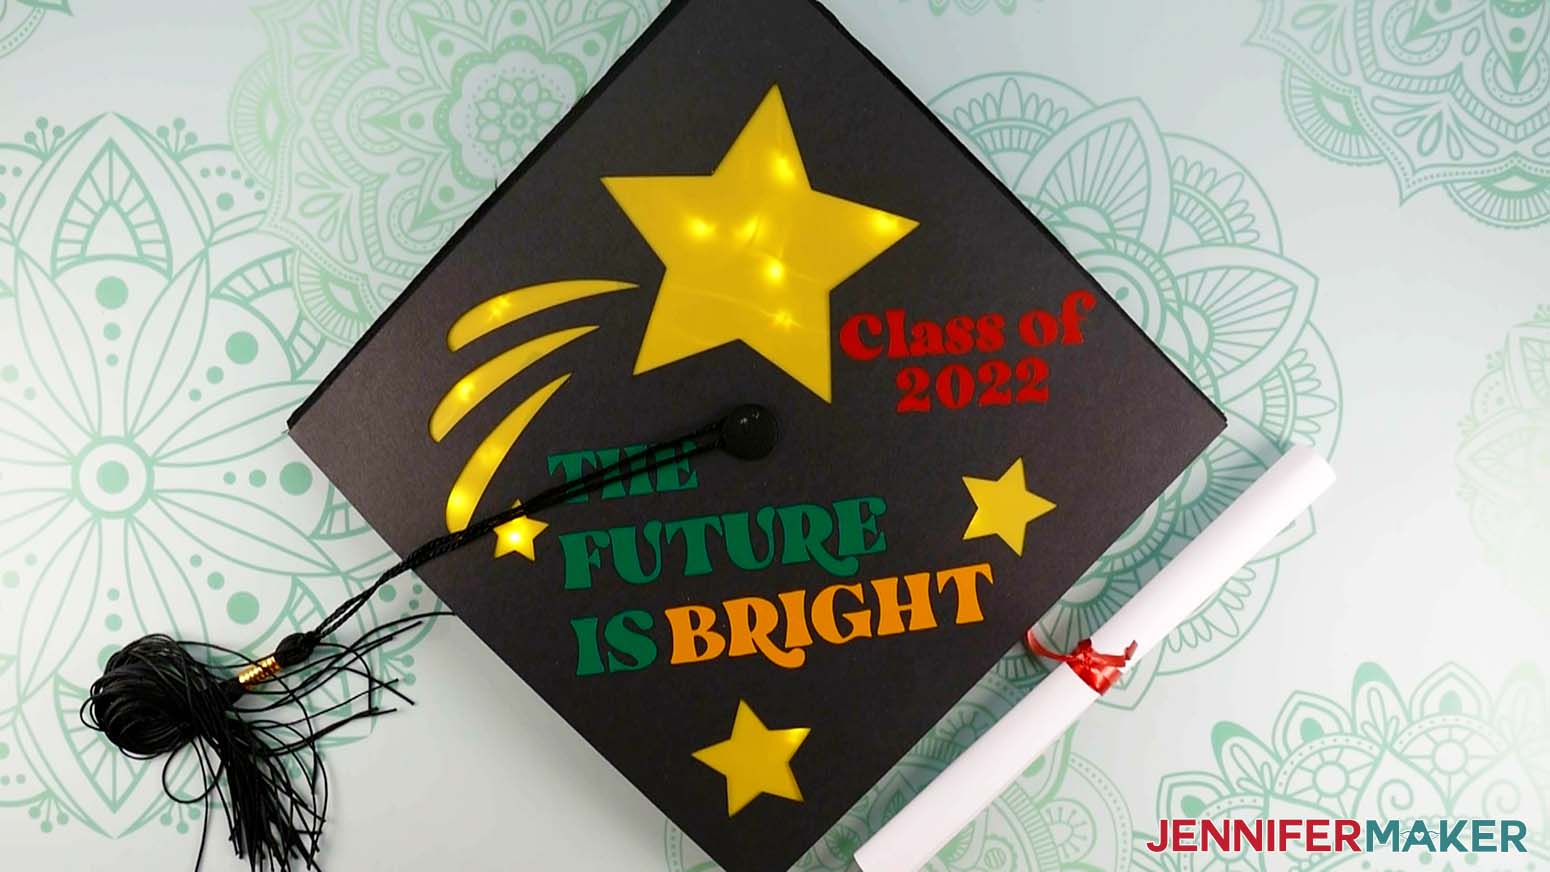
As I mentioned earlier, I have a couple of notes to help you cut and assemble the other two designs.
The Rose Graduation Cap is made up of several layers of glitter cardstock with a foil cardstock top piece. I found using a purple StrongGrip Machine Mat and the "Glitter Cardstock" cut setting along with "More Pressure" worked best for cutting the glitter cardstock.
I used a green StandardGrip mat and the "Cardstock (for intricate cuts)" setting with “Default” pressure for the foil cardstock. Your cutting machine may be different, so please remember to test cut your material before cutting the full designs. If you’re not sure how to do that, visit my Best Cricut Tips and follow #16!
It also has some intricate cuts that may make removal from your mats difficult. Remember to turn the mat over and roll the mat away from the cardstock. If the intricate pieces do not want to easily come away from the mat, try gently sliding a spatula under them.
To stack the layers of cardstock, start with the bottom layer and work your way to the top. The flowers stack: green, white, yellow, red, then silver. I applied thin lines or dots of craft glue to the back of each piece before placing it on the layer below.

Craft glue also works well to apply the assembled cardstock to the graduation cap, but keep in mind this is pretty permanent. If you want, or need, a temporary application, you can make a topper from the Stars SVG file's black layer to apply the Rose assembly to, then use adhesive dots to apply the topper to the cap. The topper can later go inside a shadow box for display.
The Sports Graduation Cap is made completely from permanent vinyl. The file is designed so that the corner elements on each side of the cap are cut together as one piece. This may seem like a waste of material, but it will save assembly time. Apply the set of lines to the cap first (and as an all-in-one piece) and then use them to align elements with the left and right corners of the cap. You can use a ruler to keep things as straight as possible.
NOTE: Keep in mind there's a possibility the fabric isn't completed adhered to the mortarboard underneath, so it might look a little off center if the fabric slides around a bit. That's ok, it doesn't have to be perfect.

NOTE: Remember, while you might be tempted to use iron-on vinyl since the surface of the graduation cap is fabric, permanent adhesive vinyl is a much better option! I tested both options and found that heating the cap for iron-on can warp and even melt the cap and its fabric.
STEP 6: SHOW IT OFF!
Once you have your graduation caps assembled, wear them proudly to stand out in the crowd. Show them off after your celebrations with a shadow box display made up of your cap and other mementos of your big day!

I hope you’ll use these ideas as inspiration to create your own personalized graduation cap!
The Finished Stars Graduation Cap design is 13.294" x 13.294", but can be rotated to be cut on 12” x 12” material and mats.
The Rose Graduation Cap design measures 8.937" x 10.389" but can be rotated to be cut on 8.5" x 11" material.
The Sports Graduation Cap design measures 10.5" x 10.254."
Fonts used: Stars design: Wished Rose design: Brenson Charlotte and Brenson Charlotte Shadow from the same download pack Sports design: Sweetie Almeera , Gilden , Varsity Team Bold
Answers to Your Questions About Graduation Cap Decoration Ideas
What should I write on my graduation cap?
You can add anything you like! Graduates add inspirational quotes, lines from a favorite book or favorite movie. Quotes from a favorite character or TV shows are also popular. You can add anything that you feel sums up your college experience, really. I’ve seen some cute matching best friend cap ideas, too.
How do you decorate a graduation cap last minute?
Graduation season is busy, so last-minute cap decorations are very popular! If you don’t have much time to personalize your own graduation caps, I recommend sticking to a simple design. Design a quick decal in Cricut Design Space using some existing shapes or a short quote in a bold font and use permanent adhesive vinyl right on the cap. Simple can still help you stand out!
Should I decorate my graduation cap?
It’s totally up to you, but decorating your mortarboard is a fun way to celebrate your years of hard work! A custom cap is a nice personal touch for your big day!
What do you put on a high school graduation cap?
You can use any ideas for college graduation caps for high school, too! I love seeing custom caps from kindergarten to graduate school.

How do you decorate a graduation cap with cardstock?
Cutting some simple designs or shapes in cardstock with a Cricut is a super easy way to decorate your graduation cap. After cutting out your design, just stick the cardstock to the cap with craft glue or double-sided adhesive foam for a bit of depth.
What glue is best for graduation caps?
I recommend different glues depending on how you plan to decorate and preserve your graduation cap. If you want to decorate the cap for your big day and then be done with it, you can use craft glue for permanent adhesion. Glue dots can be removed pretty easily, so they’re a good option if you want to remove the designs to save or need to return the cap without damage.
How do you put letters on graduation caps?
I highly recommend cutting letters from cardstock or adhesive vinyl with a Cricut for your cap. If you don’t have a Cricut, you can also buy pre-made letters from a craft store and glue them on for easy grad cap designs.
What if my school doesn’t allow graduation can decorations?
Always check the rules before crafting for an event! Different school have different requirements. If you aren’t allowed to decorate for the ceremony, maybe make a topper to use in photos! If you aren’t allowed to decorate the cap at all, you can buy one from the materials list and decorate your own cap as a memento.
Get my free Graduation Cap Ideas SVG files!

Want to remember this? Save the Graduation Cap Ideas Tutorial to your favorite Pinterest Board

Jennifer Marx is a designer, an enthusiastic crafter, a lifelong teacher, and a proud overcomer of a variety of life's challenges. In her spare time she loves to play D&D and video games, garden, sew costumes, and go to Disney. She lives a full, happy life in beautiful Ann Arbor, Michigan with her partner Greg, her daughter Alexa, their two dogs, Hunter and Chloe, and their sassy orange cat, Butterscotch.
Similar Posts

Make Miniature Paper Roses for Cute Crafts

Paper Flower Dress Canvas Wall Art

Cricut Joy Projects: 7 New Designs and 130+ Ideas!

Face Masks for Children: Answers to your Face Mask Questions

Magic Unicorn Head SVG – Flowers & Hearts – Free!

How to Make Sublimation Garden Flags for Spring!
Leave a reply cancel reply.
This site uses Akismet to reduce spam. Learn how your comment data is processed .
DIY Graduation Cap Bottle Toppers
Make these DIY Graduation Cap Bottle Toppers for your special graduate this spring. Add this creative touch to your list of graduation party ideas and you’ll have your party guests impressed by your attention to detail. Get the easy instructions here.

Make this DIY Graduation Cap for Fun Graduation Party Decor!
I’ve gotten a lot of great feedback about these mini graduation caps, and the modern triangle cupcake toppers I added to my modern-classic graduation party. So today I’m sharing the steps to make these cute diy graduation cap bottle toppers . I have to admit I think they look incredibly cute lined up on the table. These, plus the “diploma” napkin rolls are enough to bring home the graduation theme.
If you don’t want to use the Frappuccino bottles I used, you can always make your caps a bit smaller and place them on top of soda or water bottles. And if you have a lot to make, I would suggest starting early and putting together a few at a time. In fact you can cut out all of your shapes ahead of time and then put them together as time permits.
What do you fill your bottles with, to quench your thirst? My family-friendly golden graduation punch , of course! It’s a great signature drink to match the party color scheme.

Now, of course you can change up your colors of scrapbook paper and tassels to reflect your school’s colors if you like. These would also look cool on a grouping of bottles at a drink station. Fill them with milk and add them beside a row of peanut butter cup graduation caps .
What else would you top with these? You can make them as large or small as you need to. Hope you’ll give it a try!
How to Make Graduation Cap Toppers Supplies: Black scrapbook paper – you’ll need something with a little weight to it, but not heavy card stock Small Black brads Gold mini tassels {I got these at JoAnn’s in the upholstery trim section: 2 for $3} Double sided tape and/or Glue Dots Scissors Cut strips from the scrapbook paper, that are about 1.25″ wide, and long enough to wrap around the bottle top you’re using {6.5″ here}. Cut out squares from the scrapbook paper, that are a little larger than the bottle caps you’ll be topping. Wrap the strips around and adhere the 2 ends together using double stick tape. This will be your base. {step 1} Meanwhile, use a brad and push through the center of the square; add a tassel around the brad, and secure the brad to the square underneath. {step 2} Add 2 glue dots to the ‘top’ edge of the base. {step 3} Attach the top square to the base using the glue dots. {step 4} Top your bottles!

Sharing is caring!
Similar Posts

How to Design Parties

How to Make a Pennant Banner for Tailgating

Outdoor Living & Entertaining Design
Diy bottle labels.

Keys To Success Dessert Table theme

Easter Peeps Garden Centerpiece DIY
These are too adorable Chris!!
Aw, thanks Carrie!
These are seriously the cutest things ever, Chris! Great job! I love the geometric cupcake toppers you made too 🙂
Aw, thanks Jenn. This was a fun project to work on.
Comments are closed.
50 Best Graduation Cap Ideas That'll Make You Stand Out at the Ceremony
Choose from inspirational, funny, and cute caps!

Every item on this page was chosen by a The Pioneer Woman editor. We may earn commission on some of the items you choose to buy.
Whether you're the graduate or you're gathering ideas or making a graduation gift for your child, there are tons of ways to gussy up that cap. Ahead, we're sharing all the ideas that are sure to inspire you. You can work your DIY magic with an easy tutorial and let your creativity fly as high as your cap will at the end of the ceremony, or if you're not in the mood to be crafty, you can turn to lots of other options, including printable toppers, buying one that's already printed, or relying upon the amazing crafting skills of a pro who can customize the topper of your dreams. Flowers, photos, inspirational graduation quotes , favorite movies, sentiments about how excited you are be done—these ideas are all here, and then some!
Painted Graduation Cap

Let your dreams blossom with this hand-painted cap full of pretty florals! You can personalize it with your own quote and white, gold, or silver lettering.
'Change the World' Graduation Cap

Let this water color-inspired cap topper inspire you to be the change you want to see in the world. It can be personalized with your name, school, year, and your own photo.
'It Was Ruff But We Did It!' Graduation Cap

On graduation day, it's a safe bet that no one is prouder of you than your parents—but your pup might be a close second! Have your furry friend join in on the fun with their own adorable cap.
'I Did It!' Graduation Cap

Forget "we can do it"—you did it! Now say it loud and proud with this empowering Rosie the Riveter grad cap.
Modern Photo Overlay Graduation Cap

Have a graduation photo shoot and choose your favorite pic to display on your graduation cap! This neat design features an overlay of the word "graduate" along with your name and year.
Custom Vinyl Quote Graduation Cap

This bold, sparkly cap will make you "stand out" like the star that you are! The classic version reads, "Why fit in when you were born to stand out," but you can also customize it with your own quote.
SpongeBob Graduation Cap

Order up! Anyone who grew up watching SpongeBob SquarePants will instantly get this funny graduation cap inspired by the show's iconic time cards.
'She Believed She Could' Graduation Cap

This glittery black cap featuring beautiful faux florals in shades of pink and white will make anyone feel special on their big day. Reviewers love how responsive this designer is, and she offers plenty of room for customization.
Florals and Photos Graduation Cap

This sweet cap is made of memories—literally! Choose three favorite photos of you and your friends and family to include on this fun floral topper.
'With God, All Things Are Possible' Graduation Cap

Express your gratitude and faith with this glittery black cap featuring colorful flowers and a beautiful quote: "With God, all things are possible."
Taylor Swift Eras Graduation Cap

Celebrate entering your graduation era with this chic cap topper featuring a color block design. It's printable so it makes a great last-minute choice!
Baseball Graduation Cap

This one is for all the baseball players or fans out there! Knock it out of the park with this cute cap featuring a baseball-inspired design, your name, and your class year on a tiny jersey.
'I Chose My Path' Graduation Cap

This pretty custom cap is such a sweet choice for anyone who feels God guided their journey through school. You can personalize details like the hairstyle as well as the hair, skin, dress, shoes, and gown color.
'Holy Cow!' Graduation Cap

This might be the most a-moo-sing idea we've seen yet! Featuring cute spots and a fun pink font, this topper comes with double-sided adhesive so you can easily apply it to your cap.
Football Graduation Cap

The Drummond boys know a thing or two about playing football for their schools! If you're anything like them, go with this cap cover to show off your love of the game. You can grab it for several other sports, too.
Custom School Graduation Cap

Whether you're graduating high school or college, this personalized mortarboard is the perfect way to show your school spirit. Choose things like background color and lettering, then send the seller a logo photo so she can work her magic!
Graduation Cap Tassel

If you don't want to go all out with the decorations, but still want a touch of personality... replace your original tassel with one in a color of your choosing! With this one, there are more than 30 shades to choose from.
Pet Graduation Cap

Animal lovers, rejoice! Now you can carry your furry friend with you across the stage. Just send in a photo of your pet and choose your custom text then let this seller hand paint the sweetest topper for you.
'Someday Is Today' Graduation Cap

Glitter, faux flowers, and stitched letters that read "Someday is Today" come together to make this pretty pick. We bet you'll receive so many compliments on the big day!
Leather Graduation Cap

How amazing is this one? The leather is hand tooled and painted with your customized design for a unique graduation cap that's sure to make your milestone even more special.

.css-l114lb:before{background-repeat:no-repeat;-webkit-background-size:contain;background-size:contain;content:'';display:block;margin:auto auto 0.25rem;}.loaded .css-l114lb:before{background-image:url('/_assets/design-tokens/thepioneerwoman/static/images/butterfly.svg');}@media(max-width: 48rem){.css-l114lb:before{width:2.039rem;height:1.616rem;}}@media(min-width: 48rem){.css-l114lb:before{width:2.5rem;height:1.9rem;}} Family

Is Memorial Day a Federal Holiday in the U.S.?

Funny Pranks to Try for April Fools' Day This Year

Gifts That Every Grad Will Appreciate in 2024

30 Best Gifts for Teachers That Deserve an A+

45 Easter Egg Hunt Ideas for the Whole Family

Motivate Your Son With These Graduation Quotes

30 Graduation Party Recipes for the Class of 2024

The Most Thoughtful Graduation Gifts for Girls

30 Creative High School Graduation Gifts

45 Sentimental Graduation Quotes for Daughters

110 Heartfelt Wishes To Write in a Graduation Card
Clearly, you’re not a dummy since you are getting ready to graduate this year, but when it comes to decorating your graduation cap , you have no idea where to start. Don’t worry – we have put together a list of the best tutorial videos for DIY graduation caps that cover all the details. So, all you have to do is follow along and do exactly what these videos say.
If crafts aren't your expertise, no worries. Shop our collection of pre-made custom grad cap designs today.
“DIY Graduation Cap 3 Ways”
Hands down – our favorite DIY custom graduation cap tutorial is this one! In less than a minute and a half, you’re shown how to design a grad cap in three different ways. The tutorial also tells you the type of materials used to decorate the grad cap. There’s no talking or nonsense in this video; it greats straight to the point and shows you just how easy it is to have a custom grad cap.
“Graduation cap Design Tips and How To Put On”
If there’s one graduation cap tutorial to watch, it’s this one! Eleanour explains the tips to decorating a grad cap, as well as the how to wear your custom grad cap. Some of our favorite decorating grad cap tips from this video include:
- Know how the cap will sit before you start designing it
- Design your grad cap on a flat surface first
- Use a pencil to start creating your graduation cap
- You don’t have to cut out a circle for the tassel button
“Decorating My Grad Cap + Vlog”
We really like this grad cap tutorial because it’s also a vlog so you’re able to watch the steps to decorating your grad cap. Chaney also shows you absolutely every step she took to design her custom grad cap. She also paints the grad cap instead of gluing on grad cap decorations which adds a nice, personal touch to the final look – and experience.
“Decorating My Graduation Cap”
This is an amazing decorating a grad cap tutorial for people who have absolutely no idea what to do. Every step is shown to you – and explained – in this custom grad cap tutorial. So, just follow along and get started!
“Decorate My Graduation Cap With a Headband”
Here’s one of our favorite DIY grad cap tutorials. We really like this video because it breaks down the steps to decorating your grad cap – from shopping at a craft store to drawing your own design on the grad cap and everything in between.
Now that your custom graduation cap is done, send it over to Tassel Toppers to turn it into a masterpiece. We take your DIY grad cap and layer it with highest grade plastic to ensure you can keep your graduation cap as a souvenir for years to come. Your custom grad cap will also be waterproof and can be removed and reapplied as many times as you want.
Leave a comment
COMMENTS
A super quick and fun tutorial to make your own paper graduation cap for!For more projects like these visit my other blog, www.oliveandapron.comFollow me on ...
Learn how to make a paper graduation cap for kids in 10 minutes with cardstock, construction paper, and glue. Follow the step-by-step instructions and template or measure by hand.
In this easy paper craft tutorial, learn how to make a DIY graduation cap that's perfect for celebrating your big day! All you need is some paper, scissors, ...
Learn how to make a cute little origami graduation hat! This 'mortarboard' makes a great congratulatory gift for those receiving their diploma or degree. Mad...
Tape the cut ends of the cord to one end of the strip and roll paper tightly around the cord; secure with tape. Use a pin or needle to poke a hole at the circle in the top center of the envelope. Thread the cord's folded end through hole by 1 inch; secure the inside envelope with tape. Put a gift inside the envelope; seal the envelope with tape.
Putting it together. Use the pointy end of the brad to make a small hole in the center of your foam core. Use a toothpick to press the knot in one end of your floss through the hole. Position the tassel string so that 1 inch or so of the string falls down over the side of the hat. Inside the hat, knot the tassel string if necessary to secure.
3. Fold the long edge up over the ruler by 1 inch (2.5 cm) or so. Lay your ruler along the long edge of the paper, lined up with the side. Flip that edge of the paper up with the ruler so that the paper is overlapping it just enough to cover the ruler. Fold along that edge and then pull the ruler out.
To make the headpiece, fold the 8.5 x 2 inch strip of paper in half, lengthwise. 5. Place each of the "flaps" from the top of the graduation cap inside the fold of the headpiece strip, as shown. Staple to secure. 6. Punch a hole at one corner of the cap for the tassel. 7. To make the tassel, make a knot about one inch up from one end of the yarn.
Assemble the band using glue or tape, and fold the top flaps inward. Then, take a square sheet of black card stock and attach it on top of the folded flaps. The top of our cap measures 10 x 10 inches. Next, add the circular piece to the top of the cap. We cut two circular pieces of card stock using the template.
Instructions: How to Make a Graduation Hat and Diploma out of Standard Paper. 1-Fold first paper into a square. The way I did this was match one corner to the side to form a square——without creasing it! Then bring the bottom up and fold it in place to form a perfect square. Next, fold the second sheet of paper into fourths hot dog/length-wise.
Learn how to fold a little origami graduation hat to give as a congratulatory gift. This origami mortarboard cap is made from 1 sheet of square paper, you can also make a little paper tassel to go on top. This is a modification of my previous origami round twisted box. The top flat part is now completely flat, whereas before it was curved/rounded.
Some people use a sharp blade, such as an exacto knife. However, I personally use and recommend a compass circle knife. 4. Attach to Cap. Next, attach the topper to the top of the cap . Remove the tassel first, then ensure the tassel holder button fits through the center hole. Add the tassel back on top.
Step 1: Materials. All materials are from Joann's. Compared to Amazon, searching for similar supplies, I saved around $20! As I mentioned in the past Instructable, plan ahead so you can save the best coupons and make a single trip. Old Scrapbook Paper. Scrapbook Paper- Darice Cardstock (12 x 12, #2 Black Midnight) for $0.99/piece.
Follow the step-by-step instructions to cut, fold, and assemble your cap, complete with a tassel for an authentic look. This project not only offers a charming photo opportunity but also engages children in hands-on creativity. Get ready to celebrate in style with your very own paper graduation cap. 4. Making a Graduation Cap Out of Money
Celebrate your graduation with style by making your own paper graduation caps. Discover unique and creative ideas to personalize your cap and stand out on your big day.
Can't wait to graduate? First things first. Make yourself a cap and strike a pose! What does it feel like? Wearing a graduation cap? Take a look at our YouTu...
Place 3D adhesive dots on all four corners of the cardstock's underside where it extends past the yellow plastic. Flip the layers over and apply the assembled topper to the graduation cap, making sure the four corners line up. The wire and battery pack should stick out toward the bottom between the plastic and the cap.
Wrap the strips around and adhere the 2 ends together using double stick tape. This will be your base. {step 1} Meanwhile, use a brad and push through the center of the square; add a tassel around the brad, and secure the brad to the square underneath. {step 2} Attach the top square to the base using the glue dots. {step 4} Top your bottles!
In this easy paper craft tutorial, learn how to make a DIY graduation cap that's perfect for celebrating your big day! All you need is some paper, scissors, ...
Modern Photo Overlay Graduation Cap. Now 25% Off. $16 at Zazzle. Credit: Zazzle. Have a graduation photo shoot and choose your favorite pic to display on your graduation cap! This neat design features an overlay of the word "graduate" along with your name and year. 6.
If there's one graduation cap tutorial to watch, it's this one! Eleanour explains the tips to decorating a grad cap, as well as the how to wear your custom grad cap. Some of our favorite decorating grad cap tips from this video include: Know how the cap will sit before you start designing it; Design your grad cap on a flat surface first
Dear all,I hope you enjoy this project. Please SUBSCRIBE, leave a like👍 and support if you liked what you saw. Dont forgot to click the bell🔔 icon to turn ...
How To Make A Graduation Cap (FUN FOLD CARD TUTORIAL)Handmade graduation cards are a great way to send a special message to the new graduate. There are lots ...