- PRO Courses Guides New Tech Help Pro Expert Videos About wikiHow Pro Upgrade Sign In
- EDIT Edit this Article
- EXPLORE Tech Help Pro About Us Random Article Quizzes Request a New Article Community Dashboard This Or That Game Popular Categories Arts and Entertainment Artwork Books Movies Computers and Electronics Computers Phone Skills Technology Hacks Health Men's Health Mental Health Women's Health Relationships Dating Love Relationship Issues Hobbies and Crafts Crafts Drawing Games Education & Communication Communication Skills Personal Development Studying Personal Care and Style Fashion Hair Care Personal Hygiene Youth Personal Care School Stuff Dating All Categories Arts and Entertainment Finance and Business Home and Garden Relationship Quizzes Cars & Other Vehicles Food and Entertaining Personal Care and Style Sports and Fitness Computers and Electronics Health Pets and Animals Travel Education & Communication Hobbies and Crafts Philosophy and Religion Work World Family Life Holidays and Traditions Relationships Youth
- Browse Articles
- Learn Something New
- Quizzes Hot
- This Or That Game New
- Train Your Brain
- Explore More
- Support wikiHow
- About wikiHow
- Log in / Sign up
- Hobbies and Crafts
- Paper Craft

How to Make a Paper Kunai Knife
Last Updated: February 21, 2024
wikiHow is a “wiki,” similar to Wikipedia, which means that many of our articles are co-written by multiple authors. To create this article, 80 people, some anonymous, worked to edit and improve it over time. This article has been viewed 589,405 times. Learn more...
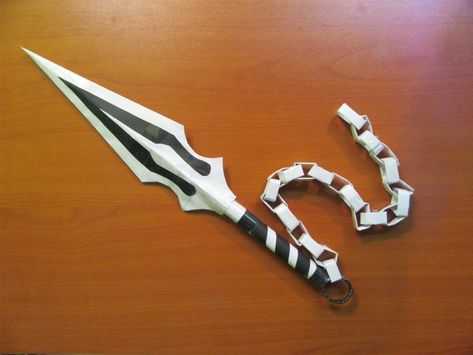
Kunai are believed to be derived from a type of gardening tool, but now are famously known as the preferred knives of ninjas [1] X Research source , made popular in Japanese Animes and Mangas such as Naruto. Now you can make them yourself out of paper!
Folding the Blade
- Gather the rest of your materials. These include some tape, scissors (to cut the paper into squares), and, optionally, a small, heavy object, like a penny.
Making the Handle
- Optionally, before flattening the extra length of the tube, cut a chopstick to the length of the handle and stick it inside to improve the stiffness of the handle.
Finish the Kunai Knife
Community q&a.
- When doing this Origami Paper is recommended, but any piece of paper will suffice when making the Kunai. Thanks Helpful 3 Not Helpful 1
- On step 6, make sure that the corner is sharp for a sharp knife. Thanks Helpful 2 Not Helpful 2
- Instead of tape you can use a glue gun. Thanks Helpful 2 Not Helpful 2
Tips from our Readers
- If the knife flops over instead of sticking upright when thrown, experiment with different weighted fillings like pennies or metal washers to improve balance.
- For easier folding, use origami paper which already starts as a colored square and doesn't need excess trimming. Construction paper can also work too.
- Display your finished kunai knives under glass or plastic on a wall if possible, when not playing ninja battles. Keeps them looking nice longer!
- To make a sturdier handle, insert a chopstick or pen barrel before wrapping with paper. This helps prevent bending and breaking over time.
- Go slowly and firmly when making folds — don't wrinkle or rip the paper. Unfold and redo any messy folds for a crisp finished look.

- Fold and read the instructions carefully, one little mistake can change a lot. Thanks Helpful 85 Not Helpful 18
- Be wary of paper cuts. Thanks Helpful 72 Not Helpful 28
- Do not aim at people. Thanks Helpful 64 Not Helpful 41
Things You'll Need
- 2 pieces of paper
- A penny or a similar object to add extra weight to make throwing easier.
You Might Also Like

- ↑ http://www.trueswords.com/swords-kunai-knives-c-4_97.html
About This Article
Kunai knives are known for being used by ninjas and assassins. To make a paper one, you’ll need to fold 1 piece of paper into the shape of the blade, then roll a separate piece of paper into the handle. To make the blade, fold a square of paper in half diagonally twice to make a small triangle. Then, unfold it once and fold the edge of 1 side of the paper to the middle. Keep folding until you can’t fold anymore, then tuck the extra paper at the bottom inside the blade. It should resemble a tall, skinny triangle. To make the handle, simply roll a larger square paper into a thin tube. Insert the end into the open bottom of the blade and secure it with a piece of tape. To learn how to make a notch at the bottom of your handle, read on! Did this summary help you? Yes No
- Send fan mail to authors
Did this article help you?

Featured Articles

Trending Articles

Watch Articles

- Terms of Use
- Privacy Policy
- Do Not Sell or Share My Info
- Not Selling Info
Get all the best how-tos!
Sign up for wikiHow's weekly email newsletter
404 Not found
404 Not found
Quill And Fox
Best Design Studio

Amber Robertson
Amber Robertson is the founder of Quill and Fox. A creative writing studio that helps people find their voice and share their stories. Amber is also a published author, with her first book slated for release in 2020. She loves spending time with her family and friends, reading, writing, and traveling. When Amber was younger, she loved to write short stories and plays. But somewhere along the way, she lost touch with her creativity. It wasn’t until she became a mom that she realized how important it was to share her stories—both the good and the bad—with the people she loves most. That’s when Quill and Fox was born. Amber is passionate about helping others find their voice and share their stories. She believes that every person has a story worth telling, and it’s her mission to help them tell it in a way that is authentic and true to themselves
How to Make a Paper Kunai: A Step-by-Step Guide
Table of Contents
Kunai is a traditional Japanese tool that was originally used for farming purposes. However, it soon became popular among the ninja, who used it as a weapon. Today, kunai is a popular weapon that is used in martial arts and can be seen in various movies and TV shows. If you are a fan of ninja or martial arts, you may want to learn how to make a paper kunai.
In this article, we will provide you with a step-by-step guide on how to make a paper kunai. We will also provide you with some tips and tricks to make your paper kunai more durable and realistic.
Before we start, let’s take a look at the materials you will need to make a paper kunai.
- A4 size paper (2 sheets)
You can use any type of paper, but we recommend using printer paper as it is easy to fold and cut.
Now that you have all the materials, let’s get started with the steps to make a paper kunai.
Step 1: Fold the paper
Take one sheet of A4 size paper and fold it in half lengthwise. Crease the paper and unfold it. Now, fold the paper in half widthwise and crease it again. Unfold the paper, and you should have four equal sections.
Step 2: Cut the paper
Take your scissors and cut along the crease that you made in step 1. You should have two equal pieces of paper.
Step 3: Fold the paper again
Take one of the pieces of paper and fold it in half lengthwise. Crease it and unfold it. Now, fold the paper in half widthwise and crease it again. Unfold the paper, and you should have four equal sections.
Step 4: Fold the corners
Take the top left corner of the paper and fold it down to the center crease. Crease it and repeat the same step with the top right corner. Flip the paper over and repeat the same step with the bottom corners.
Step 5: Fold the paper in half
Fold the paper in half lengthwise, bringing the top edge to the bottom edge. Crease it and unfold it.
Step 6: Fold the paper diagonally
Take the top left corner of the paper and fold it diagonally to the center crease. Crease it and repeat the same step with the top right corner. Flip the paper over and repeat the same step with the bottom corners.
Step 7: Fold the paper in half again
Step 8: Fold the top corner
Take the top edge of the paper and fold it down to the center crease. Crease it and repeat the same step with the other side.
Step 9: Form the handle
Fold the paper in half widthwise, bringing the two edges together. Crease it and unfold it. Now, fold the paper in half lengthwise, bringing the top edge to the bottom edge. Crease it and unfold it. Now, fold the paper in half diagonally, bringing the top left corner to the bottom right corner. Crease it and unfold it. Repeat the same step with the other side.
Step 10: Assemble the kunai
Take the second sheet of A4 size paper and repeat steps 1-9. Now, take one of the pieces of paper and apply glue to the handle. Place the other piece of paper on top of it, making sure that the corners match. Apply glue along the edges to seal the kunai.
Congratulations, you have successfully made a paper kunai! In the next section, we will provide you with some tips and tricks to make your paper kunai more durable and realistic.
Steps in Making a Paper Kunai (Continued)
Step 11: Finish the kunai handle
Apply glue to the handle and wrap it with tape. Cut off any excess tape to make it look neat.
Step 12: Decorate the kunai
You can now decorate your kunai to make it look more realistic. You can use markers or paint to add details to the handle and blade.
Tips and Tricks
Now that you have made your own paper kunai, here are some tips and tricks to make it more durable and realistic.
Tip 1: Use thicker paper
Using thicker paper can make your paper kunai more durable. You can use cardstock or construction paper instead of printer paper.
Tip 2: Use glue instead of tape
While tape can be used to seal the edges of the kunai, glue can make it more sturdy. You can use a glue stick or liquid glue to apply a thin layer of glue along the edges.
Tip 3: Add weight to the handle
Adding some weight to the handle can make the kunai feel more realistic. You can use small rocks or sand to fill the handle before sealing it.
Tip 4: Add a sheath
To protect your paper kunai, you can make a sheath out of paper or cardboard. Cut out a rectangular piece of paper, fold it in half lengthwise, and glue the edges to create a pocket for the kunai.
Common Mistakes to Avoid
Here are some common mistakes that you should avoid when making a paper kunai.
Mistake 1: Cutting the paper too small
Cutting the paper too small can make it difficult to fold and can result in a small and fragile kunai.
Mistake 2: Not creasing the paper properly
Not creasing the paper properly can make it difficult to fold and can result in a misshapen kunai.
Mistake 3: Using too much glue
Using too much glue can make the paper soggy and can result in a weak kunai. Apply a thin layer of glue along the edges to avoid this.
By following these tips and avoiding common mistakes, you can make a durable and realistic paper kunai that you can proudly display or use in your martial arts practice.
Variations and Designs
Now that you know how to make a basic paper kunai, you can experiment with different designs and variations to create a unique kunai. Here are a few ideas to get you started:
- Double-sided kunai: Instead of using one sheet of paper, use two sheets of paper to create a double-sided kunai. This will make your kunai more durable and realistic.
- Colored kunai: Use colored paper to create a kunai that stands out. You can also use markers or paint to add more details to your kunai.
- Embellished kunai: Add some extra flair to your kunai by adding embellishments such as glitter, sequins, or stickers.
Remember, the possibilities are endless when it comes to creating a paper kunai. You can customize your kunai based on your preferences and create a design that is unique to you.
In conclusion, making a paper kunai is a fun and easy project that anyone can do. By following the step-by-step guide we provided, you can create a basic paper kunai in no time. We also provided some tips and tricks to make your paper kunai more durable and realistic, as well as some ideas for different designs and variations.
We encourage you to give it a try and see what kind of kunai you can create. Not only is it a fun activity, but it can also be a great way to show off your ninja skills to your friends and family. So, grab your paper and scissors and get started on your paper kunai today!
The Tech Edvocate
- Advertisement
- Home Page Five (No Sidebar)
- Home Page Four
- Home Page Three
- Home Page Two
- Icons [No Sidebar]
- Left Sidbear Page
- Lynch Educational Consulting
- My Speaking Page
- Newsletter Sign Up Confirmation
- Newsletter Unsubscription
- Page Example
- Privacy Policy
- Protected Content
- Request a Product Review
- Shortcodes Examples
- Terms and Conditions
- The Edvocate
- The Tech Edvocate Product Guide
- Write For Us
- Dr. Lynch’s Personal Website
- The Edvocate Podcast
- Assistive Technology
- Child Development Tech
- Early Childhood & K-12 EdTech
- EdTech Futures
- EdTech News
- EdTech Policy & Reform
- EdTech Startups & Businesses
- Higher Education EdTech
- Online Learning & eLearning
- Parent & Family Tech
- Personalized Learning
- Product Reviews
- Tech Edvocate Awards
- School Ratings
How to Start a Tanning Salon: 8 Steps
How to keep your job, 3 simple ways to do kali, 3 ways to prepare for a school picture, how to enjoy life after 50: 13 steps, how to write a story for a movie: 9 steps, 3 ways to find your ideal partner, 8 ways to prepare land for farming, 3 easy ways to dispose of razor blades safely, how to make a paper kunai knife.
Origami has long been a popular art form in Japan and has become more popular all around the world. One such creation, the paper kunai knife, is an impressive representation of a traditional Japanese throwing knife. The paper kunai knife is an exciting way to ignite your creativity, showcase your origami skills, and learn about Japanese culture all at once. In this article, we’ll guide you through the steps on how to make your own paper kunai knife.
Materials You’ll Need:
– Two sheets of A4 paper (one for the blade and one for the handle)
– Scissors
– Glue or tape
– Optional: Additional materials like markers to decorate
Step-by-step Instructions:
1. Start with the Blade
* Take your first sheet of A4 paper and fold it in half lengthwise.
* Crease well and unfold.
* Fold both edges toward the center crease, so they meet in the middle.
* Fold again in half lengthwise, hiding the edges you just folded over.
* Fold one end up diagonally to align with the top edge. This will create a triangle shape at one end.
* Repeat on both sides. This will form the tip of your blade.
* Secure with glue or tape if necessary.
2. Create the Handle
* Take your second sheet of A4 paper and fold it in half lengthwise.
* Starting from one corner, roll it up along the short side into a tight tube until you reach the other corner.
* Use glue or tape to secure it together.
3. Assemble Your Paper Kunai Knife
* Take your blade and handle that you created previously.
* Insert one end of the handle into the open side of the blade’s base (where it’s not pointy).
* Push it in about an inch to ensure a stable connection.
* Secure the connection with glue or tape if necessary.
4. Add Final Touches
* Customize your kunai knife by decorating the handle and blade with markers or colored pencils.
* Draw patterns, symbols, or even your ninja name to make it truly unique.
Congratulations! You’ve now created your very own paper kunai knife. This crafty project is perfect for honing origami skills, sharing with friends, or hosting an exciting themed party activity. With practice and creativity, you can become a true origami master while having fun and learning about Japanese culture. Happy folding!
How to Clean a Kitchen
4 ways to hide.

Matthew Lynch
Related articles more from author.

How to Make Ethiopian Coffee (Buna)

4 Ways to Transport Fish
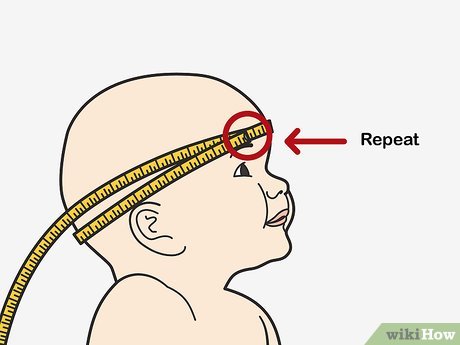
3 Ways to Measure Head Circumference
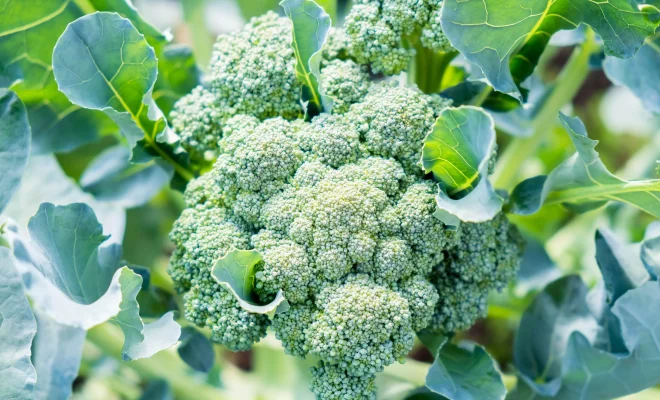
How to Pick Broccoli: 14 Steps

4 Ways to Build a Playhouse

3 Ways to Draw Bubble Letters
Not logged in
- Recent changes
- Random page
- From WikiHow
- Toy Weaponry
Make a Paper Kunai Knife
Kunai are believed to be derived from a type of gardening tool, but now are famously known as the preferred knives of ninjas [1] , made popular in Japanese Animes and Mangas such as Naruto. Now you can make them yourself out of paper!
- 1.1 Folding the Blade
- 1.2 Making the Handle
- 1.3 Finish the Kunai Knife
- 4 Things You'll Need
- 5 Related Articles
- 6 Sources and Citations
Folding the Blade
- Gather the rest of your materials. These include some tape, scissors (to cut the paper into squares), and, optionally, a small, heavy object, like a penny.
- Holding the smaller square, fold one corner to the opposite side. It should now look like a triangle.
- Fold a crease halfway through the paper. It should now look like a smaller triangle.
- Unfold the paper. Now, it's a triangle with a crease.
- Take one of the short sides of the triangle (not the long one) and fold the edge to the middle. The edge of the side you're folding should line up with the crease. Flatten the fold down.
- Keep folding repeatedly until you can't fold it anymore. Then tuck the extra paper inside the kunai.
- Squish the paper from top to bottom so that it creates a kunai shape (grasp by edges and press). This step isn't that necessary. It just makes a flatter kunai.
Making the Handle
- Take the larger square paper and roll it into a thin tube for the handle. Tape it.
- Insert the tube into the hole. You may need to open the blade a bit to allow the tube to fit.
- Optionally, before flattening the extra length of the tube, cut a chopstick to the length of the handle and stick it inside to improve the stiffness of the handle.
- Use a series of folds and reverse folds on the flat side of the tube to create a circle. You'll be making 90 degree folds in the flattened tube, in a counter-clockwise fashion.
- Tape the circle so that it stays. One piece of tape connecting the end of the tube to the unflattened section should do it.
- Tape or staple the tube into the back of the kunai (where the hole is). Make sure the handle is secure. Use extra tape here if necessary.
Finish the Kunai Knife
- Take something heavy and put it inside the knife so that it can fly better. Pennies work well and are cheap. This step is optional.
- Seal the kunai with thick tape so that the heavy object doesn't come flying out when you throw it. Place tape over where the blade and handle meet, enough of it to seal and secure the heavy object in the blade.
- Finished. You've now got your very own paper kunai knife. Avoid throwing it at people as you could injure someone.
- Insert a chopstick or pencil into the tube to make a more stiff handle.
- On step 6, make sure that the corner is sharp for a sharp knife.
- When doing this Origami Paper is recommended, but any piece of paper will suffice when making the Kunai.
- Using electrical tape is better than regular cellophane scotch tape.
- Fold and read the instructions carefully, one little mistake can change a lot.
- Be wary of paper cuts.
- Do not aim at people.
Things You'll Need
- 2 pieces of paper
- A penny or a similar object to add extra weight to make throwing easier.
Related Articles
- Make Throwing Knives
- Make a Pen Gun With a Trigger
- Make a Paper Clip Shooter
- Make a Pocket Bola
- Make a Paper Blowgun
- Make a Ninja Sword Out of Cardboard
Sources and Citations
- ↑ http://www.trueswords.com/swords-kunai-knives-c-4_97.html
- Make an Arrow
- Make a Recurve Bow
- Build a Trebuchet
- Make a Small Crossbow out of Household Items
- Make a Paper Hornet
- Make a Spear
- Make a Tennis Ball Mortar
- Make a Homemade Bow
- Make Homemade Weapons out of Everyday Objects
- Make a Toy Bow and Arrow
What links here
- Make a Paper Knife
You may like
- This page was last modified on 21 September 2022, at 14:43.
- Content is available under Creative Commons Attribution-NonCommercial-NoDerivs 2.5 License unless otherwise noted.
- Privacy policy
- About Kipkis
- Disclaimers
- Mobile view
Glue Guides
Create your own paper kunai without tape or glue.
By Scott Graham
Crafting can be a fun and engaging way to spend your free time, and creating paper weapons can be a great pastime for those interested in ninja culture. Making a paper kunai without tape or glue may seem like a challenging task, but with the right guidance, it can be an enjoyable experience. In this article, we will provide a step-by-step tutorial on how to make a paper kunai without the need for any additional supplies beyond paper and scissors. So, grab your materials and let’s get started!
Materials Needed:

When it comes to making a paper kunai, the first material you’ll need is, of course, paper. But not just any paper will do. For this project, you’ll need a sheet of regular printer paper measuring about 8.5 x 11 inches. It’s important that the paper isn’t too thick or too thin, as this will affect the durability and usability of your kunai.
Tip: If you don’t have printer paper, you can also use origami paper or any other thin, rectangular paper that’s a similar size.
To make your kunai even sturdier, you can use double-sided paper. This is paper that’s colored or patterned on both sides, so there’s no plain white side to be seen. Using double-sided paper can add a pop of color and extra style to your kunai.
Pro tip: To make your paper kunai extra-special, you can use metallic or glitter paper. These types of paper can make your kunai shimmer and shine, perfect for a ninja-themed party or cosplay.
No matter what type of paper you use, make sure it’s completely flat and free of creases or tears. This will make the cutting and folding process much easier and smoother.
Internal link: How to Use Wood Glue
When it comes to making a paper kunai without tape or glue, the scissors are a critical tool in the process. A good pair of scissors will make your kunai-making much easier and faster. It is important to choose a sharp pair that can easily cut through paper without tearing it. Using blunt scissors can damage the paper and result in an uneven or messy kunai.
To ensure that your scissors are sharp, you can use a sharpening stone or take them to a professional for sharpening. It’s also crucial to handle the scissors with care to avoid injury. When not in use, keep them in a safe place where they won’t be accidentally knocked over or stepped on.
Pro Tip: If you’re in search of a fun craft project to do after making your paper kunai, check out our article on how to make slime at school without glue . Or, if you’re wondering how to attach vellum paper to glass, read our guide on how to glue vellum paper to glass . Additionally, if you want to know how to make glue from scratch for your next art endeavor, we have an article on how to make Art Attack glue .
Step-by-Step Tutorial:

Step 1 – Cut the Paper
To make a paper kunai without tape or glue, the first step is to cut a piece of paper to the appropriate size. It’s best to use a rectangular piece of paper, such as printer paper or origami paper. The size of the paper will determine the size of the kunai, so choose a size that feels comfortable in your hand.
Pro tip: If you want a smaller kunai, you can use half a sheet of paper.
To cut the paper, place it on a flat surface and use a pair of scissors to cut it to the desired size. If you’re not sure what size you want, start with a larger piece of paper and cut it down as needed. It’s always better to start with a larger piece that you can trim down than to cut a piece that’s too small.
Note: If you’re having trouble finding scissors or want to avoid using them, you can use a craft knife instead. Just be careful not to cut yourself!
Once you’ve cut the paper to the right size, you’re ready to move on to the next step. But before we do, let’s take a moment to review the materials you’ll need for this project.
Now that you have your materials ready, let’s continue with the tutorial.
Step 2 – Fold the Paper in Half
After cutting the paper to the correct size, the next step is to fold it in half. This step creates the basic shape of the kunai and makes it easier to manipulate. To fold the paper, take one corner and fold it over to the opposite corner, making sure that the edges line up neatly. Use your fingers to press down firmly on the fold, making it as sharp as possible.
Pro tip: If you are having trouble making a sharp crease, run a fingernail or the edge of a credit card along the fold to make it more defined.
Once you have folded the paper in half, unfold it and you will see that it now has a distinctive crease down the center. This crease will be the guiding line for the next few steps.
Note: If you are having trouble folding the paper neatly, try using a ruler to help guide the fold.
Folding the paper in half is a simple step, but it’s important to get it right. A poorly folded kunai won’t hold its shape and won’t look as impressive. Take your time with this step and make sure that the fold is as neat and precise as possible.
If you need a break from folding, why not check out our article on how to make slime with clear glue ? It’s a fun activity for kids and adults alike!
Step 3 – Make the Handle
To make the handle of the paper kunai without using any tape or glue, fold the corner of the paper that doesn’t have the tip down to create a triangle. To help create a more secure handle, use scissors to slightly trim the top of the triangle to create an even edge.
Next, take the short end of the triangle that is opposite the hypotenuse and fold it upwards towards the tip of the kunai, using the top of the triangle as a guide. Once it is folded upwards, use the scissors to trim off the excess paper that is sticking out past the hypotenuse line.
Now, fold the long end of the triangle that is opposite the hypotenuse down over the short end that was just folded up. This should create a long rectangle shape with a triangular flap hanging off of one end. Use a flat edge, such as a ruler or the edge of a table, to crease along the edge of the rectangle where the two ends of the paper meet to ensure the handle stays in place.
To finish the handle, fold the triangular flap down towards the side of the paper that will be the blade. Tuck the flap under the edge of the rectangle handle to secure it in place. Use the scissors to trim any excess paper that may be sticking out from the handle to create a clean and streamlined look.
Note: Be sure to use caution when using scissors during this step and make sure to handle sharp objects with care to avoid injury.
It’s important to have a secure handle on your paper kunai. If you’re allergic to surgical glue, check out this article for tips on how to treat an allergic reaction. Additionally, if you’re wondering what kind of glue to use on a dryer seal, check out this article for helpful information.
Step 4 – Fold the Tip
Now it’s time to fold the tip of your paper kunai to complete its distinctive and iconic shape. Follow these steps:
- Take the top corner: Starting with the top corner of the paper, fold it diagonally downward so that it aligns with the bottom of the paper, forming a triangular point at the top.
- Fold the sides: Next, fold the two sides of the paper kunai towards the center crease line, creating a sharp tip at the end of the folded paper.
- Tuck in the flaps: At the base of the kunai, there should be two flaps sticking out. Tuck these flaps inside the folded paper, creating a smooth and even tip.
- Perfect the shape: With the flaps securely tucked in, adjust the shape of your kunai by pressing down on the folds and creases to form crisp and defined edges. Make sure the tip is even and sharp for an authentic and polished look.
Once you’ve finished folding the tip, give your paper kunai a test run by throwing it into the air and letting it stick into a nearby target. With some practice and attention to detail, you can create a paper kunai that looks and feels like the real thing.
Decorate Your Kunai:
Now that you’ve learned how to make a paper kunai without tape or glue, it’s time to take it to the next level and add your own personal touch. There are several ways to decorate your kunai and make it truly unique. Get ready to unleash your creativity and make your paper kunai stand out from the rest! Let’s explore some of the options for decorating your paper kunai.
Option 1 – Coloring
One fun way to decorate your paper Kunai is through coloring. Here are some tips to make your coloring pop:
- Use vibrant colors: Using bold and bright colors can make your paper Kunai look more eye-catching and playful.
- Add shading: Adding shading to your Kunai can create an illusion of depth and dimension. You can do this by coloring one side of the Kunai a little darker than the other.
- Consider a gradient: Gradient coloring can create a beautiful transition of colors that makes the Kunai look more polished. To achieve this effect, color your Kunai using a light hue on one end and a darker shade on the other end. Then blend the colors in the middle.
- Add texture: You can also add some texture to your Kunai by experimenting with various coloring techniques such as cross-hatching, stippling, and blending.
By following these simple coloring tricks, your paper Kunai can become a unique and striking piece of art.
Option 2 – Add Details
To take your paper kunai to the next level, you can add intricate details to make it look more realistic. Here are some ideas for adding details to your paper kunai:
- Carve out a design: Once you have your basic paper kunai, you can take a pair of scissors or a craft knife and carefully carve out designs on the handle or blade. This can include anything from simple lines to more complex designs like swirls or even kanji characters.
- Add texture: To give your paper kunai a rougher, more realistic feel, you can try crumpling up the paper before you fold it. This will create a texture that mimics the look of metal. You can also use sandpaper or a nail file to rough up the edges of the paper kunai.
- Paint on details: If you want to add color to your paper kunai or highlight certain details, you can use acrylic or watercolor paint. This can include painting the handle a different color, adding shading to the blade, or outlining the design you carved out.
- Make it look battle-worn: To give your paper kunai the look of a weapon that has seen some action, you can add scratches or tears to the paper. You can use a craft knife or scissors to carefully make small scratches or cuts in the paper surface, making sure not to rip the whole kunai.
- Add a tassel: For a finishing touch, you can add a small tassel to the end of the handle. To make a tassel, cut a small strip of paper or string and loop it through the hole at the end of the handle. Tie a knot at the bottom and snip the ends to create a tassel.
These are just a few of the ways you can add extra details to your paper kunai and make it look more polished and realistic. Get creative and experiment with different techniques to see what works best for you.
Option 3 – Use Multiple Papers
If you want to take your paper kunai to the next level, consider using multiple papers . This technique allows you to create a kunai with different colors or patterns. To use multiple papers, follow these steps:
Using multiple papers is a great way to add variety to your paper kunai, and it can be especially fun for kids who want to get creative with their art projects. Consider using patterned paper for a unique look or using different shades of the same color for a subtle effect. The possibilities are endless! Just remember to be careful when folding and handling the papers to ensure that your kunai stays intact.
After following the step-by-step tutorial on how to make a paper kunai without tape or glue, you should now have a completed paper kunai! Congratulations on your creation!
Remember that while this paper kunai may not be as durable as a real one, it can still be a fun and creative way to pass the time. You can also use it as a prop for cosplay or as a decoration in your bedroom or office.
If you’re feeling particularly artistic, try decorating your paper kunai using one of the options listed in the article. Whether you choose to color it, add details, or use multiple papers to create a set, you can really make it your own.
Overall, making a paper kunai without tape or glue is a great DIY project that anyone can try. With just a few materials and some patience, you can create a unique and fun item that shows off your creativity. So go ahead and give it a try – you might be surprised at how much fun it is!
Frequently Asked Questions
1. can i use any type of paper to make a paper kunai.
Yes, you can use any type of paper as long as it’s a rectangular shape. However, thicker paper may be more difficult to fold and manipulate.
2. Do I need to use tape or glue to hold the paper kunai together?
No, this tutorial will show you how to make a paper kunai without using tape or glue.
3. Is this paper kunai durable enough for throwing?
This paper kunai is not meant for throwing or any type of rough play. It is purely for decoration purposes.
4. How long does it take to make a paper kunai?
It depends on your level of experience with origami or paper crafting. However, this tutorial should take about 10-15 minutes.
5. Can I make a smaller or larger paper kunai using this tutorial?
Yes, you can adjust the size of your paper kunai by using smaller or larger paper and adjusting the measurements accordingly.
6. Is it okay to use scissors instead of a cutting tool?
Yes, scissors can be used instead of a cutting tool to cut the paper for your kunai.
7. Can I decorate my paper kunai with markers instead of coloring it?
Yes, markers or any other type of coloring tool can be used to decorate your paper kunai.
8. Is it possible to make multiple paper kunais at once using this tutorial?
Yes, you can make multiple paper kunais by using multiple sheets of paper and following the same steps.
9. Can I use this tutorial to make a paper kunai with a point or blade?
No, this tutorial is for making a paper kunai with a rounded tip only.
10. What should I do if I am having trouble following the steps in this tutorial?
If you are having trouble following the steps in this tutorial, try watching a video tutorial or asking for help from someone who has experience with origami or paper crafting.
- How to Make a Paper Knife | LoveToKnow – Kids
- How to Make a Paper Kunai Knife (with Pictures)
How to Cure UV Glue Without Lamp
The ultimate guide: how to glue posters to walls, leave a comment cancel reply.
Save my name, email, and website in this browser for the next time I comment.
Paper Kunai

Introduction: Paper Kunai

Here I will show you how to make a paper Kunia.

First You need to print and cut the print out below. Now fold along the lines. At the line going horizontily on each side there should be to cuts. You might need to resize the print out below. At the cut tape it together. Do this for both of them. Now tape them both together.

Now fold the rectangle together down the middle. Now roll it as tight as you can and tape it to the bottom of the other part.

There you're done! Below is the finished product

Participated in the Halloween Props Contest

Participated in the Office Supplies Contest

Participated in the Hurricane Lasers Contest
Recommendations

Big and Small Contest

Make it Resilient

Making Time Contest

IMAGES
VIDEO
COMMENTS
Subscribe for more amazing videos! https://bit.ly/33SNrhK How To Make an Origami Ninja Kunai!For this origami you only need an A4 square sheet of paper, ...
1. Take the larger square paper and roll it into a thin tube for the handle. Tape it. 2. Insert the tube into the hole. You may need to open the blade a bit to allow the tube to fit. 3. Wrap your hand around the section of the tube next to the blade. Make sure there's enough of the tube that you can hold it.
In this video I showed you How to Make an Origami Ninja Kunai.For this origami you only need A4 paper, scissors and / glue. Follow this step-by-step tutorial...
In this video we show you how to make an origami Ninja Kunai.For this origami you only need an A4 sheet, scissors and glue. Follow this step by step tutorial...
On make a paper kunai, start on 2 square pieces of paper, one bigger than the sundry. Record the little square, which you'll use to make the blade for thine cutting, press fold it in half diagonally as it looks likes an triangle-shaped. Then, fold the paper includes half again to make a smaller trident, and unfold.
Fold the tail of the kunai in half. Unfold and fold down at a right angle. Fold that part in half so itâ s thinner than the handle. Fold it around however you see best to make the circle. (I had to do his on a sperate piece of paper because the picture didnâ t quite make sense) Fold the kunai blade to form to shape
Kunai knives is known for being used by ninjas and assassins. Go make a paper one, you'll want on fold 1 piece of paper into the shape of which blade, then roll a separate piece off paper the the handle. In make the vane, fold a square is paper in one diagonally two-time to make ampere small triangle.
This is how to make a paper kunai knife with just 2 pieces of paper, stapler , and pennies. Step 1: The Supplies. You need two pieces of paper , staples , and pennies. Step 2: Start (To skip just make a paper claw.) Start like if you were going to make a square and fold so a corner meets the opposite side like in the picture.
You have to turn one over and put one flap of one and put it in between the other one's flap. Make sure the flat side faces out and it remains flat! Step 9: Have Some Fun... With Tape! Duct tape them together so they'll stay. Be extremely careful about the flaps on the end (the shorter end)Don't tape them together! Optional: wrap tape around ...
How to Make an Origami Ninja Kunai! For this origami you only need an A4 square of paper, scissors. Follow this step-by-step tutorial and add a kunai to your...
Start by folding the paper in half lengthwise. Crease the fold with your finger, and then unfold the paper. Fold the top two corners of the paper down to the center crease. This will create a diamond shape at the top of the paper. Fold the bottom of the paper up so that the edge meets the bottom of the diamond shape.
Adding some weight to the handle can make the kunai feel more realistic. You can use small rocks or sand to fill the handle before sealing it. Tip 4: Add a sheath. To protect your paper kunai, you can make a sheath out of paper or cardboard. Cut out a rectangular piece of paper, fold it in half lengthwise, and glue the edges to create a pocket ...
In this article, we'll guide you through the steps on how to make your own paper kunai knife. Materials You'll Need: - Two sheets of A4 paper (one for the blade and one for the handle) - Scissors - Glue or tape - Optional: Additional materials like markers to decorate. Step-by-step Instructions: 1. Start with the Blade * Take your ...
Hey everyone, In this video I have shared an easy and beautiful way to make a Kunai Knife from a paper. This easy craft tutorial will help you to make this p...
Keep folding repeatedly until you can't fold it anymore. Then tuck the extra paper inside the kunai. Squish the paper from top to bottom so that it creates a kunai shape (grasp by edges and press). This step isn't that necessary. It just makes a flatter kunai. Making the Handle. Take the larger square paper and roll it into a thin tube for the ...
Step 4: Attaching the Handle Ring. Create a square piece of paper by folding the fourth sheet of paper into a triangle- like shape as shown and cut off the excess. Fold the square over and over to form a slip of paper just less than one centimeter long, and tape it together. Create a ring on the handle by folding the end over, leaving a hole ...
Fold each paper in half lengthwise and make a crease along the center. Step 3. Place one folded paper on top of the other, making sure that the creases are lined up. Step 4. Follow steps 3 and 4 of the previous section to create the handle and fold the tip of the kunai.
Instructions on how to make kunai from A4 paper.Help: Kunai (苦 無 / kunai)) - Japanese dagger with a large blade and a ring on the handle (for attaching the r...
Step 1: Beginning the Kunai. Take 1 piece of paper. first take the right side and fold it all the way to left side. Then take the bottom and fold it up to the top. Unfold it and turn it so that the paper looks like a book. Fold up both bottom corners until they meet the crease in the middle. It might remind you of a paper airplane.
Welcome to our YouTube tutorial on how to make an Origami Paper Kunai! In this step-by-step video, we will guide you through the process of creating a stylis...
Origami paper kunai making very easy tutorial for kids - Paper knife make your own hand for your children #kunai #knife #crafts | craft, origami, tutorial
Inspired by the legendary Minato, dive into the world of shinobi as we guide you through the exciting process of creating your own kunai. Using the art of pa...
First You need to print and cut the print out below. Now fold along the lines. At the line going horizontily on each side there should be to cuts. You might need to resize the print out below. At the cut tape it together. Do this for both of them. Now tape them both together. Ask Question.