- Grades 6-12
- School Leaders
FREE Poetry Worksheet Bundle! Perfect for National Poetry Month.

How To Make Paper Airplanes (Free Printable + Videos)
Soar into a world of creativity, problem-solving, and hands-on learning!

Teaching kids how to make paper airplanes isn’t just a fun activity. It’s also an opportunity to build fine motor and critical thinking skills. Plus, it introduces them to the basic concepts of aerodynamics, such as lift, drag, and thrust.
Ready to get started? Follow our simple step-by-step directions for making three different paper airplanes. You’ll learn how to fold a dart plane, a glider plane, and a stunt plane. There’s even a free printable with instructions so kids can follow along as they soar into a world of creativity, problem-solving, and hands-on learning!
@weareteachers_ We’re sharing how to make paper airplanes on WeAreTeachers.com. Get printable directions for three different paper airplanes! #paperairplane #diy #funforkids ♬ Cute and heartwarming song B: Editing 2 – Ken Nakagawa
Step 1: Fold the paper in half lengthwise.

Step 2: Unfold. Then fold both top corners into the center crease.

Step 3: Fold both top edges into the center crease.

Step 4: Fold the paper in half lengthwise along the existing crease.

Step 5: Fold both edges down to meet the bottom fold.

You finished the dart plane!

Glider Plane
@weareteachers_ Make a glider paper airplane! #paperairplane #diy #funforkids ♬ A 3-minute song that is ideal for the BGM of cooking videos(1031572) – mi-ya

Step 3: Fold the paper in half lengthwise along the existing crease.

Step 4: Fold both edges down to meet the bottom fold.

Step 5: Fold the bottom of both wings up to meet the top fold.

You finished the glider plane!

Stunt Plane
@weareteachers_ Make a stunt paper airplane! #paperairplane #diy #funforkids ♬ The song is bright and has a sense of speed from the second half. – Syatk
")
Step 3: Fold the top point down to touch the bottom of the folded edge.

You finished the stunt plane!

Paper Airplane Printable Directions
")
Ready to save and print your free paper airplane printable directions? Just click the orange button to fill out the form at the top of this page.
Yes, I Want My Paper Airplane Printable Directions!
Plus, check out our favorite STEM activities .
Want more sign up for our newsletters to be the first to know about new articles.
Copyright © 2023. All rights reserved. 5335 Gate Parkway, Jacksonville, FL 32256

Paper Airplanes: The science behind it
Sharing is caring!
- Pinterest 13
Do you remember folding and flying paper airplanes when you were a child? It turns out that they’re not only fun, but can be a great teaching experience for your child.
Building paper airplanes with your child helps them to understand simple principles of aerodynamics, like what makes a plane fly and what can affect the flight. It also helps with the concept of distance, since you can measure how far each paper airplane flies during your experiment.
I know it sounds a little intimidating to teach your child about aerodynamics, but these concepts are very basic and I walk you through the entire thing below!
How to make the Paper Airplanes experiment
Supplies you will need.
For the paper airplane experiment, you’ll need:
- 3 sheets of printer paper

Before you start
Although I do walk you through the steps of making 3 different paper airplanes, I did gather these folds from a great site called Fold ‘N Fly . If you find these particular airplanes challenging, you may find a better fit for you on their site.
I do recommend choosing 2-3 different airplane folds so you can cover the science behind it by comparing the models. The 3 folds I cover here have varying wing lengths, and that’s what we will talk through in the “Science Behind It” section.
Instructions
Here is how to do the paper airplane experiment with your child:
Step 1: Fold 2-3 paper airplanes
I chose to do 3 paper airplane folds. I’ll link to each one on the Fold ‘N Fly site below, as well as include a quick video of me folding them.
“The Basic” – this is the paper airplane fold that most people first learn how to fold. Very easy to do!
“Basic Dart” – the next level up from the basic airplane fold. It’s sleeker and is supposed to travel farther.
“The Stable” – I hadn’t heard of this fold before, but it was easy to do and, like its name, is very stable and can fly far.
Get your preschooler involved : If your child is able to do simple folds, allow them to make the first couple of folds on each paper airplane. If not, then start the fold and let them press on the crease.
(Optional) Step 2: Create a runway to track the flying distance of each airplane
I chose to use painter’s tape on the carpet for this step. Just stick a few lines of tape on the carpet before flying your airplanes and see which went the farthest!
Get your preschooler involved : Let them fly the plane! Show them how to hold it properly and how much force to throw it with and see how far they can throw it. If you have extra paper, create an extra airplane of each fold so you can compete!
The science behind the Paper Airplanes experiment
Teaching your child about aerodynamics is a lot more fun when they get to build and fly airplanes. This experiment does just that: testing out different airplanes, asking questions about why and what makes them fly further, and flying them to find the answers!
In our experiment, we test out 3 different airplanes of varying wing lengths and bodies. This allows us to answer important questions about flying airplanes:
- Which model of airplane will fly farther? One with a shorter or longer wingspan?
- Does the length of the airplane affect anything?
- Which model allows us to fly higher? Perform spins? Fly further? Fly more controlled?
While you’re running the experiment with your child, compare the wingspans before flight, then test each one. It will help them to keep that information in mind while flying the airplanes.
How it works
There are several different forces at work that affect how far our paper airplanes will fly:
- Drag – resistance our airplanes encounter while moving through the air
- Thrust – the forward movement of the airplane, which is provided by us in this experiment
- Lift – the air below the airplane wings that help it keep flying
- Gravity – the force that pulls the airplane downward
The first and third folds, “Basic” and “The Stable” are considered gliders (although “Basic” is more of a hybrid between a dart and glider) and the second fold is a dart.
Gliders can utilize lift much better than darts due to their larger wingspan, although they cannot tolerate much thrust to get it started. Darts, on the other hand, can tolerate a large amount of thrust but cannot utilize lift as well.
While the larger wingspan does allow the gliders to have longer flight time, they do not technically fly the farthest distance. Darts, given their resiliency to a larger amount of thrust, allow them to fly farther and spend less time aloft.
More physics experiments to try out with your child
- Catapults – build a catapult and see what makes your objects fly farther!
- Sink or float – what is density and how do you know when something is denser than the liquid it’s in?
FAQ about the Paper Airplanes Experiment
What makes a paper airplane fly farther.
When it comes to distance, dart paper airplanes tend to fly farther than a glider. This is due to the amount of thrust a dart can handle, giving it more power to fly farther.
Recent Posts
Time Flies When You Build a Water Clock!
This ancient device used for keeping time is what we'll be making today. The water clock, or clepsydra, was invented thousands of years ago to keep track of time passing. It is a device that drips...
Cloudy with a Chance of Creativity: A cloud collage adventure for kids
Does your child enjoy looking up at the clouds and finding shapes? If so, they will love making cloud collages! This experiment helps kids to understand some basic meteorology, the water cycle,...
The Joy of Teaching
Sharing creative ideas and lessons to help children learn.

Paper Airplane STEM Challenge for grades 3–6
January 16, 2020 by Evan-Moor | 0 comments

Paper airplanes are the perfect STEM project for classroom science lessons! It’s an easy and fun lesson idea for large groups of children, and teaches key scientific concepts like aerodynamics, velocity, thrust, speed, and other scientific forces. Teach your students about the different components of flight while making it a fun and memorable experience! As a summer camp counselor, I used this project nearly every week. The children were engaged and interested for long periods of time, designing their own planes, coloring them, trying out different styles, and testing flight!
Listed below are three simple paper airplane designs to include in your STEM aerodynamics lesson.
How to Make Paper Airplanes
This activity will teach your students about aerodynamics, the forces of flight, and the fun of paper airplanes! By making three different models of paper airplanes and testing each of them, students will begin to understand what makes a plane fly and how they can design their very own paper airplane!
You’ll need to gather some materials for paper airplane making and testing. You’ll need:
- I’ve found that while children like to use colored construction paper, it is too heavy to fly and a bit more difficult to fold, so I would recommend regular printer paper or lightweight colored paper.
- Paper clips (optional)
- Tape (also optional)
- It’s always fun to have the students decorate their planes! You can even have them give their planes a name and write it along the side. Each plane will look very different!
- Tape measure
- Large outdoor space (preferred)
Once you have all the listed materials, you’ll need an Airplane Comparison Chart, like the one shown below. These are simple to make and reproduce. You simply need three columns and nine rows. Each row will be for an individual trial of one of the airplanes. Each column will measure the time, distance, and average measurements of each plane.
Follow the directions to create three different paper airplane designs. Tips for paper airplane folding: Line up your fold before you crease. Make good creases and tight folds to improve the aerodynamics of the plane. Keep your folding as symmetrical as possible for better flight results. Add tape if you will be throwing the plane multiple times so it doesn’t fall apart after each throw. Staples also work, but will add weight to the plane.

- Fold your paper hot dog style.
- Lay the paper out in front of you, portrait style.
- Fold the top-right corner to the center crease, lining up the edges and creating a triangle.
- Do the same thing with the left corner.
- Fold the right side again, along the crease.
- Do the same thing with the left side.
- Fold the plane inwards, in half, so the previous folds are on the inside.
- Fold back one side so the edges align.
- Flip and repeat with the other wing.
Tip for throwing: For this plane, hold it slightly above your head when throwing to achieve a better liftoff. Use a nice level throw; don’t aim too high or too low.

- Fold the point of the plane down, creating a fold along the bottom of the corner triangles. The tip should be about ⅓ of the page from the bottom of the paper.
- Fold the top-right corner to the center, about one inch above the tip.
- Repeat with the left corner. This should create a small triangle at the point.
- Fold the small triangle up.
- Flip your plane over so that your folds are on the table.
- Fold your plane in half, left side onto its right, so the edges line up.
- Fold the top wing down so your edges align.
- Flip and repeat with other wing.

- Fold your paper hamburger style.
- Lay the paper out in front of you, landscape style.
- Fold the top-right corner point to the center, about an inch and a half from the top of the paper.
- Repeat with the top-left corner point, forming a wide upside-down triangle at the top of the paper.
- Fold the top of the paper down, to the tip of the upside-down triangle.
- Fold the top over itself again, crease well. Repeat this fold twice more.
- Fold in half, inwards. Unfold.
- Fold in half, outwards.
- Make a crease about one inch from the left edge and fold the right side/top wing to the left on this crease. Flip and repeat.
- Fold 1 inch on edge of wings up.
Hint: For this plane, throw it angled more steeply upwards, instead of straight, to see it glide. This plane needs a hard throw.
Tips for airplane throwing: Most planes require a loose and light grip, and a quick throw. Tilt your plane up slightly before you throw it, and release early. This will help your plane catch the wind and propel itself upwards, using lift force.
- Fly the planes to test time aloft and distance. Record the information on the Airplane Comparison Chart. (to match chart)
- After testing, have students try to design their own paper airplane, using components from the planes they’ve already made. Have them name their new plane.
- Test the students’ planes. Record the test results on the Challenge Chart.
STEM Challenge: Airplane Grade 3
Now that your students are locked in on creating paper airplanes, start to dive into the science behind it! Evan-Moor’s STEM Lessons and Challenges grade 3 features a unit on airplanes and the physical science of air resistance. The unit includes vocabulary like lift , thrust , gravity , drag , and aerodynamics . This STEM unit challenges students to design and create a paper airplane that goes a long distance with accuracy and is available on Teachers Pay Teachers here . Using a premade paper airplane or diagram to demonstrate, discuss the forces of flight with your students. Highlight key vocabulary such as: lift , weight , thrust , and drag .
- Lift is the force that is created by the wings of the airplane, which push air down so the aircraft rises up.
- Weight , along with gravity, pulls down on the plane, opposite the lift.
- Thrust is the force that propels the plane forward, created by the engines of the aircraft.
- Drag is the air resistance that acts opposite the thrust.
Have fun flying your very own paper airplanes! This easy and fun STEM lesson can be adapted for all ages, and paper airplanes never get old. Challenge your students to design their own plane, tweak it for optimal performance, and get creative with their designs and decorations.

Leave a Reply Cancel reply
Subscribe Today!
Sign-up for education inspiration for PreK–8 teachers and parents.
Email address:
Grade Level Pre-K Kindergarten 1st Grade 2nd Grade 3rd Grade 4th Grade 5th Grade 6th Grade 7th Grade +
Profession Teacher Homeschooler Parent School Admin Other
By submitting this form, you are consenting to receive emails from Evan-Moor. You can unsubscribe at any time by using the Unsubscribe link found at the bottom of every email.
4 Simple & Fun Paper Airplanes | STEAM Activity for Kids
by Emily | Feb 28, 2020 | STEAM Experiments , STEAM for Kids | 5 comments

My 5 year old son and 3 year old daughter are currently OBSESSED with making paper airplanes. My son brings home at least two paper airplanes from school every day that he has folded with his friends. When I’m home with my daughter, she usually asks me to fold her a paper airplane about once a day, and when big brother is home she asks him. Now, she has started attempting to fold them herself, and she’s actually doing a really great job!
Once they have the paper airplanes folded they let them fly. They fly the planes through the air testing whose plane can go the fastest, highest, furthest, or shortest distance. Sometimes they try to see if the plane can do tricks, like loops, and spins. Sometimes they hold the plane in their hands and run around the house making airplane noises.

I find paper airplanes everywhere. In their rooms, bathrooms, the kitchen, under my desk chair…but I don’t mind at all. The more paper airplanes they make the more they are learning many STEAM skills. 🙂
Making paper airplanes is an awesome classic STEM/STEAM activity for kids . In this post I’m going to share instructions on making four types of simple paper airplanes, then how you and your kids can test the different airplanes for which fly fastest, glides longest, and more!
Where’s the STEM/STEAM in making paper airplanes?
The STEM skills your child is building while making paper airplanes are:
- How to follow instructions
- Problem solving
- Basic understanding of the forces of flight
Let’s talk about each skill individually. First, and one of the most important in my mind, is creativity . This is what gives us the A to turn STEM to STEAM and is so important for children’s development. Making paper airplanes can be an extremely creative process. From picking the color of the paper, or better yet coloring the paper themselves with patterns, pictures, and designs, to deciding which type and style of airplane to fold there is lots of room for creative exploration in this activity.
To learn to fold a paper airplanes children have to be able and willing to follow instructions . These are two separate points that are equally important to following instructions. They may be mature enough to be able read or listen to instructions and complete the steps, but they have to also be willing to follow those steps exactly. Some kids get too excited and get ahead of themselves and don’t want to wait to hear the next step. This will cause them to miss steps and the plane will fail. It is a great lesson to be willing to slow down, and follow the steps closely.
Troubleshooting the paper airplane’s fold or flight is a great lesson in problem solving for kids. Why did the airplane immediately crash? Why does sister’s plane fly further than brother’s? Why is one plane faster than the other? What modifications can be made to correct these problems? Challenge your child to come up with the answers on their own, and when they can’t help them by figuring it out together.
Finally, your kids will learn about the four forces of flight: lift , weight , thrust , and drag . These four forces must be balanced in order for a plane (paper or commercial) to fly . As the paper airplane flies through the air, lift holds it up. You gave the paper airplane a forward thrust with your arm. Drag from the air made the paper airplane slow down. The paper’s weight , along with gravity, brings the paper airplane back to the ground.
If your child is asking you how the plane flies, you can explain each of the four forces using my descriptions above. Even if you don’t explain the forces they are learning about these things when they see their airplane fly. When they eventually learn about these terms in school, maybe they’ll remember how these forces acted on the paper airplanes they built as a kid. 😉
Lift : The force that causes the airplane to rise up and holds it in the air. It is created by the wings of the airplane, which push air down.
Weight : The force that acts in a downward direction on the plane. The weight of the airplane, along with gravity act opposite to lift in keeping the airplane flying. In order for an airplane to fly, the lift force must be greater than the force of weight.
Thrust : The force that propels the plane in the direction of motion. It is created by your arms strength and motion forward when throwing a paper airplane, or by the engines, rocket, or propellers of larger aircrafts.
Drag : The force that acts opposite the direction of motion, slowing the plane down. It is caused by friction and air resistance. The front of an airplane is narrow to create less drag.
Check out these awesome resources that I referenced while creating this post. You will find even more paper airplane ideas and instructions on these sites:
- The Four Forces of Flight by NASA
- Paper Airplane STEM Challenge for grades 3-6 by Evan-Moor
- Paper Airplane STEM Challenge by BEE-A-Maker on TPT
Below you’ll find instructions (including photos and videos) on how to fold four simple paper airplanes . This is a great activity to do together with your children of any age. Younger kids (~age 2-3) can color the paper, watch you fold, help press the creases, and then they can have fun throwing the planes to make them fly. Maybe they’ll start to fold the paper airplanes themselves after observing you do it a few times. Older kids (~ages 4+) can begin following the instructions and fold the plane themselves.

My tips for making these planes with your kids a better experience:
- Carefully and patiently help them line up the ends of paper to make them even BEFORE creasing a fold.
- Emphasize the importance of making strong crease with each fold.
- If it’s not perfect, who cares! Even with a few mistakes, the plane will likely still fly, and maybe a bad fold on one side will make the plane fly curved towards one direction. That is a cool learning experience, and maybe the will like a curved flying plane better than a straight shooter!
- When throwing the paper airplanes, use a light grip, a quick throw, and release when your hand is level with the ground or slightly before.

The following safety precautions and materials are applicable to all four paper airplanes we will be creating below.
Since we are using paper, there is a risk of paper cuts. To try to minimize this risk, handle the paper at the folded creases rather than the edges. If a paper cut does occur, immediately clean and bandage the lesion before continuing with the activity.
When the paper airplane is folded, there is a pointed tip. Please remember to instruct your child not to throw the paper airplane directly at anyone, and especially at faces. The nose of the paper airplane is pretty soft (because it’s made of paper), but can be painful and potentially harmful if it is thrown at or into an eye ball. For this reason, please insist that paper airplanes are NEVER thrown towards faces.
Materials Needed:
- Letter size (8.5″ x 11″) sheet of printer paper
- Crayons, markers, or paint to decorate the paper ( OPTIONAL )
#1: The Classic Dart Paper Airplane

This is the first paper airplane I learned to make and the only one I can easily do without thinking of following instructions. It is a simple and classic plane flies far with decent glide time.
Instructions:
STEP 1 : Lay out your copy paper horizontally on a clean table or desk in front of you

STEP 2 ( OPTIONAL ) : Color both sides of your paper with designs and patterns that will decorate your folded paper airplane
STEP 3 : Fold the paper in half long ways (remember to use strong creases with each fold), then reopen the paper

STEP 4 : Turn the paper vertical and open it up again

STEP 5 : Fold the top right corner on a diagonal towards the center line, repeat on the left side (your paper should now resemble a house)

STEP 6 : Repeat STEP 5 , again folding the top right corner (starting at the newly folded crease) in towards the center, repeat on the left side (your paper should now look like a long triangle with about 1″ of paper not folded at the bottom)

STEP 7 : Refold the plane in half long ways, along the center crease you created in STEP 3

STEP 8 : With the paper lying with the crease facing you, fold back the top edge down to meet the middle crease, flip the paper over and repeat on the other side, creating the wings

STEP 9 : Lightly grip the plane by the middle of the center crease in your dominant hand. Pull your hand back to your shoulder with the airplane level with or slightly above your head, then shoot your hand forward, aiming slightly upward, while releasing the plane to make it fly.

What Happened:
You folded a classic dart paper airplane. This paper airplane is known for its easy fold and is a good distance flier when thrown. You may have noticed the release technique is especially important in throwing your paper airplane. Release too early and your plane shoots up into the sky, release too late and it nose dives to the ground. If you keep your arm level with the plane’s nose pointed slightly upward during release this plane should glide forward at least 10 feet before nose-diving for landing.
#2: The Chase Paper Airplane

My son made the small modification adding wing tips to the classic dart paper airplane, and it flew even better. With the tips of the wings folded upward this plane soared further, and if you throw it with a tilt it can do rolls while it flies!
STEP 1 : Fold STEP 1 through STEP 7 of the paper airplane #1 instructions above
STEP 2 : With the paper lying with the crease facing you, fold the top edge down to about 1″ past the middle crease (see image below), flip the paper over and repeat on the other side, creating long the wings

STEP 3 : Fold the right wing back towards the center line, repeat on the left side

STEP 4 : Lightly grip the plane by the middle of the center crease in your dominant hand. Pull your hand back to your shoulder with the airplane level with or slightly above your head, then shoot your hand forward, aiming slightly upward, while releasing the plane to make it fly.

The slight change in the wings made a big difference (at least in our test flights at home) in how far the plane flew. The wing shape change gave the plane more lift and reduced the drag, making the plane capable of flying further. If we threw it with a little tilt of our hand, this plane would do rolls while flying!
I’m proud of my son for experimenting with the paper airplane folds and coming up with this improvement to the classic. Encourage your kids to experiment with the paper airplanes and do lots of test flights to see how small changes affect the flight of the paper airplane.
#3: The Bullet Paper Airplane

Once my 5 year old son learned how to fold paper airplanes, this has been his go-to fold. He has attempted many other paper airplanes, but this is his quick and easy fold that I’m pretty sure he can do with his eyes closed. This plane is built for speed. The narrow design makes this aerodynamic plane the one to beat!
STEP 1 : Fold STEP 1 through STEP 6 of the Paper Airplane #1 instructions above
STEP 2 : Fold the right edge towards the center again, but leave a triangle hanging over the bottom edge (see image below), align the raw edge along the center line. Repeat on the left side.

STEP 6 : Refold the plane in half long ways, along the center crease you created in the beginning (your folds should face inward)

STEP 7 : With the paper lying with the crease facing you, fold back the top edge down to meet the middle crease, flip the paper over and repeat on the other side, creating the wings

STEP 8 : Lightly grip the plane by the middle of the center crease in your dominant hand. Pull your hand back to your shoulder with the airplane level with or slightly above your head, then shoot your hand forward, aiming slightly upward, while releasing the plane to make it fly.

This is a long narrow plane build for speed. The reason it moves fast is the narrow, aerodynamic shape makes it easy to thrust and provides less surface to cause drag resistance. This plane is so fun to throw and you will love being able to fly past all the competition with this speed racer!
#4: The Glider Paper Airplane

This is a fun fold that makes a glider plane with large wings that leave lots of room for decoration or modifications. For my 3-year-old daughter, the most important thing about her paper airplanes is how they look. She likes them decorated with stickers, or her drawings, and better yet, she adds glam with scissors. She cuts out triangles from the wings giving them a cool look, and which also changes the way the plane flies. Grab a pair of kids scissors and try this folding and cutting this simple plane with us.
This paper airplane includes instructions to cut the paper wings. If you’re allowing your children to do this step themselves, I highly recommend using children’s scissors. They are much less likely to cut themselves or anything besides paper with these dull kid-friendly scissors. Remember to always supervise your children while they are using scissors. This is in addition to the safety precautions listed at the beginning of this post.
In addition to the paper and crayons listed in the beginning for this paper airplane you may also want to use optional kids safety scissors
STEP 1 : Fold STEP 1 through STEP 5 of the Paper Airplane #1 instructions above
STEP 2 : Fold the top triangle you just created down to the bottom half (the fold is along the bottom straight edge of the triangle)

STEP 6 : Fold the upper right corner down at a diagonal to meet the center line (this will be between the top of the paper and the tip of the triangle you folded down in STEP 5 ), repeat on the left side

STEP 7 : You now have a small triangle below the two folds you did in STEP 6 ; fold this triangle up and crease along the bottom edge of the STEP 6 folds.

STEP 8 : Refold the plane in half long ways, along the center crease you created in the beginning (the folds you created in previous steps will be on the outside of this fold)

STEP 9 : This glider plane is fun to throw as-is, but if your child loves scissors as much as my daughter this is a good opportunity to cut the large wings. Cut out triangles, make fringe, or whatever your kid would like.

STEP 10 : Lightly grip the plane by the middle of the center crease in your dominant hand. Pull your hand back to your shoulder with the airplane level with or slightly above your head, then shoot your hand forward, aiming slightly upward, while releasing the plane to make it fly.

You created a classic glider paper airplane. You and your child may or may not have taken it up a notch by adding cuts to the wings. How did this affect the flight of the paper airplane? My daughter added stickers to her plane which added more weight and the plane crashed sooner.
We’ve created dozens of paper airplanes in the making of this post alone, and that’s not including the paper airplanes my kids are constantly folding around the house. If you introduce paper airplanes to your kids, be prepared to start buying copy paper in bulk!

We had several competitions where we all lined up with our best or favorite paper airplanes, counted down from 5 to 1 then let them fly. We all had a blast watching our planes fly and discussing which planes flew further or faster and why.
I hope you and your children have as much fun as we did building and flying the paper airplanes in this post. If you make one let me know how it turned out or share a picture with me on Instagram !
Was your favorite paper airplane to fold featured here? Are your kids as into paper airplanes yet as mine are?
Share this:

I love this and it ties right in to a transportation theme post I am working on for my library’s kids and parents blog. Do you mind if I provide a link to this page in my post?

Thank you! Yes, please do link to this page in your post! I appreciate your kind words and sharing it!

Wow i learned so much!

I should’ve folded mine a little bit better.

This is the first time I browse your website. It is a wonderful journey and I get a lot of insights for our kids. Thank you very much for creating this website.
Leave a Reply Cancel reply
This site uses Akismet to reduce spam. Learn how your comment data is processed .

Hi, I’m Emily. I’m an engineer, mom, and wife. I encourage kids to love STEAM and motivate women to find personal happiness in their career and motherhood journeys.
Search the site
Enter your email address to receive notifications of new posts by email.
Email Address
Shop Engineering Emily’s Favorites
Popular Posts
- STEAM Experiments
- STEAM Books
- Interview Series
- Work/Life Balance
- Gardening with kids
engineering_emily

Some of the links below are affiliate links, which means that if you click on a product link I may receive compensation at no additional cost to you. I only link to products and pages I personally use and highly recommend. As an Amazon Associate I earn from qualifying purchases. Thank you for your support!
Some of the links below are affiliate links, which means that if you click on a product link I may receive compensation at no additional cost to you. I only link to products and pages I personally use and highly recommend. As an Amazon Associate I earn from qualifying purchases. Thank you for your support!
You have Successfully Subscribed!
Early Science Matters
Laying the foundation for a lifetime of discovery.
- Home close submenu
- About close submenu
- Increase Your Knowledge close submenu
- Set Up Your Environment close submenu
- By Title close submenu
- By Content Area close submenu
- By Materials close submenu
- Lessons by IELD Standard close submenu
- IELD Standards Map close submenu
- Professional Development close submenu
- Resources close submenu
- Blog close submenu
Paper Airplanes
In this lesson, children will plan, create and test paper airplanes using an engineering-design inquiry process
Content Area:
Engineering
Learning Goals:
This lesson will help toddlers and preschoolers meet the following educational standards :
- Develop beginning skills in the use of science and engineering practices, such as observing, asking questions, solving problems and drawing conclusions
Learning Targets:
After this lesson, toddlers and preschoolers should be more proficient at:
- Expressing wonder and curiosity about their world by asking questions and solving problems
- Developing and using models to represent their ideas, observations and explanations through activities such as drawing or building
- Carrying out simple investigations
- Using mathematical and computational thinking
- Generating explanations and communicating ideas and/or conclusions about their investigations

Lesson plan for toddlers/preschoolers
Step 1: gather materials..
- Masking tape
- Chart paper (optional)
Note : Small parts pose a choking hazard and are not appropriate for children age five or under. Be sure to choose lesson materials that meet safety requirements.
Step 2: Introduce activity.
- Assemble the children in a large group and introduce the idea of making airplanes. What materials in the classroom might we use?
- After this discussion, share and pass around a pre-folded paper airplane. Do not show the children how you made the airplane, as they will be using their own ideas to create original designs.
- Ask the children if they have any ideas about making a paper airplane or how far it might travel.
Step 3: Engage children in lesson activities.
- Separate the children into small groups and hand out paper and pencils, so that they can design their own ideas of what their paper airplane might look like.
- After the drawings are completed, invite the children to share their designs and tell the group how they will create their airplanes.
- Next, give the children paper so that they can create paper airplanes based on their design plans.
- After the children have made their airplanes, invite them to predict how far their own airplane, and their classmates’ planes, will travel. As an option, consider documenting these ideas and flying lengths in a chart.
- Have children test their designs. Put a piece of masking tape on the floor to mark where the children will launch their airplanes. Ask the children to “fly” their airplanes to see how far they will travel. Use another piece of masking tape to show how far each airplane travels.
- After all of the airplanes have flown, invite the children to share their reflections on the activity. What airplanes flew the farthest? What design elements made the planes fly better? What would you do differently if you made another airplane?
Step 4: Vocabulary.
- Design : To create a plan for something that will be built
- Predict : To guess what might happen
- Plan : To decide how to carry out an experiment or conduct an engineering project
- Test : To try out an idea to see if it works or not
Step 5: Adapt lesson for toddlers or preschoolers.
Adapt lesson for toddlers, toddlers may:.
- Not yet have developed the fine-motor skills they need to accurately fold airplanes
- Not yet engage in lengthy discussions
- Be interested in trying to fly paper airplanes and describing these actions using simple sentences
Child care providers may:
- Have pre-folded airplanes ready for the children to try out and omit the drawing and planning part of the activity
- Explore how these paper airplanes fly through extended, open-ended play over the course of several days
- Use self-talk and parallel talk to describe the process of throwing and flying a paper airplane
Adapt Lesson for Preschoolers
Preschoolers may:.
- Be interested in exploring paper airplanes independently during an open-ended choice time
- Use precise language to compare and contrast airplane designs
- Use measurement tools to find out how far their airplanes flew
- Offer materials to make paper airplanes throughout the day
- Guide children in collecting data about the distance that the airplanes flew
- Guide children in displaying and analyzing this data
- Offer measurement tools for children to use to examine how far the airplanes flew
Suggested Books
- Planes Fly! by George Ella Lyon
- The Boy and the Airplane by Mark Pett
- Rosie Revere, Engineer by Andrea Beaty
Music and Movement
- Create a paper airplane obstacle course and ask the children to fly their airplanes to different parts of the classroom or gross-motor space—going through, above or below obstacles
- Sing “The Airplane Song” by The Laurie Berkner Band
Outdoor Connections
- Fly the paper airplanes outside on a windy day and discuss how the wind changes the planes’ flight paths.
- Go on a “What Flies?” neighborhood walk to look for things that fly.
Web Resources
- How to make a paper airplane
- Teach your child to make paper airplanes
Comment on this lesson
Share at-home learning activities from today’s lesson with your day care families..
Download this editable Word document and then email the document to your day care families or send it home with the children.
Share this:
- Click to email a link to a friend (Opens in new window)
- Click to share on Twitter (Opens in new window)
- Click to share on Facebook (Opens in new window)
Subscribe to blog via email
Enter your email address to subscribe to this blog and receive notifications of new posts by email.
How to make a paper airplane | POWERUP for kids
Building paper airplanes is one of those rare activities that is both genuinely fun and actually educational. Kids love making things— especially things that can fly. Whether they know it or not, by building paper airplanes, kids are learning valuable lessons about how things work and, even more importantly, about the joy that comes with building.
Here are some helpful tips from POWERUP Toys for parents and educators about paper airplane building and how to make doing so fun, un-stressful, and valuable to everyone involved.
Steps to Make a Simple Paper Airplane
You don't need much to make a paper airplane. Just a sheet of letter-sized paper, a ruler or straight edge, and something to use as a weight (paper clip or penny).
First things first, though, is for parents and teachers to keep in mind just how significant something as seemingly insignificant as building a paper airplane can be in the life of a young person. For some, paper airplane building will be their first foray into the world of science, engineering, or physics. If that first experience is stressful or tense in any way, kids may sense that and can associate that tension with learning topics that should be considered fun, engaging, and easy.
So, after parents and educators have put themselves in the right calm, playful mindset, the following steps will make things easy:
1) Fold a piece of paper in half lengthwise. 2) Fold the upper cockpit, so the paper looks like a house 3) Fold the cockpit down 4) Fold the lower cockpit

5) Make the first set of wingfolds 6) Make the second set of wingfolds 7) Gently the paper airplane up 8) Solidify all folds, and yup, you're done!

Paper Airplane Folding | More On How to Fold
There are many ways to fold a paper airplane. The steps above are just one method. There are variations on the design, and there are also more complicated versions that can be fun to try once you have mastered the basic design.
To make things even more interesting, try folding your paper airplanes out of different types of paper. How does weight affect flight? How about texture? Does it make a difference if the paper is glossy or matte? You can also decorate your planes with markers or stickers before you fly them.
Flying | How to Get Your Paper Airplane Off the Ground
Now that you've built your plane, it's time to fly it! For indoor flying, find a large open space like a gymnasium or school cafeteria. Outdoors, a park or backyard will do nicely.
To get your plane off the ground, you'll need to give it a good throw. Start by holding the plane at the very end of the tail. Then, swing your arm back and release the plane when your arm is pointing straight out in front of you.
If your paper airplane doesn't fly very well, don't worry. There are lots of factors that can affect flight, from the type of paper you use to how well the folds are executed. With a little practice, you'll be an expert in no time!
More Paper Airplane Tips for Parents and Educators
Here are a few additional tips to keep in mind when building and flying paper airplanes:
Paper airplanes are more than just a fun activity. They can also be used to teach kids about science, math, and engineering.
Be sure to supervise children when they are building and flying paper airplanes.
If you're flying indoors, be mindful of obstacles like ceiling fans and light fixtures.
Have fun and be creative! There are no wrong ways to build a paper airplane.
Other Types of Simple Paper Airplanes for Kids
Once you've mastered the basic design, there are lots of other types of paper airplanes you can try. Check out these designs for some paper airplane inspiration.
Bulldog Dart Paper Airplane

The Boomerang Paper Airplane

More impressive paper airplane designs...
Why does a paper airplane fly? Fun Science Info for Kids
How do paper airplanes fly? It's all thanks to four things: lift, drag, thrust, and, of course, gravity.
Lift is the force that keeps an airplane in the air, drag is the force that slows it down, and thrust is the force that you use to throw a paper airplane forward.
Lift is created by the airplane's wings. As air passes over the wings, they create a low-pressure area above the wing and a high-pressure area below. This difference in pressure creates lift, which lifts the plane into the air.
Drag is created by anything that slows down the airflow around the plane. The more streamlined a plane is, the less drag it will have. That's why most paper airplanes have long, narrow tails—to help them fly more smoothly through the air.
Thrust is the force you get when you push a paper airplane forward.
Gravity plays a role in that when paper airplanes are thrown up, gravity pulls them down. This causes a difference of air pressure on the airplane wings, which then causes lift.
Now that you know how paper airplanes fly, why not build your own and see how far it can go?
How to Make a Paper Airplane Fly Further
Yes, if you're kid or students are asking about how to make their paper airplanes fly further, there are plenty of things you can encourage them to do. For instance:
- Use lighter paper. Heavier paper will weigh the plane down and make it harder to fly.
- Fold the wings neatly and evenly. Uneven folds can affect the plane's balance and make it harder to fly straight.
- Make sure the tail is pointing in the right direction. The tail helps stabilize the plane, so if it's pointing in the wrong direction, the plane may not fly as well.
- Decorate your plane with streamers or stickers. This will add some extra weight, but it can also help the plane fly further by acting as a stabilizer.
- Try different types of paper to see what works best. Some types of paper, like construction paper, are heavier and may not fly as well. Others, like tissue paper, are very light and can help the plane fly further.
You’re ready for takeoff ~ enjoy!
If your kid or student is interested in learning about some of history's coolest aviators and coolest planes check out these kid-friendly resources:
History's Coolest Aviators | POWERUP for kids
History's Coolest Planes | POWERUP for kids
Recent Articles
- Soar High with Mom: Why POWERUP Is the Perfect Mother's Day Activity
- POWERUP WINTER CONTEST: Most Creative Design
- Easter Joy with POWERUP 4.0: The Ultimate Gift for the Season
- Fun facts about airplanes | POWERUP for kids
- The world's fastest planes | POWERUP for kids
- Famous astronauts | POWERUP for kids
- Cool spaceships | POWERUP for kids
- History's coolest planes | POWERUP for kids
- History’s coolest aviators | POWERUP for kids
- Fun answers to your kid's flying questions | POWERUP for kids
How To Make A Paper Airplane For Kids: Step-By-Step Illustrated Guide
Whether you’re a kid or just young at heart, there’s something exhilarating about making a paper airplane and watching it soar through the air. With just a few simple steps, you can easily teach your kids how to make a paper airplane that will have them entertained for hours on end.
Or if you are a kid, these instructions are super easy to follow! So why not get started today? Let’s take a look at the step-by-step guide on how to make a paper airplane for kids down below!
How To Make A Paper Airplane For Kids Video Walkthrough
There you go! I hope this video I have made has made it more than easy enough to create this awesome paper airplane for kids! You should have no problem following along as this is a super simple design!
If you prefer learning a different way though, I have also created a step-by-step illustrated guide that you can follow down below!
If you enjoy this design make sure to check out all my other Origami Vehicles !
How To Make A Paper Airplane For Kids : Step-By-Step Instructions
1. creating the initial folds and plane front.
Take your full printer-size sheet of paper and fold it in half vertically and then unfold it to create a crease. Then take the top left and right corners of the paper and fold them downwards toward the center crease to meet each other. You Can use the dotted lines above as a reference. This fold will create the front of the plane as seen above.
2. Giving the Plane a Jet Shape
Once again you are going to fold the left and right sides of the paper towards the center crease that you made in step one to meet each other. Fold over the dotted lines that you see above in the image. This is to give the plane more of a jet shape.
3. Folding the Paper Model in Half
This is what you should have now. Now, take the current model and fold it in half by taking the left side and folding it over to the right side, and aligning the edges.
4. Crafting the First Wing
Turn the paper so that it’s aligned with how the image above looks. Next, we’re going to make the wings. Pick a side and fold the flap down to meet and align with the bottom of the plane. Use the dotted line as a reference to help you create this wing.
5. Completing the Second Wing
Flip the plane over and do the same thing with the other side to create the other wing.
6. Admiring the Finished Origami Airplane
Congratulations! Your final design should resemble the reference image. Enjoy your completed origami airplane and consider making more to share or race with friends and family.
There you go! If you enjoy instructions more than videos I hope that these were simple and easy to follow! Now that you have a video and graphic instructions at your disposal, you should be a near pro at creating this paper airplane for kids!
This is a fun and simple design that anyone can follow along too! Below you’ll find the same instructions but in one large printable graphic!
How To Make A Paper Airplane For Kids Printable Instructions
Paper airplanes are a classic childhood toy. They’re easy to make and can provide hours of entertainment. In this post, I’ve shown you how to make a paper airplane for kids using an illustrated step-by-step guide.
If you want to keep learning the art of origami, be sure to check out my other origami creations. Thanks for reading!
Related Posts
Check out my other origami designs and sharpen your paper folding skills!
How To Make A Paper Plane That Returns: 12 Step Guide For Beginners
Learn how to make a paper plane that returns right to you! This is an extremely fun and rewarding project, and it's perfect for beginners because there are no fancy tools required....

How To Make An Origami Boat That Floats: A Step-By-Step Guide
Follow these simple instructions and you'll be able to create your own floating origami boat in no time!...

Check our Hours & Admission page and social media for updates about our operating hours.
- Become a Member
- Book an event
SCIENCE EXPERIMENTS FOR KIDS
How to make a paper airplane.
Watch your kid’s imagination take flight with this fun and easy project

This animal is not on exhibit in the habitats. It is one of our Animal Ambassadors and is used in public and school programs.
Download a PDF of this experiment
Making paper airplanes might be one of the oldest activities around, but this simple project can make your child’s mind soar as they get a taste of physics and engineering.
In this activity, students will have an opportunity to build a paper airplane and then make many changes to observe how the flight of the plane changes. Plus, all you’ll need is paper and a paper clip to have your little pilot ready for takeoff.
GATHER THIS:
- Scrap paper
- Paper clip (optional)
THEN DO THIS:
* Download the pdf to view illustrations.
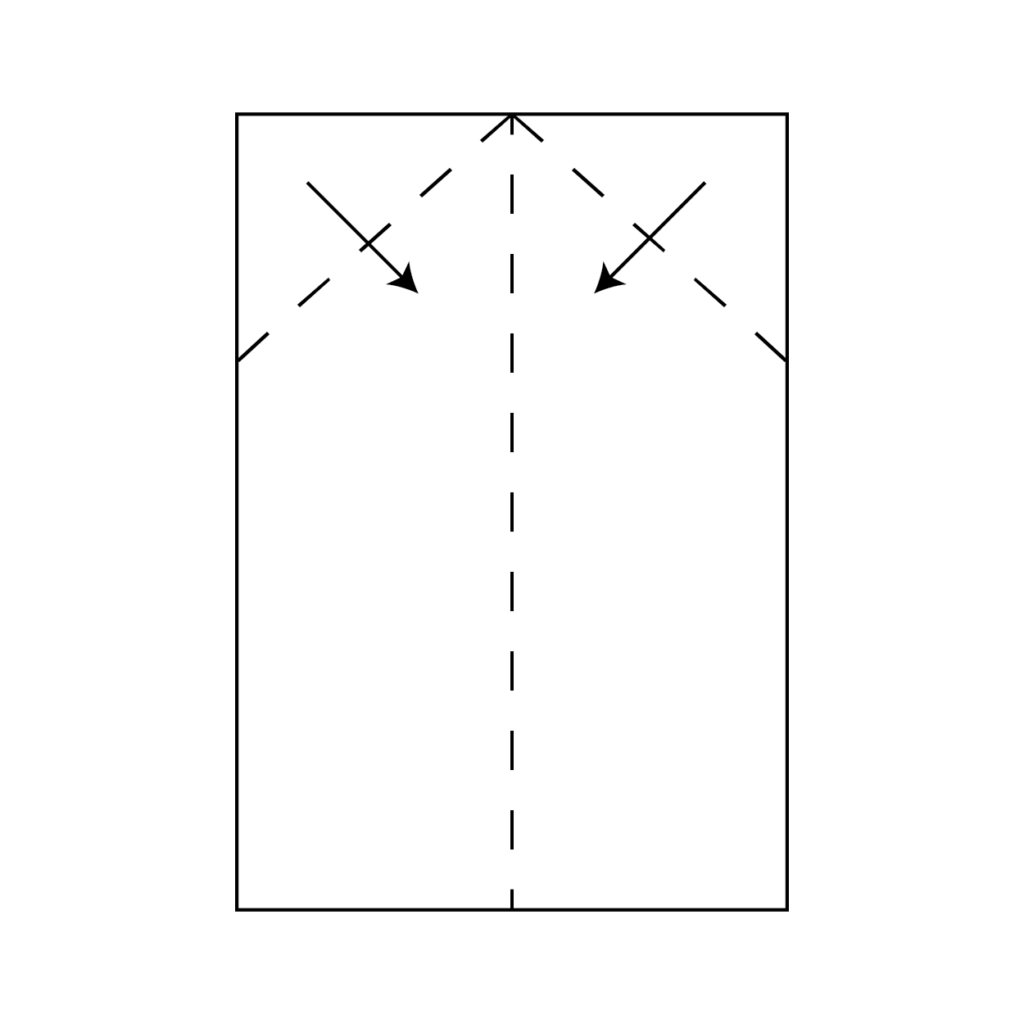
- Crease a piece of paper in half lengthwise and then unfold.
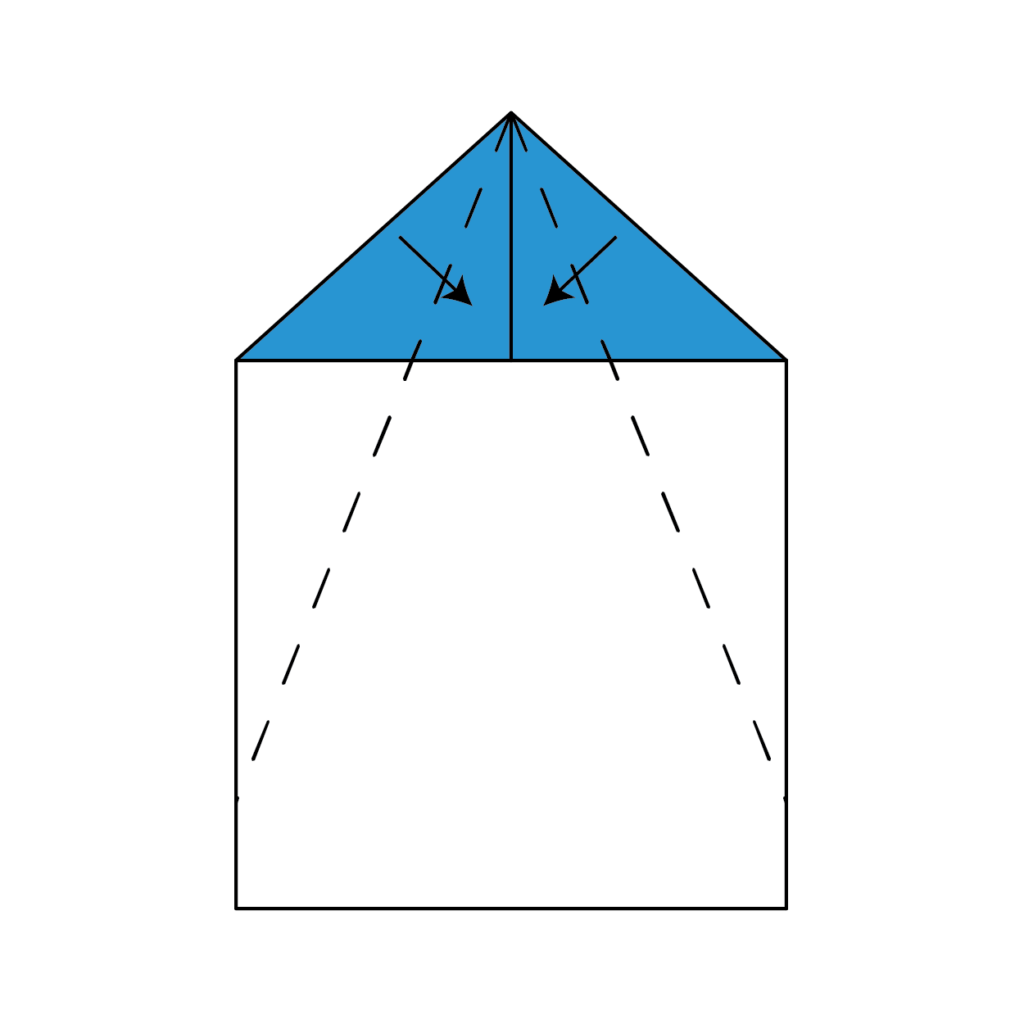
- Fold the top two corners down to the middle fold.
- Fold the resulting triangle down.
- Crease the tip of the triangle up 1 inch and then unfold.
- Fold the top corners down to the center fold so that the corners meet at the base of the crease in the tip.
- Fold the creased tip up so that it overlaps the corners you just folded down.
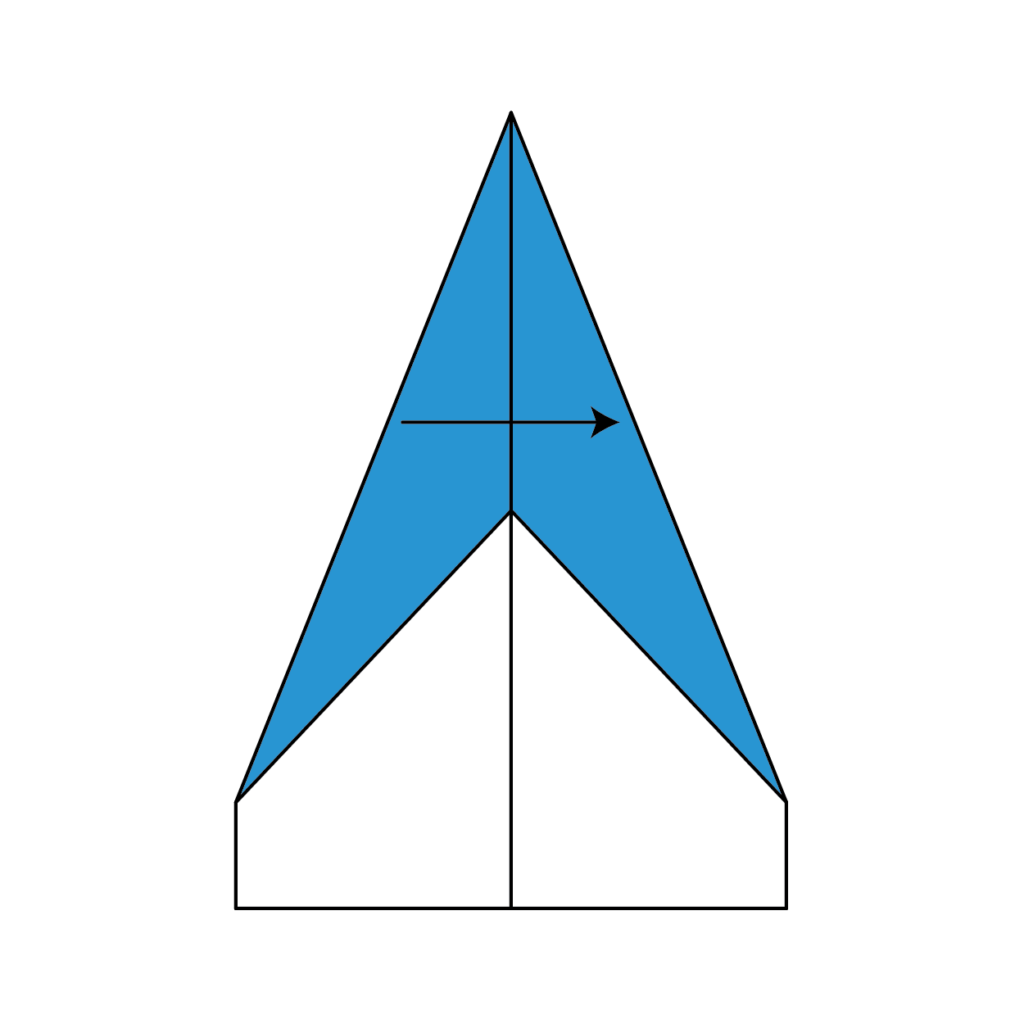
- Fold the entire paper in half along the original fold so that the tip is on the outside of the folded paper.
- Fold the wings however you would like!
- Hold the paper plane near the tip between your finger and thumb and give the plane a toss! Try holding the plane differently and notice how the plane flies.
- Now design your own folded paper airplane!
- Notice what happens when you try throwing the paper plane hard/soft.
- Notice what happens when you try throwing the paper plane upside down.
- Notice what happens if you bend the back edge or tip of the wing up/down.
- Notice what happens if you add a paper clip to the nose of the paper plane.
- Notice what happens if you fold the wings unevenly.
WHAT IS HAPPENING?
There are four forces that act on an object in flight: thrust, drag, lift and gravity. Thrust is what pushes the object forward. Thrust is produced from an engine, an animal wing using muscles to push through the air, or your arm muscles when you throw your paper airplane.
Drag works in the opposite direction of thrust. Drag pulls in the opposite direction of the thrust and is friction on the air, or air resistance.
Lift is the force that pulls or lifts an object up into the air. If the front edge of a wing is slightly raised compared to the back edge of a wing, the air will go slightly faster over the top of the wing and slightly slower over the bottom of the wing. Faster moving air has lower pressure and slower moving air has higher pressure. Lift is a combination of the slower moving air pushing the wing up and the faster moving air pulling the wing up.
Gravity pulls everything on Earth towards the center of the planet, in the opposite direction of lift.
Like this experiment? Explore more flight science with the CuriOdyssey Flight Science Kit in the CuriOdyssey Shop !
WHAT THIS TEACHES:
Themes: Engineering design process
Join the CuriOdyssey Community
Contact Us History Jobs Mission, Values & Equity Statement News & Media Privacy Policy Site Map
1651 Coyote Point Drive San Mateo, CA 94401 Ohlone Land Acknowledgement 650-342-7755 [email protected]
CuriOdyssey is a 501(c)(3) nonprofit, Tax ID 94-1262434

Kids Art & Craft
Paper airplane origami step by step tutorial for kids.

Kids Activities
Create the perfect paper airplane with this easy step-by-step origami tutorial for kids. With detailed instructions and colorful diagrams, your child will have an awesome paper airplane they can proudly show off.
Origami is a fun and creative craft that can be enjoyed by adults and children alike. With just a few simple steps, you can create beautiful works of art that are sure to impress.
Welcome to our step-by-step tutorial on how to make paper airplane origami! Do you want to show your kids a fun and creative way to pass the time? Look no further than the classic paper airplane origami! With just a few simple folds, you can turn a piece of paper into a plane that can soar through the air! In this tutorial, we’ll teach you how to make a paper airplane origami with clear instructions and illustrations. So grab a sheet of paper and let’s get started!
How To Make An Origami Airplane Using Paper

Materials Required:-
- Origami Paper
Read More: Easy Craft Ideas Make At-Home Video Tutorial
Step 1: Creasing Square In Half

First, begin with a square piece of paper. Fold the paper half in both diagonals, crease it well, and unfold it.
Step 2: Bringing Corners In The Middle

Now, bring the corners of the square paper to the middle point with the help of the creases made previously.
Step 3: Folding The Sides

Turn the square around to form a diamond shape. Bring both the right and left sides of the paper to the middle as shown in the above image.
Step 4: Folding The Upper Triangle

Fold the top triangle in the opposite direction.
Step 5: Folding The Model In Half

Flip the paper and fold the model in half.
Step 6: Making Three More Models

Following the above steps, make three more models.
Step 7: Cutting Top Of The Triangle

Now, take one model out of the four. Cut the top of the triangle using scissors
Step 8: Making Small Cut In The Middle

Make a small cut in the middle of the top of the model using scissors.
Step 9: Folding The Corners Outwards

Fold the both right and left corners on the top in the outward direction.
Step 10: Folding Bottom Corners To The Middle

Now, take the other two models and fold their bottom side corners to the middle in an inwards direction.
Step 11: Inserting The Corner In Pockets

Now, insert the left corner of the model that you fold in the previous model in the inner right pocket of the first triangle model.
Step 12: Inserting Other Corner In Outer Pocket

Insert the other corner of the model in the outer pocket of the first triangle model.
Step 13: Repeating The Same With Other Model

Now, take another corner folded model. Insert its left-folded corner in the inner left pocket of the first triangle model.
Step 14: Inserting Corner In Outer Pocket

By repeating the same step, insert the right folded corner in the outer right pocket of the other mode.
Step 15: Making the Tail Of The Airplane

Finally, insert the last model in the back pocket of the first model.
Your Paper Origami Airplane is Ready To Take Off!

Congratulations! Your paper origami airplane is ready to take off and soar! Making a paper origami airplane is a fun and creative way to pass the time. With just a few simple folds, you can make a beautiful airplane to fly around the house or even outdoors. Have Fun!
Some More Airplane Craft Tutorial
Construct an airplane craft out of a water bottle.

Image Source/Tutorial: Kids Art & Craft
Constructing an airplane craft out of a water bottle is a great way to turn a simple item into a fun project. It only requires a few supplies and the instructions are easy to follow. With a little bit of creativity and imagination, you can make a unique and creative airplane craft.
FAQs Paper Origami Airplane Craft
1. what type of paper is best for origami airplanes.
Lightweight paper such as copy paper or construction paper is best for making origami airplanes.
2. What other supplies do I need to make an origami airplane?
You will need scissors and a pencil to make an origami airplane.
3. How do I fold an origami airplane?
There are many tutorials available online that will show you how to fold an origami airplane.
4. How long does it take to make an origami airplane?
It usually takes around 15 minutes to make an origami airplane.
5. How do I decorate my origami airplane?
You can decorate your origami airplane by using markers, paint, glitter, or other craft supplies.
6. What can I use my origami airplane for?
Your origami airplane can be used to decorate a room, as a gift, or as a toy.
7. How should I store my origami airplane?
To protect your origami airplane, you should keep it in a safe place away from direct sunlight and moisture.
8. Can I make an origami airplane out of any type of paper?
No, not all types of paper are suitable for origami airplanes. Lightweight paper such as copy paper or construction paper is best.
9. How can I get better at making origami airplanes?
With practice and patience, you can get better at making origami airplanes. Try watching tutorials online and practice folding the paper to get better.
This paper airplane origami step-by-step tutorial is a great way to get kids to learn a fun and practical skill. With these easy-to-follow instructions, kids of all ages can learn how to make a paper airplane in no time.
Follow us on Youtube for art and craft tutorials and much more.
More Articles from Kids Art & Craft
- Easy Paper Crafts DIY Video Tutorial for All
- DIY Paper Crafts Video Tutorial for All
- Easy Paper Crafts Activity Try At home Video Tutorial for All
- Super Easy Craft Activities Video Tutorial At Home
- Simple Origami Animal Crafts Video Tutorial for Kids
Related posts:
- Heart Shaped Paper Mouse Craft Step by Step Tutorial
- How to Make Paper Umbrella Craft for Kids Tutorial
- How To Make Paper Snowflakes Easy Tutorial
- DIY Bird Nest Paper Craft For Kids
- Easy Paper Craft Toy Tutorial For Kids
- DIY Paper Butterfly Easy Craft For Kids
- DIY Easy Origami Paper Shark Toy Tutorial For Kids
More in Kids Activities
Navratri and dussehra craft fun activities for kids.
Navratri and dussehra are the two most important festivals of the Indian heritage. They are celebrated...

Coloring Pages
The simpsons coloring pages for kids – free printables.
The Simpsons coloring pages can be an entertaining way to practice coloring. You can download and...
Beautiful Bird Drawings to Make at Home
Birds are unique, special living species that can fly. We are so fascinated to see how...
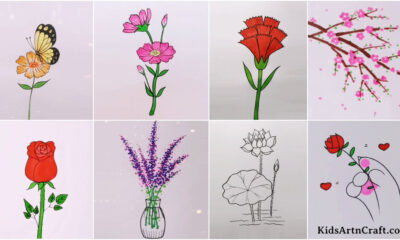
Colorful Flower Drawing Ideas For Kids
Essence has bestowed us with many pleasant presents and flowers are one of them. We don’t...

Easy Fun Animal Drawings for Kids
If you’re searching for easy fun animal drawings for kids to do at home, you’re in...
Like us on Facebook
Recent post, diy and crafts, things to do with paper bags – easy crafts for kids, simple activities for kids using shaving cream, glow in the dark activities for kids.
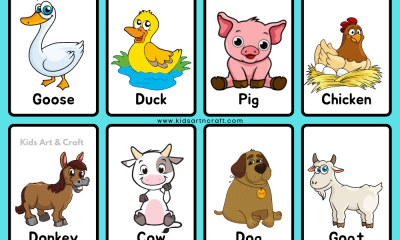
Animal Flashcards for Kindergarten – Free Printable
Popular tags.
- PRO Courses Guides New Tech Help Pro Expert Videos About wikiHow Pro Upgrade Sign In
- EDIT Edit this Article
- EXPLORE Tech Help Pro About Us Random Article Quizzes Request a New Article Community Dashboard This Or That Game Popular Categories Arts and Entertainment Artwork Books Movies Computers and Electronics Computers Phone Skills Technology Hacks Health Men's Health Mental Health Women's Health Relationships Dating Love Relationship Issues Hobbies and Crafts Crafts Drawing Games Education & Communication Communication Skills Personal Development Studying Personal Care and Style Fashion Hair Care Personal Hygiene Youth Personal Care School Stuff Dating All Categories Arts and Entertainment Finance and Business Home and Garden Relationship Quizzes Cars & Other Vehicles Food and Entertaining Personal Care and Style Sports and Fitness Computers and Electronics Health Pets and Animals Travel Education & Communication Hobbies and Crafts Philosophy and Religion Work World Family Life Holidays and Traditions Relationships Youth
- Browse Articles
- Learn Something New
- Quizzes Hot
- This Or That Game New
- Train Your Brain
- Explore More
- Support wikiHow
- About wikiHow
- Log in / Sign up
- Hobbies and Crafts
- Paper Craft
- Paper Planes
How to Make a Paper Airplane
Last Updated: January 22, 2024 Fact Checked
This article was co-authored by wikiHow staff writer, Hunter Rising . Hunter Rising is a wikiHow Staff Writer based in Los Angeles. He has more than three years of experience writing for and working with wikiHow. Hunter holds a BFA in Entertainment Design from the University of Wisconsin - Stout and a Minor in English Writing. This article has been fact-checked, ensuring the accuracy of any cited facts and confirming the authority of its sources. This article has been viewed 5,211,790 times. Learn more...
Up, up, and away! Paper airplanes are a fun, easy way to pass the time—but how exactly do you turn a basic piece of paper into a jet-setting masterpiece? You’ve come to the right place. We’ve put together a handy, step-by-step guide to help you fold your way to a sleek, far-flying paper airplane . In a matter of minutes, you’ll be ready for take-off!
Folding a Classic Paper Airplane
- If you want to make a colored paper airplane, use construction paper instead.
- Make sure the crease points toward you when you’re folding your paper airplane or else you’ll fold the wrong corners.
Tip: Try using a ruler or a credit card to press the fold down if pressing it with your fingernail doesn’t work.
- This fold creates the bottom of your plane so it’s easier to hold and throw once it’s finished.
- Make sure your wings are symmetrical to one another so your plane stays level when you throw it.
Making an Advanced Plane
- Try using different kinds of paper to add designs and test how it affects your plane.
- Make sure the crease you folded is pointing toward you when you start folding the paper, or else your folds won’t line up.
- Don’t let the point touch the bottom edge of your paper or it will affect the structure of your plane when you’re finished.
- If you want your airplane to have a blunt edge in front instead of a point, fold the top of your paper so only the corners touch the center crease.
- Your paper should look like a large triangle on top of a narrow rectangle when you're finished.
- Don’t hide your previous folds inside or else it will affect your plane’s structure.
- Make sure the wings on your plane are the same size so your plane doesn’t fly to one side.
Community Q&A
- Test throwing your airplane outdoors so it can catch the wind and fly further. [13] X Trustworthy Source Science Buddies Expert-sourced database of science projects, explanations, and educational material Go to source Thanks Helpful 6 Not Helpful 3
- Look for other paper airplane designs online to test out different styles. [14] X Research source Thanks Helpful 4 Not Helpful 3
- Try taping or gluing your paper airplane if it doesn’t stay together on its own. Thanks Helpful 47 Not Helpful 17

- Avoid throwing your airplane at any people or animals since the tip may be sharp. Thanks Helpful 53 Not Helpful 19
- Don’t throw a paper airplane in school since you could get into trouble. Thanks Helpful 47 Not Helpful 26
You Might Also Like

- ↑ https://www.foldnfly.com/1.html
- ↑ https://www.origamiway.com/plane-nakamura-lock.shtml
- ↑ https://www.artofmanliness.com/skills/how-to/how-to-make-the-worlds-best-paper-airplanes/
- ↑ https://www.sciencebuddies.org/science-fair-projects/project-ideas/Aero_p046/aerodynamics-hydrodynamics/how-far-will-paper-planes-fly
- ↑ https://www.origamiway.com/paper-airplanes.shtml
About This Article

To make a simple paper airplane, first fold a piece of paper in half lengthwise. Then, unfold it and fold the top 2 corners to the center. Next, fold the angled edges that you just created towards the center, leaving about 1 cm of space between the bottom of the angled edges and the crease. Fold along your original center-line, revealing a small inverted triangle. Now, fold the small inverted triangle up, to lock the angled edges in place. Then, turn your plane over and fold down the top 2 flaps to create wings. Hold it by the bottom edge, and let it fly! For tips on making a slightly more advanced plane, keep reading the article! Did this summary help you? Yes No
- Send fan mail to authors
Reader Success Stories
Did this article help you?
Oct 16, 2023
Eunice Andrews
Apr 29, 2017
Aug 10, 2017

Featured Articles

Trending Articles

Watch Articles

- Terms of Use
- Privacy Policy
- Do Not Sell or Share My Info
- Not Selling Info
wikiHow Tech Help Pro:
Develop the tech skills you need for work and life

Teach Your Child to Make Paper Airplanes
A rainy afternoon with nothing to do is the best time to learn to do something new. Why not try making a paper airplane with your child? It is amazingly simple to turn a plain piece of paper into a toy that flies!
Paper airplanes can be simple or fancy, ranging from the basic “Arrow” design, which is probably the airplane you remember from your school days- to a complex and carefully crafted flying machine modeled after a real one. As with any new craft, it makes sense to start with an easy project until you get the hang of it.
Paper airplane making is relatively new, as airplanes have only been around for about 100 years. If your child is interested in flight, this project will help them learn the basics of aerodynamics as they design and alter their planes.
So if you’ve got basic 8½ by 11 inch copier paper and an imagination, why not give this fun activity a try? This project will teach measuring, how to patiently follow step-by-step directions, and the value of trial and error as a scientific method. It will also develop fine motor skills and hand-eye coordination. Besides that, it’s fun!
Preschoolers will laugh with delight when you try out your first plane. If it flies, they will want to do one of their own. If they are able to watch while you model folding and follow your directions, they are ready.
It is best to practice making a simple airplane, such as the basic Arrow. You can then progress to something different. Your library will probably have a how-to book on paper airplanes. The Internet also has a wealth of designs and information, including how-to videos.
You will need:
- A pattern to follow
- Light paper- 16-20 pound copier paper is good
- A flat surface to work on
These directions for the Arrow are adapted from a great Website called 10PaperAiplanes.com .
- Fold paper in half, lengthwise.
- Unfold keeping paper lengthwise.
- Fold top right hand corner over to meet the center line formed by the first fold.
- Repeat, folding the top left hand corner to meet the center line.
- Starting at the tip of the point, make another fold, folding each side over so that the edges meet the center line.
- Turn the plane over and fold it in half, creating the arrow form.
- Now, fold the first wing over with the line of the fold running nearly parallel to the centerline of the plane about ½ to 1 inch from the center.
- Repeat with other wing.
- You’re ready to fly!
Your airplane may require some adjustment. If it dives, turn the edges of the rear wings up slightly. If it swoops up, then crashes, do the opposite. Trial and error will help you get some distance. Other simple designs are available and easy to do. Experiment by shortening the length of the paper, varying folds and using paper clips as weights. You can also customize your planes with crayon or markers before or after folding. Little one’s results may not be perfect, but that’s okay. They will still love the finished product and want to fly it around the house. Save them in a safe place for the next sunny day!
Main points to address:
- Your child is ready if he or she can watch, then follow directions with your help.
- Start with a simple design, like the Arrow.
- Your plane may need some adjustments.
- Vary the design by changing paper size and types of folds.
Grades K-3rd
Young school age kids are ready for fancier designs. Having something to look at while creating a new plane is helpful. Try to be sensitive to your child’s learning style. Some children can follow spoken directions better than watching a demonstration. Others need to read the directions and carefully digest each step.
Most kids will need to make several tries before getting their plane to fly the way they want. Let them know that’s what the Wright Brothers did! It took them several years of not giving up until their plane flew.
The Internet has many sites that offer free designs, some with very detailed instructions and some with animated or videoed directions. Some of the fancier designs are the Stealth, the Moth, the Zump, the Slider and the Spinster, to name but a few. There are even delicate origami-type designs. Each time your child makes a different model, they are learning something additional about aeronautics.
If your child is really excited about this craft, you may want to use paper airplane making as a theme for a party. The supplies are cheap, the kids will stay engaged, and they will have a neat favor to take home when the party’s over! Make several models and decorate so they can see what is possible. Have an extra pair of adult hands to assist.
- School-age children can handle more complex designs.
- Try to consider your child’s learning style while they are attempting to follow directions.
- Try making paper airplanes a theme for a birthday party.
Grades 3-6th
Older school children will be able to attempt quite complex planes. Refer to some of the sites referenced below to see some examples. You may need a ruler, scissors and white glue to make a more sophisticated plane. Supplies are still cheap and easily had. Kits are also available when your child is able to follow more detailed directions and manipulate multiple parts. Airplanes available from kit manufacturers make a nice display or collection.
Of course, airplanes are meant to be flown and kids love to compete against each other for both distance and time aloft. Wind conditions are a factor in paper airplane flight, just as with actual airplane flight. Pick a slightly breezy to still day and make sure you are flying with the wind, not against it. Ken Blackburn, an aeronautical engineer from Florida in the USA, holds the Guinness World Record for time aloft at 27.6 seconds!
There are many historical books on early airplane design that might make good gifts for a child this age. Biographies of early flyers, like Lincoln Beachey and others who flew balloons, dirigibles, biplanes and monoplanes may inspire your child.
If your older child is interested, there are several online clubs for kids and adults where ideas are shared and successes celebrated. Some localities may have hobby clubs of the same sort. Many young people interested in paper airplanes as children have gone on to do research or engineering work with flight. For these kids, what started out as a passion for flying things turned into a meaningful, and highly rewarding occupation.
- Older children can handle more complex designs. Kits are also available.
- Your child and his or her friends may want to compete for flight distance and time aloft.
- Support your child’s passionate interest in flight with books, by providing materials to build with or by finding a club to participate in.
Resources that can help you in your venture include:
- Learn how to make 10 great paper airplane designs with free, easy to follow animated instructions: http://www.10paperairplanes.com/
- Elementary Themes Paper Airplanes: Site directory/resources: http://www.cdli.ca/CITE/paper.htm
- Best Paper Airplanes UK: Step by step directions for 10 origami-type planes: http://www.bestpaperairplanes.com/
- Kids Turn Central: Online resources for making paper airplanes: http://www.kidsturncentral.com/links/airplanelinks.htm
- Early Birds of Aviation: Biographical and historical site: http://earlyaviators.com/
Posted in Leisure . Comments: none -->
- Teach Your Child How to Take Good Pictures
- Teach Your Child How to Paint
- Teach Your Child to Play Hide and Seek
How to Make Paper Airplanes That Go Far
- Elementary , Invention , Outdoors , Problem Solving
19 Comments
Have you ever made a paper airplane.
Did you learn how to make it from a book? Or maybe it was from the kid you shared a desk with in the third grade?
We tested a few designs, and one of them really stood out as a winner (I’ll share it below). You’ll have to test some, too, and see which one flies the furthest.

How to Make Paper Airplanes that go Far
Well guess what? Today I’m sharing links to instructions for making paper airplanes that go far and actually work, along with some ideas on how to help kids invent their own paper airplane designs.
So let’s get started with How to Make Paper Airplanes while building Design Skills…

Paper Airplane Supplies
- A few sets of instructions for making paper airplanes. You can get these from a book or download instructions from the internet (see recommended links below)
- Copy paper. Thinner paper is easier for children to fold.
- Markers (optional)
- Scissors (optional)
- A clear table
The Best Paper Airplane Designs
- Our favorite was The Eagle
- We also tried High Glider
- Try a few and have a fly-off to compare them.

Step One: Select a Design
We looked through all of our designs, picked one to start with, and my daughter and I sat down and followed the directions for the first airplane. If you’ve ever made origami, it’s the same approach. Most of the steps were easy enough for her four-year old hands and mind, but I had to help her with a few of the trickier folds.
If you find instructions that are too complicated for you, then skip them and find another plane to make.
Step Two: Teach someone else how to make a plane
Once we got the hang of it, N thought our six-year old neighbor would enjoy this project and we invited him over to join us. Either that or misery loves company.
We each started with another sheet of paper and while we folded, the kids educated each other on hamburger and hot dog folds. If you don’t have a neighbor to teach, teach a parent, babysitter, or grandparent. This step does wonders for building confidence.

Step Three: Iterate and Invent New Planes
Once that first airplane was complete, it was interesting to see where the kids took the project next. My daughter, a designer to the core, got busy decorating her plane with markers. Her friend, a tinkerer at heart who has a soft spot for Legos, began iterating on the design to improve it!
As we folded, he asked me questions like, “On your Eagle, how did you make the wing tips?” And then he proceeded to invent his own series of planes with pointed noses, flat noses, and wing tips.
When my daughter jumped in to help him, I commented that they were iterating . I actually said, “Hey you guys are iterating! Do you know that word? It means that you’re building a lot of planes to test new ideas and in order to figure out how to make it better. Can you say ‘iterate?'” And then of course, they obliged me.
I swear, the teacher thing will probably never leave my soul! Do you ever find yourself in that mode?

Step Four: Take it outdoors
They tested their planes in the house and once they amassed a small fleet of planes, I heard, “Let’s have an airplane show!!” So we took it outdoors to see what the planes could do.
Our friend guessed that the pointy-nosed planes would get more distance and said he was “amazed that the flat-nosed Eagle flew the best.”

All in all, we spent a good hour on this project, and in the end not only did these kids have fun bonding and playing together, but they came away with some new design skills, tools for developing an innovator’s mindset, and good ol’ fine motor skill practice.
A question for you…
Did you ever make paper airplanes as a child? Where did you learn how to make them? And how did they fly?
Online Art Classes for Kids
Engaging kids art classes - from the comfort of home you set up the space, we'll provide the instruction..

unfortunately I remember using them in middle of class with a substitute but paper airplanes always remind me of Curious George…remember?
Faigie, Yikes, your story reminds me of spit balls and passed notes. Why are kids so terrible to poor substitute teachers? I was never a big Curious George follower — I’ll have to look for it! R
Classic! I’m so glad my husband likes doing this with our kids, because for some reason it makes me crazy to try to make these… every kid should know how to make these.
Ha! That’s funny, Jeanette. It never really occurred to me that people would detest making paper airplanes. It’s just a few paper folds, for goodness sake 🙂 But they can be frustrating, so I get it. Hooray for plane-making spouses.
Some of the best paper airplanes we ever made were paper straws with two paper strips made into circles, one at each end. I got the idea here:
http://www.diynetwork.com/decorating/how-to-make-straw-and-paper-airplanes/pictures/index.html
These babies fly better than anything I have ever folded and my son loves them!
My kids love to make paper airplanes, so I can perform other tasks.
My kids have developed an interesting in making their own paper airplanes. Love all the parts of the brain that get used in the process. Pinned and stumbled!
Thanks, Vicky. Aren’t paper airplanes fantastic? All you need is a sheet of paper (or a small stack) and off you go!
You may find that an existing system serves a particular process, but it may be frozen in time so it has limited usage. With Eclipse, professionals can offer an advanced custom product with greater comfort and without the occlusion effect—providing a clear differentiation from the myriad of standard offerings in the market. When it recognized a pattern, a meaning was assigned.
no u uno reverse card
I think the admin of this web page is actually working hard in favor of his web site, since here every material is quality based data.
[…] need to get fancy. Just have fun. Look up a few good paper airplane tutorials, (I like this basic one,this stunt plane, and this fancy one) cut those paper bags into big paper rectangles, and get to […]
Nice article 👍👌 thank you for sharing
[…] How to Make Paper Airplanes That Go Far by Tinker Lab […]
[…] makes some brilliant paper aeroplanes. Try having a competition to see who can get their plane to fly the furthest. This is great for a […]
[…] everyone a few sheets of paper and have them engineer several planes. Once finished, have a flying […]
[…] Paper Airplanes that Go Far from Tinkerlab […]
[…] Make a paper plane and host an air show! Whose plane will fly the furthest? Highest? Straightest? Via […]
[…] Make a paper airplane and host an air present! Whose airplane will fly the furthest? Highest? Straightest? Through […]
Comments are closed.
TinkerLab is a creative studio dedicated to sparking curiosity and a love for art through hands-on making. Our mission is to inspire creativity and experimentation in parents, educators, and artists of all ages, transforming everyday moments into creative adventures.
USEFUL LINKS
Testimonials
Privacy Policy
Terms & Conditions
GET IN TOUCH
855 El Camino Real
Suite 13A-144
Palo Alto, CA 94301
10 WAYS TO INTRODUCE ART TO PRESCHOOLERS
An inspiring 10-point poster for your fridge, planning binder, or to share with colleagues or friends.

TinkerLab acknowledges the ancestral land of the Muwekma Ohlone Tribe, and pays respect to elders both past and present. This land was and continues to be of great importance to the Ohlone people, and we have a responsibility to acknowledge, honor and make visible the our relationship to Native peoples. Donate to the Association of Ramaytush Ohlone.
Advertisement
5 solar eclipse activities to do with children
From building an eclipse viewer to using the sun to pop balloons, here's a child-friendly activity guide for April's eclipse
By Abigail Beall
6 April 2024

There are plenty of fun eclipse activities to do with kids
Edwin Remsberg/Alamy
If you are planning to enjoy the total solar eclipse on 8 April with your children, here are a few activities you can do with them before and during the eclipse, to help them understand what causes a solar eclipse and get the most out of the experience.
1. Build an eclipse viewer
On the days leading up to the eclipse, you and your children can get excited about the big event by building an eclipse viewer . There are a few ways to do this – the first of which is a simple pinhole camera using two pieces of paper. Cut a hole in one piece of paper and cover it with aluminium foil, then poke a small hole in the foil. On the day of the eclipse, hold the paper up to let the sun beam through the hole and it will project a version of the eclipse onto a second piece of paper you place on the ground.
A slightly more complicated version involves a cereal or shoe box, placing paper at one end and cutting two holes in the other end. Over one of the two holes, you place some tin foil and, again, pierce it so that the sunlight can get through. More details on how to make both versions here .
Solar Eclipse 2024
On 8 April a total solar eclipse will pass over Mexico, the US and Canada. Our special series is covering everything you need to know, from how and when to see it to some of the weirdest eclipse experiences in history.
2. Build a solar eclipse model
Another activity that can be done ahead of the eclipse is building, or acting out, a model of the sun, moon and Earth to understand what a solar eclipse is . To build it, all you need is three sticks and three balls to place on top of the sticks. You can paint them or colour them in so that they resemble the sun, moon and Earth. Make sure the sun is bigger than the moon. Then, you can show your kids what an eclipse is by placing the sun in the centre, and moving Earth around the sun and the moon around Earth. When the three line up, with the moon in between the sun and Earth, we get a solar eclipse. When the moon is on the other side of Earth from the sun, we get lunar eclipses.
Your kids can also act out a solar eclipse. Give one of them a torch or flashlight, making them act as the sun, and ask them to shine the torch on a wall. The other, who is the moon, can move around until they block the torch light. They can both play around with moving forwards and backwards, to show why the distances between the moon, Earth and sun matter when it comes to eclipses.
Sign up to our Launchpad newsletter
Voyage across the galaxy and beyond with our space newsletter every month.
Total solar eclipse tours and cruises 2026 and 2027
We are working on some amazing ways to experience the forthcoming total solar eclipses in 2026 and 2027
3. Pop a balloon using sunlight
This is something that can be done on any sunny day. But on the day you are waiting for the total eclipse, you can show your kids how to use the power of sunlight to pop a balloon. You need a balloon and a magnifying glass for this activity. Blow up the balloon and then hold the magnifying glass up so that it magnifies the sunlight onto the balloon. Wait for a few minutes and, eventually, the balloon will pop. You can also make this more exciting by blowing up a white balloon inside a black one, and doing the same trick. The black balloon should pop, leaving the white balloon intact inside. You can use this to explain how black surfaces absorb sunlight, while light surfaces reflect them.
4. Play with shadows
On the day of the eclipse, while you are waiting for totality, the partial eclipse phase will last a few hours. You and your kids can get excited about the eclipse by noticing how shadows change, and playing around with this. If you have a tree nearby, look at the shadows it casts on the ground throughout the eclipse and you will see that they start to look like a sun with a bite taken out of it. This also works by crossing your fingers over each other and casting shadows on the ground. Another way to show the eclipse through shadows is using a colander, or anything with small holes in it. As the eclipse progresses, the shadows cast will start to take on the shape of the eclipse. You can punch a series of holes in a piece of paper to spell out a word or your kids’ names in these crescent shapes.
5. Draw shadows
This is another activity that can be done in the hours leading up to and after totality, again making the most of the interesting shadows created by a partially eclipsed sun. You can lay a big white piece of paper or sheet on the ground, and ask your kids to draw the shadows cast by different objects. If you do this at the start of the partial phase, and again closer to totality, they will be able to see how these shadows change as the eclipse progresses. You should notice that, in the lead-up to totality, shadows become much clearer as the amount of ambient light is reduced.
- solar eclipse 2024
Sign up to our weekly newsletter
Receive a weekly dose of discovery in your inbox! We'll also keep you up to date with New Scientist events and special offers.
More from New Scientist
Explore the latest news, articles and features
Eclipse 2024: 5 of the best pictures of the total solar eclipse
Eclipse 2024 live: watch the full nasa broadcast – latest, when is the next total solar eclipse visible from the uk, how a total solar eclipse in 1919 left physicists 'more or less agog', popular articles.
Trending New Scientist articles
- Share full article
For more audio journalism and storytelling, download New York Times Audio , a new iOS app available for news subscribers.

- April 8, 2024 • 30:28 The Eclipse Chaser
- April 7, 2024 The Sunday Read: ‘What Deathbed Visions Teach Us About Living’
- April 5, 2024 • 29:11 An Engineering Experiment to Cool the Earth
- April 4, 2024 • 32:37 Israel’s Deadly Airstrike on the World Central Kitchen
- April 3, 2024 • 27:42 The Accidental Tax Cutter in Chief
- April 2, 2024 • 29:32 Kids Are Missing School at an Alarming Rate
- April 1, 2024 • 36:14 Ronna McDaniel, TV News and the Trump Problem
- March 29, 2024 • 48:42 Hamas Took Her, and Still Has Her Husband
- March 28, 2024 • 33:40 The Newest Tech Start-Up Billionaire? Donald Trump.
- March 27, 2024 • 28:06 Democrats’ Plan to Save the Republican House Speaker
- March 26, 2024 • 29:13 The United States vs. the iPhone
- March 25, 2024 • 25:59 A Terrorist Attack in Russia
The Sunday Read: ‘What Deathbed Visions Teach Us About Living’
Researchers are documenting a phenomenon that seems to help the dying, as well as those they leave behind..
By Phoebe Zerwick
Read by Samantha Desz
Produced by Jack D’Isidoro and Aaron Esposito
Narration produced by Anna Diamond and Emma Kehlbeck
Original music by Aaron Esposito
Engineered by Sophia Lanman and Sharon Kearney
Listen and follow The Daily Apple Podcasts | Spotify
Chris Kerr was 12 when he first observed a deathbed vision. His memory of that summer in 1974 is blurred, but not the sense of mystery he felt at the bedside of his dying father. Throughout Kerr’s childhood in Toronto, his father, a surgeon, was too busy to spend much time with his son, except for an annual fishing trip they took, just the two of them, to the Canadian wilderness. Gaunt and weakened by cancer at 42, his father reached for the buttons on Kerr’s shirt, fiddled with them and said something about getting ready to catch the plane to their cabin in the woods. “I knew intuitively, I knew wherever he was, must be a good place because we were going fishing,” Kerr told me.
Kerr now calls what he witnessed an end-of-life vision. His father wasn’t delusional, he believes. His mind was taking him to a time and place where he and his son could be together, in the wilds of northern Canada.
Kerr followed his father into medicine, and in the last 10 years he has hired a permanent research team that expanded studies on deathbed visions to include interviews with patients receiving hospice care at home and with their families, deepening researchers’ understanding of the variety and profundity of these visions.
There are a lot of ways to listen to ‘The Daily.’ Here’s how.
We want to hear from you. Tune in, and tell us what you think. Email us at [email protected] . Follow Michael Barbaro on X: @mikiebarb . And if you’re interested in advertising with The Daily, write to us at [email protected] .
Additional production for The Sunday Read was contributed by Isabella Anderson, Anna Diamond, Sarah Diamond, Elena Hecht, Emma Kehlbeck, Tanya Pérez and Krish Seenivasan.
Advertisement
IMAGES
VIDEO
COMMENTS
Teaching kids how to make paper airplanes isn't just a fun activity. It's also an opportunity to build fine motor and critical thinking skills. Plus, it introduces them to the basic concepts of aerodynamics, such as lift, drag, and thrust. Ready to get started? Follow our simple step-by-step directions for making three different paper ...
Here is how to do the paper airplane experiment with your child: Step 1: Fold 2-3 paper airplanes. I chose to do 3 paper airplane folds. I'll link to each one on the Fold 'N Fly site below, as well as include a quick video of me folding them. "The Basic" - this is the paper airplane fold that most people first learn how to fold. Very ...
Fold the point of the plane down, creating a fold along the bottom of the corner triangles. The tip should be about ⅓ of the page from the bottom of the paper. Fold the top-right corner to the center, about one inch above the tip. Repeat with the left corner. This should create a small triangle at the point.
This paper airplane is the easiest to make for kids! The classic Dart is the most popular plane around. Its simple jet design flies far and is a lot of fun!T...
STEP 1: Fold STEP 1 through STEP 7 of the paper airplane #1 instructions above. STEP 2: With the paper lying with the crease facing you, fold the top edge down to about 1″ past the middle crease (see image below), flip the paper over and repeat on the other side, creating long the wings.
Step 3: Engage children in lesson activities. Separate the children into small groups and hand out paper and pencils, so that they can design their own ideas of what their paper airplane might look like. After the drawings are completed, invite the children to share their designs and tell the group how they will create their airplanes. Next ...
1) Fold a piece of paper in half lengthwise. 2) Fold the upper cockpit, so the paper looks like a house. 3) Fold the cockpit down. 4) Fold the lower cockpit. 5) Make the first set of wingfolds. 6) Make the second set of wingfolds. 7) Gently the paper airplane up. 8) Solidify all folds, and yup, you're done!
Fold the paper in half lengthwise. Open the paper back up. Fold the top outside corners down to meet the center line. Fold the top left edge in to the center line. Repeat on the right side. Fold the plane in half along the first fold line - your previous folds will now be inside. Rotate the plane 90 degrees.
Pick a side and fold the flap down to meet and align with the bottom of the plane. Use the dotted line as a reference to help you create this wing. 5. Completing the Second Wing. Flip the plane over and do the same thing with the other side to create the other wing. 6. Admiring the Finished Origami Airplane.
Crease a piece of paper in half lengthwise and then unfold. Fold the top two corners down to the middle fold. Fold the resulting triangle down. Crease the tip of the triangle up 1 inch and then unfold. Fold the top corners down to the center fold so that the corners meet at the base of the crease in the tip. Fold the creased tip up so that it ...
Now, take one model out of the four. Cut the top of the triangle using scissors. Step 8: Making Small Cut In The Middle. Make a small cut in the middle of the top of the model using scissors.
2. Bring the top corners toward the crease in the middle. Grab one of the top corners and fold it into a triangle so the edge lines up with the crease. Flatten the fold using your knuckle or fingernail so it holds in place. Repeat your fold on the other top corner so there's a point at the top of your paper. [7]
Unfold keeping paper lengthwise. Fold top right hand corner over to meet the center line formed by the first fold. Repeat, folding the top left hand corner to meet the center line. Starting at the tip of the point, make another fold, folding each side over so that the edges meet the center line.
Use tape to mark a line on the floor 10 feet from the doorway you will use for the target. Stretch a piece of tape across the doorway about 1/4th the way from the door way top. Kids will throw paper airplanes attempting to fly over the tape and not run into the wall!
The Challenge: Build a paper airplane that flies as far as possible! Collect materials: Paper - regular boring copy paper is usually the best, but experiment with any kind of paper. Measuring tape. Fold a paper airplane! Use the videos above OR fold your own design. Remember that folding paper airplanes can be tricky.
HOW TO MAKE A PAPER AIRPLANE (EASY) - Make a classic dart style paper airplane with this step by step tutorial! :-)UPDATED and SLOWER VERSION OF THIS VIDEO H...
Have some fun with our Paper Airplane Craft Instructions. Print and distribute this paper with blank letter-size paper. This would be a great science extension or a rainy day treat! The above video may be from a third-party source. We accept no responsibility for any videos from third-party sources. Please let us know if the video is no longer ...
Step One: Select a Design. We looked through all of our designs, picked one to start with, and my daughter and I sat down and followed the directions for the first airplane. If you've ever made origami, it's the same approach. Most of the steps were easy enough for her four-year old hands and mind, but I had to help her with a few of the ...
🌻 SUPPORT MY PAPER AIRPLANE DESIGNS: Buy my paper airplane book - Modern Paper Airplanes : https://a.co/d/cR35rBm Check out my store: https://teespring.co...
Instructor Step eight, pinch the bottom and fly the plane. Wow, bro, it looks like the plane is flying right towards me. Oh, it totally is! Mayday, mayday! (screaming) (bubbles popping) Do the airplane exercise. Put you leg up and behind you, and use your arms for balance. One, two, three, four, five. And if you can, fly like an airplane.
Here's how to make an easy paper airplane that flies far!Please SUBSCRIBE for more videos like this!By: TUK CraftsLevel: beginnerPaper: A3 or A4 Printer Pape...
You can punch a series of holes in a piece of paper to spell out a word or your kids' names in these crescent shapes. 5. Draw shadows. This is another activity that can be done in the hours ...
#Paperplane #origami #papercraft Creative Chanel Makes Toys From Paper:•Paper plane, Fighter jet, Rocket Plane, Bird plane•How to make a paper airplane for k...
Gaunt and weakened by cancer at 42, his father reached for the buttons on Kerr's shirt, fiddled with them and said something about getting ready to catch the plane to their cabin in the woods.
Origami Paper AirplanePlease SUBSCRIBE for more videos like this!By: KoenDesigner: UnknownLevel: Very EasyPaper: A4 Printer PaperMy Blog: http://tinyurl.com/...